Pages

Saturday, 31 March 2012

Children's Bible in a Nutshell

A child was told to write a "book report" on the entire Bible. This is amazing and brought tears to my eyes. I wonder how often we take for granted that children understand what we are teaching??? Through the eyes of a child . . . . 


In the beginning, which occurred near the start, there was nothing but God, darkness, and some gas. The Bible says, 'The Lord thy God is one, but I think He must be a lot older than that. Anyway, God said, 'Give me a light!' and someone did. Then God made the world. 

He split the Adam and made Eve. Adam and Eve were naked, but they weren't embarrassed because mirrors hadn't been invented yet. Adam and Eve disobeyed God by eating one bad apple, so they were driven from the Garden of Eden. Not sure what they were driven in though, because they didn't have cars. 

Adam and Eve had a son, Cain, who hated his broth er as long as he was Abel. Pretty soon all of the early people died off, except for Methuselah, who lived to be like a million or something. 

One of the next important people was Noah, who was a good guy, but one of his kids was kind of a Ham. Noah built a large boat and put his family and some animals on it. He asked some other people to join him, but they said they would have to take a rain check. 

After Noah came Abraham, Isaac, and Jacob. Jacob was more famous than his brother, Esau, because Esau sold Jacob his birthmark in exchange for some pot roast. Jacob had a son named Joseph who wore a really loud sports coat. 

Another important Bible guy is Moses, whose real name was Charlton Heston. Moses led the Israel Lights out of Egypt and away from the evil Pharaoh after God sent ten plagues on Pharaoh's people. These plagues included frogs, mice, lice, bowels, and no cable. God fed the Israel Lights every day with manicotti. 

Then he gave them His Top Ten Commandments. These include don't lie, cheat, smoke, dance, or covet your neighbour's stuff. Oh, yeah, I just thought of one more: Humor thy father and thy mother. One of Moses' best helpers was Joshua who was the first Bible guy to use spies. Joshua fought the battle of Geritol and the fence fell over on the town. 

After Joshua came David He got to be king by killing a giant with a slingshot. He had a son named Solomon who had about 300 wives and 500 porcupines. My teacher says he was wise, but that doesn't sound very wise to me. 

After Solomon there were a bunch of major league prophets. One of these was Jonah, who was swallowed by a big whale and then barfed upon the shore. There were also some minor league prophets, but I guess we don't have to worry about them. 

After the Old Testament came the New Testament. Jesus is the star of the New Testament. He was born in Bethlehem in a barn. (I wish I had been born in a barn, too, because my mom is always saying to me, 'Close the door! Were you born in a barn?' It would be nice to say, 'As a matter of fact, I was.') 

During His life, Jesus had many arguments with sinners like the Pharisees and the Republicans. Jesus also had twelve opossums. The worst one was Judas Asparagus. Judas was so evil that they named a terrible vegetable after him. 

Jesus was a great man. He healed many leopards and even preached to some Germans on the Mount. But the Republicans and all those guys put Jesus on trial before Pontius the Pilot. Pilot didn't stick up for Jesus. He just washed his hands instead. 

Any way's, Jesus died for our sins, then came back to life again. He went up to Heaven but will be back at the end of the Aluminum. His return is foretold in the book of Revolution.
This is too precious not to forward....... Pass it on! 


Read Your Bible, Pray Every Day!

Friday, 30 March 2012

Porridge Tart (Pap Tert)

South African side dish with BBQ!


To make this Pap Dish, you will need:
  • Lite cream, (double cream will be too thick)
  • 1 onion chopped
  • Sliced mushrooms
  • Bacon cut in bits
  • Frankfurter cut in slices
  • Grated cheese
  • Pap...a little bit runny, if too stiff you will have a problem smearing it over your dish.
  • Oven bake glass dish sprayed with cook  Spray

To prepare:
  1. Fry onions, mushrooms, bacon and frankfurters all together in a pan with a little bit of olive oil...you can fry it all separately and mix together when done.
  2. Take your oven bake glass dish, start with a thin layer pap (see recipe below)
  3. Then a layer of the fried mixture followed by a layer of thinly grated cheese 
  4. Cover nicely with a layer op pap and finely top with grated cheese and cream and its ready for the oven.
  5. Bake in oven at 180 degrees C for 30 minutes until light brown, and this is what you get:-
                                             Enjoy!!!!!

How to make Pap (in the microwave) for 3-4 people, you will need:
  • Coarse Maize Meal  
  • Freshly boiled water
  • Large microwaveable bowl (Glass Pyrex bowl) with a lid
  • A large two tine fork
  • Salt

It will take only 10minutes so pay attention....
In your microwave bowl, 1 cup of maize meal, pinch of salt, add just enough freshly boiled water and work it in with a fork.  Set microwave on High and set timer for 10 minutes.  Put the lid on your bowl and pop it in the microwave. Microwave for about a minute and then remove it, thoroughly stir in a little bit more water and return to the microwave.
Repeat this process (remove, add a little water and stir, microwave again) 3 or 4 more times during cooking time at regular intervals.


Tips:
  • A glass Pyrex bowl is preferable to a plastic one
  • For putu (krummel) pap, add a little less water and use the fork to make the pap crumbly.  Believe me, you can make perfect krummelpap in the microwave!  
  • In the same way, adding more water will give you a denser (stywe) pap or if you add more water (with finer maize meal) you will have finer runny like porridge (slap pap).
  • Making pap in the microwave may seem strange at first, but you will master it in no time and no one will be able to tell the difference!
Warnings:
Use oven mitts as the glass bowl will get really hot. 
Hot steam will escape every time you open to stir, take lid off carefully and away from your face.

Thursday, 29 March 2012

A Sharky, carved out of a watermelon.....Great!


Materials:

  • 1 oblong, seeded watermelon
  • Dry erase marker
  • Large knife
  • Smaller utility knife
  • Large spoon
  • Paring knife (you can use the tip of a vegetable peeler)
  • 2 large marbles
  • Toothpicks or wooden skewers
  • Swedish fish candies for garnish
Instructions:
  1. Wash and dry the watermelon.
  2. Cut off 1/3 of the watermelon at a diagonal angle.
  3. Stand the remaining 2/3 upright on your work surface and use a dry erase market to draw the mouth line and eye sockets.
  4. Cut out the mouth.  Trim back a 1/2" line of the green part of the rind for the teeth area.
  5. Use a large spoon to scoop out the watermelon flesh, leaving 3" intact at the base.
  6. Cut out the teeth, using a smaller utility knife.
  7. Use melon baller to cut out the eye sockets that match the size of large marbles.  Then use a paring knife to trim the green area around the eyes and insert the marbles.
  8. Use the carved out rind from the mouth to make the dorsal fin, shape as shown in the picture.  Attach the fin using toothpicks.
  9. Fill the mouth with triangle shapes of watermelon, accented with Swedish fish.

Ideas from the
National Watermelon Promotion Board
Watermelon Carvings

Adorable DIY decorations ........ using Bottoms of Plastic Bottles!!!!


Aren't these plastic flowers gorgeous? 
Look closer:
 Yup, they are the bottoms of plastic botttles. How cool is that? Can you picture using cascades of these to decorate? 

Or, if you're really creative, you could make one of these:


Michelle Brand's Blossom Project.

Blossom is an eco-ambient light made from the bases of plastic bottles and a string of LEDs. It also looks like Michelle painted the bottle bases.

So if you're like me and have a bunch of water bottles lying around, this is a perfect project to create an eco-friendly light for your home.

So here's a rough tutorial:

Step One: Using a utility knife, cut the bases off the water bottles.

Step Two: Paint the plastic bases to your liking.

Step Three: String a set of 4-5 LEDs in parallel. Be sure to add the appropriate resistor to each LED. Repeat this process 4-5 times. After you have your 5 sets of LED strings, wire these to 3.4-3.7 V wall adapter (an old cellphone adapter works perfectly).

You can essentially follow the steps from the LED Chandelier tutorial found in Fashioning Technology to learn how to wire a number of LEDs together.

Step Four: Cut a hole from the center of the water bottle bases. Slip the LED lights into the center of each base. Using a dab of hot glue, secure the LED into place.

Or, for those of you who are ambitious and want to make this a few month long project, you can always create a lovely room divider.

 Room Divider


Or, you can spend R1, 200 for it!
Doesn't this look gorgeous!!! 
  (I think I'll start saving plastic bottles!)

Wednesday, 28 March 2012

Rainbow Cakes – in a Jar and more!!


I bring you the latest in rainbow cakery, baked in a jar to show off all the pretty colours.
 
Cakes in jars are great for a picnic or to bring to someone’s house, since they’re completely sturdy, sealable, and portable.

Here’s how you do it…

Rainbow Cakes – in a Jar
  • Buy 6 pint-sized, wide mouth jars (or 12 half-pint jars.) It’s important to use wide mouth jars so you can maneuver the cake batter around. I ran them through the dishwasher and made sure they were completely dry before getting started.
  • Preheat the oven to 375. Make a double recipe of your favorite white cake or two boxes of white cake mix.
  • Divide the batter roughly between 6 bowls. Color the batter with rainbow colors: red, orange, yellow, green, blue, and purple. It’s important to use gel or paste food coloring, not the liquid kind, or the colors won’t be as vibrant. 
  • Now, to layer the batter in the jars; this would make a GREAT personality test. You can either drop dollops of the colors in the jar in order, and let the colors fall where they may. That would be the “laid back” personality type. I did sort of a “Type A Minus” personality thing, by carefully spooning the batter into the jars and attempting to spread each color out somewhat evenly but not perfectly. The “Type A Plus” thing to do would be to put the batter color into individual Ziploc bags or pastry bags and pipe each layer, so you would get near perfection. Choose your style and get that batter in there! You only need to fill the jars to about 3/4 full as the cake will rise.
  • Put the jars in a pan with sides, like a 9×13 brownie pan. Put the pan in the preheated oven and pour in about 1/2 inch of water.
  • Bake for about 40-45 minutes, until a knife or skewer inserted all the way down comes out clean.
  • Remove from the oven, take out of the water, and set aside to cool.
(When you open your oven, you get this visual treat:)

 On to the frosting…
  • Use a knife to cut off some of the top of the cake to make room for the frosting. If you really really really like frosting, scoop out some of the middle of the cake, too. (The pieces you cut off kind of look like psychedelic mini cupcakes–save those for a kid you like.)
  • Make white frosting. 
  • Use a small spatula to scoop frosting on top of the cakes, almost to the top.
  • Cover with a lid and brighten people’s day!

You can also try this Amazing Rainbow Birthday Cake!

 
How do you make this? It’s actually not as hard as it looks. You just use 2 yellow cake mixes (the yellow cake mix renders richer colors than the white.) Mix the cake mixes as usual, divide the whole lot evenly among 6 bowls and use regular food color to get the different colors.Bake each layer separately, cool, then stack, gluing together each layer with a bit of icing. There is actually a fair amount of icing between each layer, but it gets smooshed down by the sheer weight of the thing. Ice the entire outside and decorate with candles and/or sprinkles. If it starts tipping over or seeming teetery, stick some wooden skewers in it in a couple of places and take them out right before cutting. Voila! Rainbow cake!

 
Fluffy marshmallowy meringue-y 7-minute icing. You can use any icing but this one sets up a bit and adds some structural integrity- as long as it’s not out too long. You should definitely ice this the same day as the party if you use this type of icing. Here is the easy shortcut recipe in the appropriate amount to easily cover and fill this giant monstrosity.

No-Boil 7-Minute Icing
Ingredients:
  • 6 egg whites
  • 1 1/2 cup sugar
  • 1-2 tsp vanilla extract
  • 1/2 tsp cream of tartar
  • 1/2 cup boiling water
Method:
  • In the bowl of a Kitchen-Aid, combine everything except boiling water with the whisk attachment.
  • While whisking, slowly pour in boiling water.
  • Beat about 7 minutes, until mixture holds stiff peaks.
  • Use immediately or texture will become weird and won’t spread easily.


Or, what about Rainbow Fudge!


Makes a lot even though it looks like a little. White chocolate chips are easier to use, because you don’t have to chop them, but they don’t melt as smoothly as a bar so I don’t recommend using them. Don’t get any amount of water in the white chocolate mixture, because it can cause the chocolate to seize and harden into lumps. I say this because between colors you’ll need to wash your spatula out – so be sure to fully dry it off with a towel.

Ingredients:
  • 36 oz. chopped white chocolate
  • 3 cups sweetened condensed milk (you’ll need to buy 3 of the 14 oz cans to get 3 cups)
  • 1 1/2 tsp vanilla extract, divided
  • gel or paste food coloring
Method:
  • Line a loaf pan tightly with foil. Spray lightly with non-stick cooking spray.
  • Get out 6 microwave-safe cereal bowls. Into each bowl, put 6 oz. white chocolate, 1/2 cup sweetened condensed milk, and 1/4 tsp vanilla extract. Set aside.
  • Put one bowl in the microwave at 30 second intervals, stirring well after each 30 seconds, until chocolate mixture is smooth and well combined with no lumps. (All microwaves are different but as a point of reference mine took about 90 seconds total.)
  • Add red food coloring and stir very well so there are no white streaks, scraping the sides of the bowl and making sure you get all the way to the bottom. A rubber spatula works well for this.
  • Pour into prepared loaf pan and bang the pan on the counter a few times to settle and even out the layer.
  • Place into the freezer for 20-25 minutes, until hard to the touch.
  • Repeat with remaining bowls, making orange, yellow, green, blue, and purple. Once the loaf pan and the layers have been in the freezer, the layer will almost immediately start to set, so you need to move quickly with spreading out the mixture and banging it on the counter so it’s not lopsided or lumpy.
  • After the final layer, put it back in the freezer for 2 hours, then move it to the refrigerator to completely set for a couple more hours.
  • When you’re ready to cut it, flip it onto a cutting board and remove the foil. Dip a sharp knife in hot water between cuts and wipe with a towel so the colors don’t smear together. It tastes better at room temperature and holds up pretty well for a few hours; otherwise, refrigerate it to keep.
 Rainbow cakes are also the perfect treat for all your unicorn friends.
“What’s that, magical horsie? Oh, you’re very welcome, it was my pleasure. I hope you enjoy your cake.”

SKINNY FLATS...

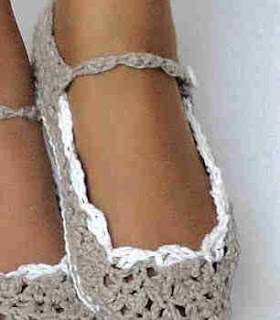
Crochet Skinny Flats

Feminine skinny flats with textured stitches!  Instructions for 4 sizes from Kids to Adults!


Materials needed:
  • Crochet hook size H/8
  • Approximately 240 yards of size 4 medium weight worsted yarn
  • Darning needle
  • Stitch markers; and
  • Buttons


Crochet hook size -H/8 Gauge= Using H/8 hook, 7 sc stitches x 7 rows = 2 inch square. Stitches used -ch (chain) sl st (slip stitch), sc (single crochet)
hdc (half double crochet) Yarn over and insert your hook into the stitch or space indicated, yarn over and pull up a loop. (You should have 3 loops on your hook.) Yarn over again and draw through all three of the loops on the hook. dc (double crochet) Yarn over and insert your hook into the stitch or space indicated. Yarn over and pull up a loop. (3 loops on hook.) Yarn over and draw through 2 of the loops. (2 loops on hook.) Yarn over and draw through the last 2 of the loops.
Dcr 1 sc (decrease 1 single crochet) Decrease 1 sc over next 2 sts as follows: Insert hook and draw up a loop in each of the next two stitches (three loops now on hook), hook yarn and draw through all three loops on the hook. Dcr 1 dc (decrease 1 double crochet) Decrease 1 double crochet over the next 2 sts as follows: Work a double crochet in the specified stitch until two loops remain on the hook Keeping these two loops on hook, work another double crochet in the next stitch until three loops remain on hook; hook yarn and draw through all three loops on the hook.
What type of yarn to use: I use size 4 medium weight worsted cotton to make my slippers, but remember cotton is not stretchy and it will shrink a bit in the washer. You can also use yarn with an acrylic mix that doesn't shrink and is stretchier.
Abbreviations -st = stitch, sp = space, dcr = decrease, yoh = yarn over hook, ch = chain, sl st = slip stitch, sc = single crochet, hdc = half double crochet, dc = double crochet.


Start Soles
*Make 2 for single thick soles or 4 to make double thick soles
*Use H/8 Crochet Hook
Beginning chain and corresponding sizes 
The instructions are for four different sizes outlined below. The different increments in stitch numbers are divided by forward slashes and for your convenience the Medium Women sizes will always be in red.
Kids --beginning chain 19 --7" soles -appr. kids size 10 to 12
Small Women’s --beginning chain 23 --8" soles, appr. , women's size 3 to 5 1/2 
Medium Women’s --beginning chain 27 --9" soles, appr. Size 6 to 8 1/2 
Large Women’s --beginning chain 31 --10" soles, appr Size 9 to 11
* Note -For Kids size only, Rnd 1 for the soles has its own directions. 

Ch 19/23/27/31
Rnd 1 Kids Only:
Sc in 2nd ch from hook, 2 sc in next ch, sc in next 8 chs, hdc in next 7 chs, 5 dc in last ch; working on opposite side of beg ch, hdc in next 7 chs, sc in next 8 chs, 2 sc in next ch; join with a sl st to first sc. (40 total stitches)

Rnd 1 Adults Only:
Sc in 2nd ch from hook, 2 sc in next ch, sc in next ch, hdc in next 9/11/13 ch, dc in next 9/11/13 ch, 5 dc in last ch; working on opposite side of beg ch, hdc in next 9/11/13 ch, hdc in next 9/11/13 ch, sc in next ch, 2 sc in next ch; join with a sl st to first sc. (48/56/64 total stitches)

Rnd 2 Kids and Adults:
Ch 3, 1 dc in same sp, (2 dc in next st) twice, dc in next 15/19/23/27 st’s, (2 dc in next st) twice, 3 dc in next st, (2 dc in next st) twice, dc in next 15/19/23/27 sts, (2 dc in next st) twice; join to top of ch 3. (51/59/67/75 total stitches)

Rnd 3 Kids and Adults:
Ch 3, 1 dc in same sp, (2 dc in the next st) 3 times, dc in next 17/21/25/29 st’s, (2 dc in next st, 1 dc in next st) twice, 3 dc in next st, (1 dc in next st, 2 dc in next st) twice, dc in each of the next 18/22/26/30 st’s, 2 dc’s in each of the last 2 sts, join to top of 1st ch 3, finish off. (62/70/78/86 total stitches) 


Start Toe

Place stitch markers to mark beginning and end stitches for toe. Find mid 2 toe stitches, place markers at 8 sts down from each side for Kids size, 11 sts for Small and Medium Womens sizes and 14 for Large Womens size. (Total marked off stitches will be 16, 22, 22, 28)

*Work Row 1 in front loops only with inside of sole facing you and working towards the toe.
Row 1:
Sl st join yarn to 1st marker st, ch 3 (counts as 1st dc now and throughout pattern), work 1 dc in next st and each st around to other side toe marker. (16, 22, 22, 28 total dc's)

*Basically rows 2 through 4 are alternating dc's and dcr dc's.

Row 2:
Working in both loops now, Ch 3, turn. *Dcr 1 dc, 1 dc in next st*, repeat * to * until last st, 1 dc in last st. (11, 15, 15, 19 total sts.)

Row 3:
Ch 3, turn. Dcr 1 dc in next st, * 1 dc in next st, dcr 1 dc in next st*, repeat from * to * to end of row. For kids size, you will have an extra st, just work another dc in this last stitch . (8, 10, 10, 13 total sts)

Row 4: 
For Kids size:
Ch 3, turn, dcr 1 dc, 1 dc in next st, (dcr 1 dc) twice. (5 sts total for kids size)

For Women's sizes:
Ch 3, turn. *Dcr 1 dc, 1 dc in next st*, repeat from * to * to end of row. (7, 7, 9 total stitches) Turn and sl st all stitches together in one st. Insert hook in each st, pull yarn through each st. In last pull through, pull the yarn through all loops on hook.
Finish off

Start Foot and Heel

The Up Down Stitch Illustrated  

Up and Down Stitch technique used for this pattern:
To make the textured look for the foot and heel of the slippers I use an “up and down stitch”. The “up and down stitch” technique is simply working alternating single crochet stitches and double crochet stitches. If your row ends in a dc, then you would ch 1, turn and sc in the last dc of the previous row. On the second row you will be working sc’s on the top of your dc’s from the previous row and dc’s on top of your sc’s from the previous row. The up and down stitch is used only for foot and the heel of this slipper. The toe and soles are worked in sc, hdc, and dc stitches.

Row 1:
(Row 1 is the only row you will work decreases and all decreases will be sc dcrs.
Place markers for decreases. 2 evenly placed at each side and 1 at heel as shown in picture. These are not precise markers, but in general area for sc dcrs.
Working in front loops only for Row 1.
Working with inside of sole facing you, and working towards heel, sl st join yarn to front loop of the next stitch after where the toe piece began. )
Ch 3, *sc in next st, dc in next st*, repeat from * to * around to other side. Remembering to work your 5 sc dcrs for Row 1. (41, 43, 51, 53 total stitches)
Row 2:
If you end with a dc in row 1, ch 1, turn, *sc in 1st st, dc in next st* repeat from * to * around to other side to work up and down stitch. If you end with a sc in row 1, you will start with a ch 3, sc in next st, dc in next st. -repeating to other end. (Remember you will be working sc's on top of previous rows dc's and dc's on top of previous rows sc's.) 
Row 3: Repeat Row 2. Finish off for Kids size slippers.
Row 4: Repeat Row 2 and finish off for women's sizes. 
Sew ends of foot piece to toe piece as shown. Sew to 1st 2 rows of dc's on toe piece with same color of yarn.


Start Ankle Piece

Here you are going to add a little height to the ankle which will be in the up and down stitch pattern. Place markers -Find mid heel stitch and mark 10 stitches for kids size up from heel on both sides, 12 stitches up for small, 14 for medium women's sizes, 16 stitches up for large women's size. You will have a total of 20 stitches marked off for Kids size, 24 for small women's size, 28 for medium women's size, and 32 for large women's size.
Row 1:


This is the decrease row and all sc's will be decreases. Working towards heel with inside of slipper facing you, sl st join yarn to both loops at 1st marker. Ch 3, dcr 1 sc, dc in next st, *dcr 1 sc, dc in next st*, repeat from * to * to other side marker. For kids size and women's large size you will have an extra stitch left, just work a normal sc in this last st. (14, 16, 19, 22 total sts)

Row 2:
Work normal up and down stitch for rows 2 and 3. If you end with a dc in row 1, ch 1, turn, *sc in 1st st, dc in next st* repeat from * to * around to other side to work up and down stitch. If you end with a sc in row 1, you will start with a ch 3, sc in next st, dc in next st. -repeating to other end. (Remember you will be working sc's on top of previous rows dc's and dc's on top of previous rows sc's.) Stop at Row 2 for Kids sizes do not finish off, go to strap instructions.

Row 3: For women’s' sizes only.
Repeat Row 2. Do not finish off, go to strap instructions.


Start Strap 


Strap is worked in motifs as follows: 


*Ch 3, yoh, insert hook into 1st ch, pull yarn through, (3 loops remaining on hook), yoh, pull yarn through 2 loops, (2 loops remaining on hook), yoh, pull yarn through remaining 2 loops on hook.* Repeat from * to * making a total of 5 motifs for kids and 6 motifs for women's sizes for strap, finish off, and work in ends. Sew button to other side of heel piece.
For the other slipper you are going to make the strap separately and sew on to the opposite side for the other foot. Just repeat the instructions for Row 3 to make 5 or 6 cluster motifs, finish off and sew with a darning needle to appropriate side.


Finishing Foot Piece
This step involves small clusters and will tighten up top of foot:


With inside of slipper facing you and working towards the toe, attach yarn with sl st at same st where upper heel started, row 1, page 6.
*Ch 3, dc in same sp, skip 3 sts, sl st in 4th st* Repeat from * to * around to other upper heel st. (Because there are not any stitches across top of toe piece, you will work 2 clusters across the top.) Finish off and work in ends to inside of heel piece.
Finishing Sole
f you are making single sole slippers -sl st same color or contrasting color yarn starting at mid heel in bottom loop left out when working rounds 1 in toe and foot instructions. Loosely slip stitch around and finish off.
If you are making double soled slippers, with wrong side of bottom sole facing down match the sole with top sole and slip stitch bottom loop of top sole to both loops of bottom sole and finish off. 

I have purchased this design fromGenevive Designs
www.genevive.artfire.com