Pages

Monday, 30 April 2012

Yesterday, Today and Tomorrow

Are You Living in Yesterday, Today, or Tomorrow?

Today is the tomorrow I worried about yesterday
And today was such a lovely day,
that I wondered why I worried about today yesterday
So today I am not going to worry about tomorrow
There may not be a tomorrow anyway
So today I am going to live as if there is no tomorrow
And I am going to forget about yesterday.

Today is the tomorrow I planned for yesterday
And nearly all my plans for today did not plan out the way I thought they would yesterday
So today I am forgetting about tomorrow and I will plan for today
But not too strenuously
Today I will stop to smell a rose
I will tell a loved one how much I love her
I will stop planning for tomorrow and plan to make today the best day of my life.

Today is the tomorrow I was afraid of yesterday
And today was nothing to be afraid of
So today I will banish fear of the unknown
I will embrace the unknown as a learning experience full of exciting opportunities
Today, unlike yesterday I will not fear tomorrow.

Today is the tomorrow I dreamed about yesterday
And some of the dreams I dreamt about yesterday came true today
So today I am going to continue dreaming about tomorrow
And perhaps more of the dreams I dream today will come true tomorrow.

Today is the tomorrow I set goals for yesterday
And I reached some of those goals today
So today I am going to set slightly higher goals for today and tomorrow
And if tomorrow turns out to be like today
I will certainly reach all of my goals one day!

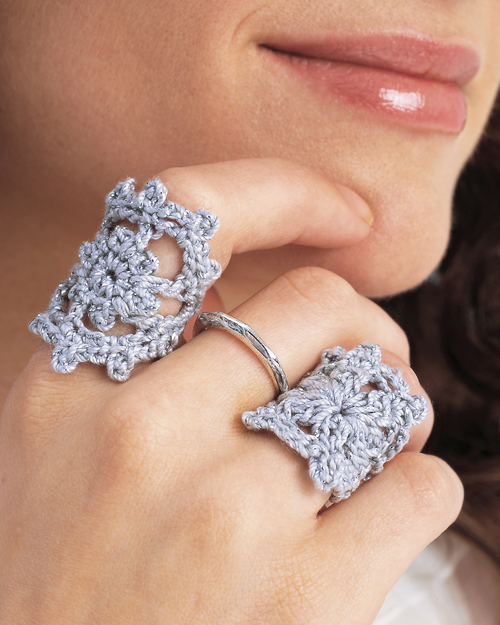
Crochet Ring Pattern

 This little ring became the most-requested crochet pattern; viewers just loved it and wanted to learn how to make it! I love it too, it takes probably less than an hour to make, and it adds the perfect crafty touch to any outfit. Enjoy!


Materials:
  • AUNT LYDIA’S Fashion Crochet Thread, Size 5, each ball approx 0.9oz/26g 100yd/91m (cotton)- 1 ball #410 Silver/Silver (One ball of thread will make many rings) 
  • Crochet hook- Size D/3 (3.25mm) crochet hook or any size to obtain correct gauge 
  • Stitch marker 
  • Thread needle 

Stitch Diagrams- Pick one or make all three!

Special Abbreviations:
Cl (cluster) Yarn over, insert hook in indicated st or sp, yarn over and draw up a loop, yarn over and draw through 2 loops on hook; [yarn over, insert hook in same st or sp, yarn over and draw up a loop, yarn over and draw through 2 loops on hook] twice, yarn over and draw through all 4 loops on hook.
picot Ch 3, sl st in 3rd ch from hook.

Finished Measurements + Gauge:
ring #1 Approx 11⁄2"/4cm across (at widest point) x 21⁄4"/5.5cm circumference
ring #2 Approx 13⁄4"/4.5cm across face (at widest point) x 21⁄4"/5.5cm circumference
ring #3 Approx 11⁄2"/4cm across face (at widest point) x 21⁄4"/5.5cm circumference
Remember to check gauge for best results! Adjust hook size if necessary to obtain correct gauge.

                                    Tip: Make it just your size! 
               Work more or fewer chains in the ring band for your perfect fit.


Instructions:
RING #1
Ch 5; join with sl st in first ch to form a ring.
Round 1 Ch 3, dc in ring (beginning ch-3 and next dc count as one cluster), ch 3, [Cl in ring, ch 3] 7 times; join with sl st in top of beginning ch—8 clusters and 8 ch-3 sps.
Round 2 Ch 3, sl st in top of next dc, ch 4, (sl st, ch 3, sl st) in next Cl; ch 9 (first half of ring band made); (sl st, ch 3, sl st) in next Cl, [ch 4, (sl st, ch 3, sl st) in next Cl] 3 times; ch 4, sl st in 5th ch of first half of ring band, ch 4 (ring band completed); [(sl st, ch 3, sl st) in next Cl, ch 4] twice; join with sl st in first sl st. Fasten off.

RING #2
Ch 4; join with sl st in first ch to form a ring.
Round 1 Ch 1, [sc in ring, picot, ch 1] 6 times; join with sl st in first sc—6 sc, 6 picots, and 6 ch-1 sps.
Round 2 Ch 8 (counts as dc, ch 5), [dc in next ch-1 sp, ch 5] 5 times; join with sl st in 3rd ch of beginning ch— 6 dc and 6 ch-5 sps.
Round 3 Ch 1, sc in same st as join, picot, ch 3, sc in 3rd ch of next ch-5 sp, picot, ch 3, sc in next dc, picot, ch 3, sc in 3rd ch of next ch-5 sp; ch 7, sl st in 7th ch from hook (first half of ring band made); [ch 3, sc in next dc, picot, ch 3, sc in 3rd ch of next ch-5 sp, picot] 2 times, ch 3, sc in next dc, picot, ch 3, sc in 3rd ch of next ch-5 sp; ch 3, place marker in 3rd ch from hook, sl st in 4th ch of first half of ring band, ch 3, sl st in marked ch (ring band completed), ch 3, sc in next dc, picot, ch 3, sc in 3rd ch of next ch-5 sp, picot, ch 3; join with sl st in first sc. Fasten off.

RING #3
Ch 4; join with sl st in first ch to form a ring.
Round 1 Ch 1, [sc in ring, picot, ch 1] 6 times; join with sl st in first sc—6 sc, 6 picots, and 6 ch-1 sps.
Round 2 (Sl st, ch 3, dc) in first ch-1 sp (counts as first cluster), ch 5, [Cl in next ch-1 sp, ch 5] 5 times; join with sl st in first dc—6 clusters and 6 ch-5 sps.
Round 3 Ch 1, sc in same st as join, picot, ch 3, sc in 3rd ch of next ch-5 sp, picot, ch 3, sc in next Cl, picot, ch 3, sc in 3rd ch of next ch-5 sp; ch 7, sl st in 7th ch from hook (first half of ring band made); [ch 3, sc in next Cl, picot, ch 3, sc in 3rd ch of next ch-5 sp, picot] 2 times, ch 3, sc in next Cl, picot, ch 3, sc in 3rd ch of next ch-5 sp; ch 3, place a marker in 3rd ch from hook, sl st in 4th ch of first half of ring band, ch 3, sl st in marked ch (ring band completed); ch 3, sc in next Cl, picot, ch 3, sc in 3rd ch of next ch-5 sp, picot, ch 3; join with sl st in first sc. Fasten off.

finishing
Weave in all ends
.

Baked Scotch Eggs


 I tweaked the classic recipe for a healthier version using
only just a touch of oil spray and a hot oven!
 
Ingredients: 
  • 10 eggs
  • 1/2 onion, very finely chopped
  • 2 garlic cloves, crushed
  • 1/2 red chilli, de seeded and finely chopped
  • 1/2 bunch coriander, finely chopped
  • 3 tbsp worcester sauce
  • 500g Pork mince (OR fresh pork breakfast sausage, casings removed)
  • Salt and freshly ground pepper
  • Plain flour, to dust
  • Breadcrumbs, to coat
  • 2 eggs, lightly beaten to coat
  • Oil spray
Instructions:
1. Pre-heat the oven to 200 degrees. Place 10 eggs in a saucepan, cover with cold water, bring to the boil and boil for 10 minutes. Rinse under cold water to cool completely, peel and dust with a bit of flour so that the surface is nice and dry.
2. In the meantime, combine the onion, garlic, chilli, herbs, worcester sauce and mince. Season with salt & pepper, mixe well and divide the mixture into 10 even portions.

3. To assemble to scotch eggs, mould half of one portion flat in the cup of your hand. Place a hard-boiled egg into it and shape the rest of the meat around to enclose. Roll it between your hands to smooth the surface. Repeat with the remaining eggs.
4. Roll each egg in the egg wash and breadcrumbs and set aside. Repeat with the other eggs.
5. When you have assembled all of the scotch eggs, place them onto an oven tray lined with baking paper. Spray with oil and bake on high heat for 20 minutes. Spray again lightly, change the oven setting and grill for another 5 minutes or until golden brown and crispy.
Scotch eggs are great sliced over a green salad for a light dinner, or simply packed for a picnic or a lunch box! Mini scotch eggs using quail eggs can also make a great party food option!

Stunning Ladies Crochet Jacket


SIZES
S–L (1X–3X)

FINISHED MEASUREMENTS
Bust: 46 (52)"/117 (132) cm
Length: 20 1/2 (23 1/2)"/52 (59.5) cm

GAUGE
One Large square = 5 1/2 x 5 1/2"/14 x 14 cm, blocked;
One Small square = 2 1/2 x 2 1/2"/6.5 x 6.5 cm, blocked.

Note: The squares tend to stretch. Be sure to make a swatch and block it, to check gauge. Adjust size if necessary.

STITCHES USED
Chain (ch), double crochet (dc), single crochet (sc), slip stitch (sl st).

SPECIAL TERMS
Working square—The Square you are currently working to complete.
Previous square—The Square you are joining the working square to.

NOTES

  1. The back and fronts are formed from large and small granny squares. Each square is joined to any previous squares when the final round (joining round) of the square is worked. Refer to the assembly diagrams for the placement of squares. Squares on the assembly diagram are numbered. Begin with square #1 and work to completion. Then work square #2, and on the final round, join square #2 (working square) to the square #1 (previous square).
  2. The back and fronts are worked separately. The shoulder seams are then sewn. Next, the sleeves are worked directly onto the body, from the shoulder down to the wrist edge. The side and sleeve seams are then sewn. If desired, the sleeves can be worked separately and then sewn to the body, before sewing the side and sleeve seams.
  3. The fronts are wider than half the back width, to allow for overlap when closing jacket with a pin.
  4. The colour combinations given in the assembly diagrams can be followed or you may use colours as desired, making the number of squares required, and arranging them according to the assembly diagrams.
HELPFUL
If you wish to work all squares up to the final round before joining them, the large squares require about 10 yds/9m to complete Round 7, and the small squares require about 4 3/4 yds/4.5m to complete Round 3. Leave at least this length of yarn attached before cutting it.

LARGE SQUARE

Note: Make the squares in the color combinations indicated on the assembly diagram, or as desired.

With first color and larger hook, ch 4; join with sl st in first ch to form a ring.
Round 1 (RS): Ch 3 (counts as dc here and throughout), 2 dc in ring, ch 2, [3 dc in ring, ch 2] 3 times; join with sl st in top of beginning ch—Four 3-dc groups, and 4 ch-2 sps. Fasten off.
Round 2: Sl st in each st to next ch-2 sp, sl st in next ch-2 sp, ch 4 (counts as sc, ch 3 here and throughout), sc in same ch-2 sp, [ch 3, (sc, ch 3, sc) in next ch-2 sp] 3 times, ch 3; join with sl st in first ch of beginning ch—8 sc, and 8 ch-3 sps.
Round 3: Sl st in first ch-3 sp, ch 3, (2 dc, ch 3, 3 dc) in same ch-3 sp (corner made), ch 1, 3 dc in next ch-3 sp, ch 1, [(3 dc, ch 3, 3 dc) in next ch-3 sp (corner made), ch 1, 3 dc in next ch-3 sp, ch 1] 3 times; join with sl st in top of beginning ch—4 corners, 12 dc (one 3-dc group on each side), and 8 ch-1 sps (two ch-1 sps on each side). Fasten off.
Round 4: With RS facing, join 2nd color with sl st in any corner ch-3 sp, ch 4, sc in same ch-3 sp, [ch 3, *sc in next ch-1 sp, ch 3; rep from * to next corner ch-3 sp, (sc, ch 3, sc) in corner ch-3 sp] 3 times, ch 3, **sc in next ch-1 sp, ch 3; rep from ** around; join with sl st in first ch of beginning ch—16 sc, and 16 ch-3 sps.
Round 5: Sl st in first ch-3 sp, ch 3, (2 dc, ch 3, 3 dc) in same ch-3 sp, [ch 1, *3 dc in next ch-3 sp, ch 1; rep from * to next corner ch-3 sp, (3 dc, ch 3, 3 dc) in corner ch-3 sp] 3 times, ch 1, **3 dc in next ch-3 sp, ch 1; rep from ** around; join with sl st in top of beginning ch—4 corners, 36 dc (three 3-dc groups on each side), and 16 ch-1 sps (four ch-1 sps on each side). Fasten off.
Round 6: Sl st in each st to next ch-3 sp, sl st in next ch-3 sp, ch 4, sc in same ch-3 sp, [ch 3, *sc in next ch-1 sp, ch 3; rep from * to next corner ch-3 sp, (sc, ch 3, sc) in corner ch-3 sp] 3 times, ch 3, **sc in next ch-1 sp, ch 3; rep from ** around; join with sl st in first ch of beginning ch.
Note: Refer to assembly for placement of working square. If working square is first square in a piece, work Round 7 (non-joining round), otherwise, work Round 7 (joining round).

Round 7 (non-joining round)
: Repeat Round 5. Fasten off.

Joining Notes:
  1. There are several different ways that the squares are joined, depending on the number and/or size of the squares being joined. Each large square has 7 groups of 3-dc per side, and each small square has only 3 groups of 3-dc per side. When 2 small squares are joined to a large square, the extra 3-dc group in the center of the large square must be handled differently. The first small square is joined to one side of the center 3-dc of the large square; the second small square is joined to the first small square (with a sl st in the corner of the small square) and to the other side of the center 3-dc of the large square. Refer to the joining diagrams.
  2. When working a corner and joining to previous squares. Three stitches will always be worked. When there is only one previous square, work (ch 1, sl st in previous square, ch 1). When there are two previous squares, work
  3. (sl st in previous square, ch 1, sl st in next previous square). And, when there are three previous squares, work
  4. (sl st in previous square, sl st in next previous square, sl st in next previous square). Refer to the joining diagrams.
  5. Round 7 (joining round): Sl st in first ch-3 sp, ch 3, (2 dc, ch 3, 3 dc) in same ch-3 sp, [ch 1, *3 dc in next ch-3 sp, ch 1; repeat from * to next corner ch-3 sp; 3 dc in corner ch-3 sp, ch 1, sl st in corner ch-sp of previous square, ch 1, 3 dc in same corner ch-3 sp of working square, **sl st in next ch-1 sp of previous square, 3 dc in next ch-3 sp of working square; repeat from ** to next corner ch-3 sp of working square, working last 3 dc in corner ch-3 sp of working square, ch 1, sl st in corner ch-sp (or next ch-1 sp) of previous square, ch 1, 3 dc in same corner ch-3 sp or working square; continue in this manner to join working square and any previous squares and to complete the round. Refer to the joining notes and joining diagrams. Fasten off.
SMALL TWO-COLOURED SQUARE
Note: Make the squares in the colour combinations indicated on the assembly diagram, or as desired.

With first color and larger hook, ch 4; join with sl st in first ch to form a ring.
Round 1 (RS): Work Round 1 of large square. Fasten off.
Round 2: With RS facing, join second color with sl st in any ch-2 sp, ch 4 (counts as sc, ch 3 here and throughout), sc in same ch-2 sp, [ch 3, (sc, ch 3, sc) in next ch-2 sp] 3 times, ch 3; join with sl st in first ch of beginning ch—8 sc, and 8 ch-3 sps.

Note: Refer to assembly for placement of working square. If working square is first square in a piece, work Round 3 (non-joining round), otherwise, work Round 3 (joining round).


Round 3 (non-joining round): Repeat Round 3 of large square. Fasten off.
Round 3 (joining round): Sl st in first ch-3 sp, ch 3, (2 dc, ch 3, 3 dc) in same ch-3 sp (corner made), ch 1, 3 dc in next ch-3 sp, ch 1, 3 dc in next corner ch-3 sp of working square, ch 1, sl st in corner ch-sp of previous square, ch 1, 3 dc in same corner ch-3 sp of working square, *sl st in next ch-1 sp of previous square, 3 dc in next ch-3 sp of working square; repeat from * to next corner of working square, working last 3 dc in corner ch-3 sp of working square, ch 1, sl st in corner ch-sp (or next ch-1 sp) of previous square, ch 1, 3 dc in same corner ch-3 sp of working square; continue in this manner to join working square and any previous squares and to complete the round. Refer to the joining notes and joining diagrams. Fasten off.

SMALL SOLID SQUARE
With A and larger hook, ch 4; join with sl st in first ch to form a ring.
Rounds 1 and 2 (RS): Work Rounds 1 and 2 of large square. Do not fasten off.

Note: Refer to assembly for placement of working square. If working square is first square in a piece, work Round 3 (non-joining round), otherwise, work Round 3 (joining round).

Round 3 (non-joining round)
: Repeat Round 3 of large square. Fasten off.
Round 3 (joining round): Repeat Round 3 (joining round) of small two-colored square. Fasten off.

BACK
Following assembly diagram, work square #1 to completion. Then work square #2 and complete through to the last round. As you work the last round, join the working square to the previous square. Continue working and joining squares until the back is complete.

FRONTS
Choose a front piece. Following assembly diagram for that piece, work square #1 to completion. Then work square #2 and complete through to the last round. As you work the last round, join the working square to the previous square. Continue working and joining squares until the front is complete. Repeat for the other front.

When back and both fronts are complete, sew shoulder seams. When sewing the shoulder seams, begin at the arm opening and work toward the neck. Try the garment on and adjust if necessary. Remember to allow for edging.

SLEEVES
Note: The sleeves are joined to the body as you go. Take care to join the first row of squares to the body of the garment.

Choose a sleeve. Following assembly diagram for that piece, work square #1 and join to body as you go. Then work square #2 and complete through to the last round. As you work the last round, join the working square to the previous square (and body of garment, if needed). Continue working and joining squares until the sleeve is complete. Repeat for the other sleeve.

FINISHING
Sew side and sleeve seams.

Sleeve Edging
With RS facing and smaller hook, join A with a sl st in dc next to the sleeve seam to work around lower edge.
Round 1 (RS): Ch 1, sc in same dc as join, sc in each dc and ch-1 sp around the lower edge. When reaching a join between squares, sc in both corners and the join (3 sc made); join with sl st in first sc, turn.
Rounds 2 and 3: Ch 1, sc in same st as join, sc in each sc around; join with sl st in first sc, turn.
Fasten off.

Garment Edging
With RS facing and smaller hook, join A with a sl st in dc next to right side seam.
Round 1 (RS): Ch 1, sc in same dc as join, sc in each dc and ch-1 sp all the way around all edges of garment, working 3 sc in each corner (bottom and top of each front edge). When reaching a join between squares, sc in the join and on both sides of the join (3 sc made); join with sl st in first sc, turn.
Rounds 2 and 3: Ch 1, sc in same st as join, sc in each sc around, working 3 sc in center sc of each 3-sc corner; join with sl st in first sc, turn.
Fasten off.

Weave ends.


Jalapeno Corn Muffin Recipe

This recipe for jalapeno corn muffins is another favourite and are rich and spicy with a hint of salt. 
Recommended Equipment:
2x 12 count muffin pans


Ingredients:
  • 4 eggs
  • 2 cups buttermilk
  • 1/2 cup unsalted butter, melted
  • 2 cups all-purpose flour
  • 2 cups yellow cornmeal
  • 1 tspn baking soda
  • 4 tspn baking powder
  • 2 tspn kosher salt
  • 5 tbsp sugar
  • 8 oz. cheddar cheese, shredded
  • 1/3 cup corn kernels, frozen
  • 3 - 4 jalapeno peppers, minced

Preparation:
Preheat oven to 400 degrees Fahrenheit.
Grease 2 12 count muffin pans (total of 24 muffins).
In a large mixing bowl, mix together the eggs, melted butter, and buttermilk.
In a separate mixing bowl, mix together the flour, cornmeal, baking soda, baking powder, salt, and sugar.
Add the corn, jalapenos and shredded cheddar cheese to the bowl containing the dry ingredients. Mix so that the corn, jalapenos and cheese gets coated with the dry mixture.
Add the bowl containing the egg, milk, and butter mixture to the dry mixture. Mix together so that all of the ingredients are distributed evenly. Try not to over-mix the batter.
Divide the batter evenly to make a total of 24 muffins. Each cup should be roughly 2/3 full.
Bake for about 20 minutes. Muffins are done when you can insert a fork into the muffin and it comes out clean.

I Meet God In The Morning.....


I meet God in the morning

And go with Him through the
day, then in the stillness of the
night before sleep comes, I pray.

I rise before dawn and cry for help; I wait for Thy words. My eyes anticipate the night watches, that I may meditate on Thy word. 
Psalm 119:147, 148 NAS

Today, whatever the hour,
wherever the place, assemble
your thoughts and prayers and
with a thankful heart present
them to God.

Sunday, 29 April 2012

Take a Cup of Kindness.....


Take a cup of kindness,
Mix it well with love,
Add a lot of patience
And faith in God above.

Be patient and you will finally win, for a soft tongue can break hard bones. Proverbs 25:15 TLB

Today blend kindness, love,
and patience. Sift in a generous
amount of faith. You'll have a
no-fail recipe for life.

Bread Dough Rose


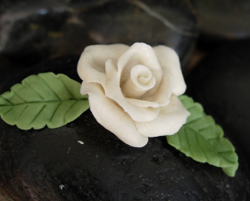
Looking for floral craft ideas that will hold up even in cold weather? Learn how to make a Bread Dough Rose and impress all of your friends. Use a vintage Aleene's technique by combining Original Tacky Glue, white bread and cold cream to create the dough.
You can even use the same technique to create the leaves! Each rose looks like an expensive porcelain piece and can be added to a variety of mediums for a elegant final product. Who knew old white bread could be an ingredient for a pretty floral craft?


Materials:
  • Aleene’s Original Tacky Glue in the Gold Bottle
  • White bread (one slice)
  • Plastic cup
  • Craft stick
  • Cold cream
  • Measuring spoon – tablespoon
  • Acrylic paint – white, green
  • Zip top bag
  • Flexible plastic (Heidi used shrink plastic) to create veins in leaf
  • Toothpick (optional) for holding flower while drying (see video demo)
Instructions:
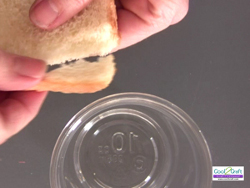
  1. Remove crust from one slice of bread.
    Bread Dough Rose
     
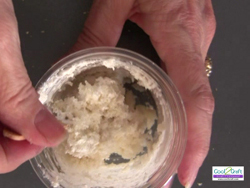
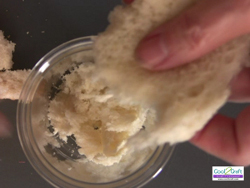
  2. Shred bread into cup.
    Bread Dough Rose
     
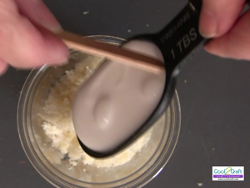
  3. Add 1 tablespoon of Aleene’s Original Tacky glue. Add one dab of cold cream. Add 10 – 20 drops of white acrylic paint.
    Bread Dough Rose
     
  4. Mix until bread dough mixture starts to stick together. Use craft stick to remove mixture from cup and begin to knead with hands.
    Bread Dough Rose
     
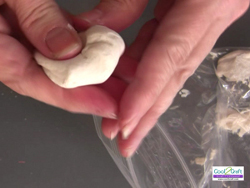
  5. Continue to knead mixture for several minutes until a smooth ball of clay forms. (The glue and mixture should start to come off your hands as you knead the mixture. If not, add a small dab of cold cream to your hands as you continue to knead ball.) Once mixed, store bread dough in zip top bag. Bread dough should remain fresh in refrigerator for several weeks and can also be frozen. Just thaw to room temp before using.)
    Bread Dough Rose
     
  6. Remove a pea sized ball from bag. (Since this is air dry clay, you need to keep the remaining dough in the zip top bag.)
    Bread Dough Rose
     
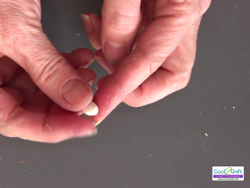
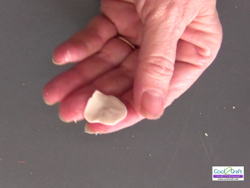
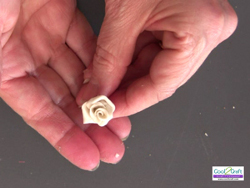
  7. Press ball between finger and thumb to create a petal shape.
    Bread Dough Rose
     
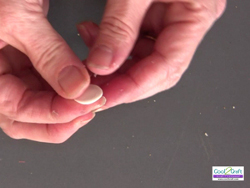
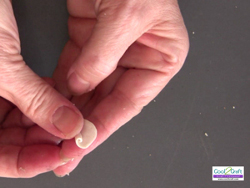
  8. Continue to press until the petal is very thin.
    Bread Dough Rose
     
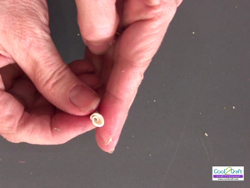
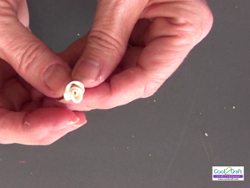
  9. To create flower center, start to roll from one end.
    Bread Dough Rose
     
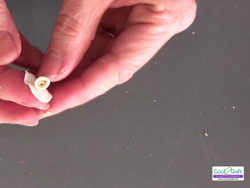
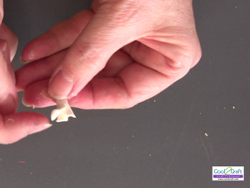
  10. Use finger to gently pull back edge of petal to give dimension and shape.
    Bread Dough Rose
     
  11. Remove another pea sized ball from bag and repeat process to create very thin petal. Guide petal around rose center and gently press in place.
    Bread Dough Rose
     
  12. Use finger to pull down edge of petal and give shape.
    Bread Dough Rose
     
  13. As you continue to add petals, be sure that each petal is flush with the center of rose. (If you do not watch this, the rose can quickly begin to look like a pine cone!)
    Bread Dough Rose
     
  14. Add as many petals as desired to create size and shape of rose. Set aside to dry overnight. Cut off back of rose with scissors to create flat back for gluing surface.
    Bread Dough Rose
     
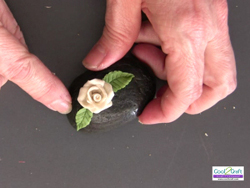
  15. To create leaves, add green paint to small piece of dough. Mix thoroughly. Form pea sized shape into leaf. Add veins by gently pressing lines with plastic. Add shape to sides of leaves by pressing plastic along the edges where lines meet side. Gently press up sides of leaves to give shape. Set aside to dry.Glue leaves and flower onto desired surface. (On this example, I used a river rock to create a paperweight.)
    Bread Dough Rose

How to Make a Bread Dough Rose Video Tutorial

By: Heidi Borchers

God Knows

God knows.......Matthew 6:8

When you are tired and discouraged from fruitless efforts…
God knows how hard you have tried.

When you’ve cried so long and your heart is in anguish…
God has counted your tears.

If you feel that your life is on hold and time has passed you by…
God is waiting with you.

When you’re lonely and your friends are too busy even for a phone call…
God is by your side.

When you think you’ve tried everything and don’t know where to turn…
God has a solution.

When nothing makes sense and you are confused or frustrated...
God has the answer.

If suddenly your outlook is brighter and you find traces of hope…
God has whispered to you.

When things are going well and you have much to be thankful for…
God has blessed you.

When something joyful happens and you are filled with awe…
God has smiled upon you.

When you have a purpose to fulfill and a dream to follow…
God has opened your eyes and called you by name.
Remember that wherever you are or whatever you are facing…
GOD KNOWS!!!

Saturday, 28 April 2012

Toddler Sweaters


Hexagon 1
Hexagon 2


Size: 
Infant 18 - 24 months old

Measurements:
Chest: 19” - 20”

Gauge:
DK weight yarn: 4.5 “3 dc, ch 2” groups and 9 rows = 4”
Worsted weight yarn: 4 “3 dc, ch 2” groups and 7 rows = 4”

Materials
Yarn:
DK weight yarn, approximately 250 yards. Yarn used for green and yellow sweater is Brown Sheep Cotton Fleece (80% cotton, 20% merino wool; 3.5 oz; 215 yards) – 2 skeins of “Rue”, 1 skein of “Buttercream.”
Worsted weight yarn, approximately 250 yards. Yarn used for variegated sweater is Plymouth Boku (95% wool, 5% silk; 50 grams; 99 yards) – 3 skeins of color 13.

Crochet hook:
F - 5 (3.75 mm) hook for DK weight yarn
G - 6 (4 mm) hook for worsted weight yarn

Tapestry needle

Stitch markers

Abbreviations:
ch = chain (s)

sc = single crochet
st(s) = stitch(s)
dc = double crochet
sl st = slip stitch
FPDC = front post double crochet
yo = yarn over
* = repeat instructions following the asterisk as directed
RS = right side
WS = wrong side BPDC = back post double crochet
sp = space
[ ] = repeat instructions inside brackets the number of times indicated.


Special Stitch:

Front Post Double Crochet (FPDC) and Back Post Double Crochet (BPDC). FPDC and BPDC are worked on a row of double crochet stitches.


  • FPDC: YO, insert hook to the right of the stitch (or post) on the row below to the back of the fabric, go around the post and bring the hook to the front of the fabric on the left side of the post (hook shaft is in back of post, hook is on the front side of the fabric) yo, pull yarn across the back of the post to the right side and through to the front of the fabric, yo, pull through two loops, yo, pull through remaining two loops.
  • BPDC: YO, insert hook to the right of the stitch (or post) on the row below, coming from the back of the fabric to the front, go across the front of the post and bring the hook through to the back of the fabric on the left side of the post (hook shaft is in front of post, hook is on the back side of the fabric) yo, pull yarn across the front of the post to the right side of the post at the back of the fabric, yo, pull through two loops, yo, pull through remaining two loops.


Notes:
  1. Read pattern instructions carefully before beginning.
  2. For a newborn-size sweater, use fingering weight yarn and a D or E hook. Crochet the same number of rounds as you would when using DK weight yarn.
  3. The length of the sleeve on all versions of the sweater is three-quarter length.
  4. Hexagons are worked in the round. Always end rounds at a “3 dc, ch 2, 3 dc” corner. Do not turn at the end of rounds. The right side should always be facing you.
  5. On each successive round, you will be adding one 3-dc group between corners.
  6. For two-colour sweater, use contrasting color for rounds 5 and 6.
  7. Button holes are added on right side of sweater front for a girl’s sweater. Add button holes on left side for boy’s sweater.
  8. To accommodate larger buttons, ch 3 instead of ch 2 when making button holes.


Instructions:
Hexagon 1:
Make a loose slip knot; fold tail over circle created by the knot.
Round 1: Working over the slip knot and yarn tail, ch 3 (1st dc), 2 dc to create “3 dc group,” ch 2, *3 dc, ch 2. Repeat from * 4 more times, sl st to top of beginning ch 3 (6 “3 dc, ch 2” groups).
Round 2: Sl st to the 1st ch-2 sp, ch 3, 2 dc, ch 2, 3 dc in the ch-2 sp (one corner made), ch 2, *3 dc, ch 2, 3 dc in next ch-2 sp, ch 2. Repeat from * 4 more times, sl st to top of ch 3 of previous round.
Round 3: Sl st to the 1st ch-2 sp, ch 3, 2 dc, ch 2, 3 dc in the ch-2 sp(corner made), ch 2, 3 dc in next ch-2 sp (1 “3-dc” group between corners), ch 2, *3 dc, ch 2, 3 dc in next ch-2 sp (corner made), ch 2, 3 dc in next ch-2 sp, ch 2. Repeat from * 4 more times, sl st to top of ch 3 of previous round.
Round 4: Sl st to the 1st ch-2 sp, ch 3, 2 dc, ch 2, 3 dc in the ch-2 sp(corner made), ch 2, [3 dc in next ch-2 sp, ch 2] twice (2 “3-dc” groups between corners), *3 dc, ch 2, 3 dc in next ch-2 sp, ch 2, [3 dc in next ch-2 sp, ch 2] twice. Repeat from * 4 more times, sl st to top of ch 3 of previous round, sl st to top of ch 3 of previous round.
Rounds 5 – 10 (11 for DK weight yarn): Repeat Round 4, increasing 1 “3 dc, ch 2” group on each round. Use contrasting color for rounds 5 and 6 if making two-color sweater. The final round should have 8 (9 if working in DK weight yarn) “3-dc” groups between each corner. Fasten off.

Hexagon 2:
Work same as Hexagon 1, but crochet one round less for a total of 9 (10 for DK weight yarn) rounds.
Center Back Seam:
  • Hold two sides of the hexagons together, WS facing each other. The hexagon with the fewer rounds should be closest to you.
  • Join yarn with sl st to the corner ch-2 sp of the hexagon closest to you. Ch 3, 2dc in the corner ch-2 sp, ch 1, sc in corner ch-2 sp of the other hexagon, ch 1.
  • 3 dc in the next ch-2 sp of the first hexagon, ch 1, sc in next ch-2 sp of the second hexagon, ch 1.
  • Continue in this manner until you reach the corner ch-2 space of the first hexagon. 3 dc in the corner ch-2 sp, ch 1, sc in the corner ch-2 space of the second hexagon, ch 1, 3 dc in corner ch-2 sp of the first hexagon, ch 2, 3 dc in the next ch 2 sp of the first hexagon.
  • Continue crocheting the last round of the 1st hexagon as established, sl st to the top of the ch 3 at the beginning of the round. Fasten off.
  • Position the sweater so that the RS of the center back seam is laying vertically on a flat surface (WS facing you). Holding the bottom of the sweater on either side of the center back seam, move your hands outward along the bottom edge until you reach the right and left ends. Pick up each corner ch-2 space and fold them over so that they line up with the bottom of the center back seam. From there you will be able to complete the folding to create the sweater shape.

 Shoulder Seam
  • Lay the folded sweater flat, front side facing you. Align the right sleeve so that the front and back ch-2 corner spaces at cuff edge are facing each other. Join the two sides by placing a stitch marker in the corner ch-2 space at the sleeve edge. Do the same for the left sleeve.
  • Next, align the corner ch-2 sp at the front, left and right edges with the corresponding ch-2 corner sp on either side of the center back seam.
  • Counting from the front edge to the right sleeve cuff, place a stitch marker in the third ch-2 space of the front and back sides of the sleeve. Do the same on the left sleeve.
  • Working on the right sleeve, Join yarn with sl st to the corner ch-2 space at the cuff edge, sc in ch-2 space, ch 3 loosely, sc in the next ch-2 space being sure to work the stitch over the ch-2 sp of the front and back of the sleeve. Continue in this manner, working the final sc in the ch-2 sp with the stitch marker. Fasten off. 
  • Join yarn with sl st on the left side of the sweater in the ch-2 sp with the stitch marker, sc in this ch-2 sp, ch 3 loosely, sc in the next ch-2 sp. Continue in this manner, working the final sc in the corner ch-2 sp at the cuff edge. Fasten off.
  • Collar:
  • Open the sweater fronts and lay WS of sweater on a flat surface, RS facing you. Join yarn with sl st to the corner ch-2 sp at the top of front edge of the sweater.

Row 1: Ch 3, *1 dc in each dc of 3-dc group, 1 dc in ch-2 sp. Repeat from *. At center seam, 1 dc in corner ch-2 sp, 1 dc around sc at top of center seam, 1 dc in corner ch-2 sp on other side of seam. Continue as established, working 1 dc in each dc of the 3-dc group and 1 dc in ch-2 sp. 1 dc at top turning ch. Ch 3, turn.
Row 2: 1 dc in 1st dc of previous row (1 increase made at beginning of row), 1 dc in each st across row, 2 dc in top of turning ch (1 increase made at end of row). Ch 3, turn.
Rows 3-5: Repeat Row 2. Fasten off.
Left Sleeve Cuff:
With RS back of the sweater facing you, locate the ch-2 space that is closest to the bottom fold of the sleeve. Join yarn with a sl st to the last dc of the 3-dc group to the right of this ch-2 sp.
Round 1: Ch 3, 1 dc in next ch-2 sp, *1 dc in 1st dc of next 3-dc group, 1 dc in last dc of the 3-dc group, 1 dc in next ch-2 sp. Repeat from *. At the shoulder seam, work 1 dc in ch-2 sp on both sides of the seam. Continue as established, working 1 dc in the 1st and last dc of the 3-dc group and 1 dc in ch-2 sp. Join with sl st at top of ch 3 at beginning of round.
Round 2: Ch 3, work 1 FPDC around the 1st st of the previous row, *1 BPDC around the next st, 1 FPDC around the next st. Repeat from *. Join with a sl st at top of ch 3 at beginning of round.
Rounds 3: Ch 3, *1 BPDC around BPDC of the previous round, 1 FPDC around the FPDC of the previous round. Repeat from *. Join with sl st to top of ch 3 at beginning of round.
Round 4: Ch 3, work a FPDC around the FPDCs of previous round and a BPDC around the BPDCs. Join with sl st to top of ch 3 at beginning of round. Fasten off

Right Sleeve Cuff:
With the front of the sweater facing you, work same as left sleeve cuff.

Bottom Edging:
With WS of bottom edge of sweater facing you, join yarn to corner ch-2 sp on the right edge and ch 3.
Row 1: *1 dc in 1st dc of 3-dc group, 1 dc in 3rd dc of 3-dc group, 1 dc in ch-2 sp. Repeat from *. At center back seam, 1 dc in corner ch-2 sp, 1 dc around last sc of back seam, 1 dc in next corner ch-2 sp. Continue as established, working 1 dc in 1st and 3rd dc of 3-dc group, and 1 dc in ch-2 sp. Work 1 dc in corner ch-2 sp at the sweater edge. Ch 3, turn.
Row 2: Work 1 FBDC around 1ST st of previous row, *1 BPDC around next st of previous row, *FPDC around the next st. Repeat from *, 1 dc in top ch of ch 3 at end of previous row. Ch 3, turn.
Row 3: *1 BPDC around 1st BPDC of previous round, 1 FPDC around FPDC of previous row. Repeat from *. Join with sl st to top of ch 3 at beginning of previous row. Ch 3, turn.
Row 4: Work a FPDC around the FPDCs of previous round and a BPDC around the BPDCs. 1 dc in top of ch 3 at beginning of row. Fasten off.

Left Front Edging:
With RS facing you, join yarn with sl st to ch-2 corner sp at top left edge of sweater.
Row 1: 1 sc in same space, sc across row. Ch 1, turn.
Row 2: Sc across row. Fasten off.

Right Front Edging:
With RS facing you, join yarn with sl st to bottom right edge of sweater.
Row 1: 1 sc in same sp. Work 6 more sc evenly spaced along the end of the 4 rows of ribbing that constitute the bottom edge of the sweater. 1 sc in corner ch-2 sp, *1 sc in each dc of 3-dc group, 1 sc in ch-2 sp. Repeat from * across, 1 sc in 3rd dc of the last 3-dc group at top of sweater. Ch 1, turn.
Row 2: 1 sc in each st of previous row, evenly spacing button holes (ch 2, skip 2 sts, 1 sc in next st) along the front edge. Evenly sp 7 sc along the end of the 4 rows of ribbing that constitute the bottom edging. Ch 1, turn.
Row 3 (worked around entire sweater): 1 sc in each st across row with 2 sts in each ch-2 button hole space. 3 sc in last st of row to create corner. Work 1 sc at top edge of sweater and 1 sc in ch-2 sp before the first collar row. Then work 9 sc evenly spaced along the edge of the collar rows, 3 sc in the 1st st of the last collar row, 1 sc in each st across top of collar, 3 sc in last st, 9 sc evenly spaced along edge of the 5 collar rows, 1 sc in ch-2 sp and 1 sc in top edge of collar, 3 sc in 1 st of row 2 of left front edge, 1 sc in each st across. Fasten off.

Finishing
  • Weave in all ends.
  • Hand wash in mild soap, cold water. Rinse and squeeze gently to remove excess water. Wrap in towel to remove remaining water.
  • Lay flat, block to measurements, and allow to dry.
  • If you used acrylic yarn, machine wash in cold water, delicate setting. Machine dry on low setting with fabric softener sheet.
  • Sew on buttons. 
Crochet Orchid

Use this flower crochet pattern to crochet a very realistic orchid. In this craft, the orchid is glued to a ribbon and used to decorate a glass jar, but you can turn into a pin or other craft. 
Materials: 
  • crochet hook: Size 7 steel crochet hook or size needed to obtain 
  • crochet cotton size 10: Small amounts each white (MC) and purple (CC) 
  • Kreinik Blending Filament (55 yd per spool): 1 
  • spool each #093 star mauve (BFM) and #012 purple 
  • (BFC) 
  • Size 7 steel crochet hook or size needed to obtain 
  • gauge 
  • Tapestry needle 
  • Large glass jar with narrow neck 
  • 1 yd. (5/8)-wide lilac ribbon 
  • Craft glue 
  • Starch 

Size: 3-1/4 inches wide x 3-1/4 inches long

Gauge: 7 dc = 3/4 inch

Note: Join rnds with a sl st unless otherwise stated. 

Instructions:


Orchid Center
Rnd 1 (RS): With one strand MC and one strand BFM held tog, ch 2, 7 sc in second ch from hook, join in first sc. Do not fasten off. (7 sc)

Top Petal
Row 1: Ch 3 (counts as first dc throughout), 6 dc in same sc as joining, turn. (7 dc)
Rows 2 & 3: Ch 3, dc in each rem dc across, turn.
Row 4: Ch 2, dc in next dc (beg dec made), dc in each of next 3 dc, dc dec over next 2 sts, turn. (5 sts)
Row 5: Beg dec, dc in next dc, dc dec, turn. (3 sts)
Row 6: Ch 2; holding back on hook last lp of each st, dc in each of next 2 sts, yo, draw through all 3 lps on
hook. Fasten off. (1 st)
With tapestry needle and length of MC, sew ends of Rows 1 & 2 tog at the back of Petal.

First Side Petal
Rnd 1 (RS): With one strand MC and one strand BFM held tog, ch 10, 2 sc in second ch from hook, hdc in next ch, dc in next ch, 2 tr in next ch, tr in next ch, dc in each of next 2 chs, hdc in next ch, 3 sc in last ch; working in rem lps across opposite side of foundation ch, hdc in next ch, dc in each of next 2 chs, tr in next ch, 2 tr in next ch, dc in next ch, hdc in next ch, sc in same ch as first sc, join in first sc. (22 sts)
Rnd 2: Ch 1, 2 sc in same st as joining, sc in each st across to center sc of next 3 sc group, 3 sc in center sc, sc in each rem st around, join in first sc. (26 sc)
Rnd 3: [Ch 3, sk next sc, sl st in next sc] rep around, end with ch 3, sl st in st at base of beg ch-3, sl st in first unworked sc on either side of Top Petal on Rnd 1 of Center. Fasten off.

Second Side Petal
Rnds 1 & 2: Rep rnds 1 & 2 of First Side Petal
Rnd 3: Rep rnd 3 of First Side Petal, ending with sl st in first unworked sc on opposite side of Top Petal on
Rnd 1 of Center as First Side Petal

First Bottom Petal
Row 1 (RS): With RS facing, attach one strand MC and one strand BFM held tog with a sl st in first unworked sc next to either Side Petal, ch 3, 2 dc in same st, turn. (3 dc)
Row 2: Ch 3, dc in each rem dc across, turn.
Row 3: Ch 3, dc in first dc, dc in next dc, 2 dc in last dc, turn. (5 dc)
Row 4: Ch 3, dc in first dc, dc in each of next 3 dc, 2 dc in last dc, turn. (7 dc)
Row 5: Beg dec, dc in each of next 3 dc, dc dec, turn. (5 sts)
Row 6: Beg dc, dc in next dc, dc dec, turn. (3 sts)
Row 7: Ch 2; holding back on hook last lp of each st, dc in each of next 2 sts, yo, draw through all 3 lps on hook. Fasten off. (1 st)

Second Bottom Petal

Row 1 (RS): With RS facing, attach one strand MC and one strand BFM held tog with a sl st in first unworked sc next to rem Side Petal, ch 3, 2 dc in same st, turn. (3 dc)
Rows 2-7: Rep rows 2-7 of First Bottom Petal.

Center Petal
Rnd 1: With one strand MC and one strand BFM held tog, leaving a length for finishing, ch 1 (center ch), ch 3 more (counts as first dc), 9 dc in center ch, join in top of first ch-3. (10 dc)
Rnd 2: Ch 3, 2 dc in next dc, [dc in next dc, 2 dc in next dc] rep around, join in top of first ch-3. (15 dc)
Rnd 3: Ch 3, dc in each rem dc around, join in top of first ch-3.
Rnd 4: Sc in next dc, dc in next dc, [2 dc in next dc, dc in next dc] 5 times, sc in next dc, sl st in next dc. Fasten off, turn.
Rnd 5: Join one strand CC and one strand BFC held tog with a sl st in last sc made, sc in next st, hdc in next st, [2 dc in next st, dc in each of next 2 dc] 4 times, hdc in next st, sc in next st, sl st in next st, turn.
Rnd 6: Ch 1, sl st in first sc, sc in each of next 2 sts, hdc in next st, [dc in each of next 2 sts, 2 dc in next st] 4 times, hdc in next st, sc in each of next 2 sts, sl st in next st; working over end sts of rows, sl st in each st across to first sl st, join in first sl st. Fasten off, turn.
Rnd 7: Join one strand MC and one strand BFM held tog with a sl st in same st as joining, [ch 3, sk next st, sl st in next st] rep around, ending with ch 3, join in st at base of first ch-3. Fasten off.

With length left for finishing, tack Center Petal to center of Center.

For FINISHING as an embellishment on a glass gift jar
: Apply starch to orchid. Pin out to shape. Let dry thoroughly.Tie ribbon around neck of glass jar. Trim ends to desired length. With craft glue, glue orchid to ribbon over
knot. Fill jar with potpourri, seashells, or any small treasures.

Brownie Crumbs


Mrs. Baughman was my 6th grade Sunday School teacher. One morning, she brought a pan of brownies to our class. As the goodies sat over by her chair, she gave each child a slip of paper marked with a household expense: house payment, utility bill, phone bill, entertainment, etc.

My slip had a car payment. Before long, Mrs. Baughman picked up the tray of brownies and began naming the expenses written on the papers. As we gave her our expenses, she redeemed each one for a brownie.

“Car payment” she announced. I jumped up to get my brownie from the pan. Finally the last brownie had disappeared.

But one boy named Donald still held his unredeemed slip. “God!” called Mrs. Baughman. Donald came forward hoping the teacher had one more brownie hidden some where.

With a knife Mrs. Baughman scraped the crumbs from the bottom of the pan into Donald’s napkin. He got a pretty raw deal, I thought -just crumbs.

“The brownies represent your money”, the teacher explained to us. “If you don’t give God his share right away, He probably won’t get anything except maybe the crumbs.”

I never forgot that illustration. The day my friend Donald got only the brownie crumbs, even as a child I learned that God should have the first right to everything I have.

In the years since Mrs. Baughman class I have struggled with giving and priorities, But whenever I recall the “Crummy Sunday School Lesson”, I know who should and must always come first in my life!

Avolicious Cheesecake


Ingredients:  (Serves 8-10)
• 250 g tennis biscuits, crushed
• 100g butter, melted
• 2 packets lime jelly
• 100 ml boiling water
• 750g Philadelphia cream cheese
• 2 large ripe avocados, pureed
• 15 ml lemon juice
• Mixed berries, sliced avos and kiwi fruit to garnish


Preparation:
1. Preheat the oven to 180°C
2. Prepare the biscuit base by mixing the melted butter into the
    crushed biscuits.
3. Press biscuit mixture into the bottom of a 23cm spring form 
    pan.
4. Place in the oven for 5-8 minutes to crisp the biscuits, remove
    and cool.
5. Dissolve the jelly in boiling water, whilst the jelly is dissolving, 
    beat the cream cheese with the puréed avocado and the lemon 
    juice until combined, pour in the dissolved jelly
6. Pour the mixture into the spring form pan and allow to set 
    overnight.
7. To serve, release the cheesecake from spring form pan, garnish
    with mixed berries, avocado slices and kiwi fruit.

Friday, 27 April 2012

Praying The 23rd Psalm

Psalm 23
Taken from "Praying The Character Of Your Father From The 23rd Psalm"
Prayer Portions, p. 245-246. © by Sylvia Gunter.
I have been reading a book on the 23 Psalm that was written by a shepherd. He has given many meaningful insights to this beautiful and reassuring psalm. My daily devotions recently went through this psalm too. I found this article and thought you may find it helpful -

Praying The 23rd Psalm
by Sylvia Gunter

To enter the sheepfolds of the Middle East, a shepherd's sheep had to pass under his rod for him to inspect their condition up close. The shepherd would tend to any obvious needs one by one. Then when all the sheep were in the fold, he lay down across the opening with his own body.

Through the 23rd Psalm we better understand our Good Shepherd in a personal way. Ask God to show you about Himself in this classic psalm, which unfortunately is so familiar that we can recite it without receiving its revelation deep in our spirits.

Listen for what God wants you to know about who He is, what He does, and what you have in your Shepherd.

As you cultivate your personal communion with God in prayer, let Him lead you to pray this psalm for others.

The Lord is my Shepherd
Jehovah-Rohi: God my Shepherd
Jesus said, "I am the Good Shepherd who knows my own sheep by name (John 10:11)." The Lord of the universe knows you personally! Thank Him for your relationship with Him.
Pray it for others: Jesus is the great Shepherd of all His sheep. Pray for someone who is discouraged and thinks God has forgotten them. Pray for them to know God as their Shepherd.

I shall lack nothing
Jehovah-Jireh: the Lord my Provider
If God provided so much in Jesus to meet your spiritual needs, will He not also take care of your daily practical needs? Pray, "Give us this day our daily bread (Mat. 6: 11)," and name specific needs you are trusting Him for. Thank Him, He is your provider.
Pray for others: Pray for those who have real financial needs and for those who are discontent with what they have. Pray they will know Jehovah-Jireh.

He makes me lie down in green pastures He leads me beside quiet waters
Jehovah-Shalom: God my Peace
Pray about anything that is disquieting your peace. Affirm that God is your peace. Pray about God's leading in His work and decisions.
Pray for others: Ask God how to pray for someone in a hard place. Pray for Him to calm all fear, doubt, worry, inadequacy and anxiety with the Prince of Peace in their heart.

He restores my soul
Jehovah-Rapha: The Lord my Healer
Where do you need the healing and restoration of Jesus the Healer?
Pray for others: Pray for God to heal the hurts, bitterness, control, judgments, differences, separation, wrong priorities,
apathy, etc., of someone else.

He guides me in paths of righteousness...

Jehovah-Tsidkenu: The Lord my Righteousness
Pray for God's guidance as you dedicate yourself to follow Him as Lord.
Pray for someone else: Jesus declares us to be righteous, not for what we have done, but because of his perfect righteousness. Pray for salvation for somebody who has not received Jesus as God's perfect sacrifice for their sin.

For His name's sake
Jehovah-M'Kaddesh
God's name is holy. He says, "I the Lord alone am holy, and I make you holy because you are called by my holy name." Pray that you will not dishonor His name.
Pray for others: Pray that someone away from God will desire to bring glory and honor to His name.

Even though I walk through the valley of the shadow of death, I will fear no evil, for you are with me
Jehovah-Shammah: God who is there
Jesus promised His disciples, "I have all authority, and I am always there for you (Mat. 28:19, 20)." Affirm his presence with you that dispels fears and unbelief.
Pray for others: God promised His presence in Exodus 3:12 for leading the children of Israel out of Egypt. In Exodus 33:14 He reaffirmed His presence to finish what he began. Ask God to reveal Himself to your family and friends in powerful new ways.

Your rod and your staff, they comfort me
You can depend on the rod of His protection and the staff of His correction and rescue. Receive the protection and correction of your Good Shepherd.
Pray for others: His comfort is as warm and tender as that of a mother for her child (Isa. 66:13, 49:13, 52:9). Who needs you to pray God's comfort for them?

You prepare a table before me in the presence of my enemies
Jehovah-Nissi: The Lord my banner of victory
Praise God that He gives victory over your enemies and sins, as you depend on the authority of your crucified, resurrected,
victorious Redeemer.
Pray for others: Pray the same prayer for your family and friends.

You anoint my head with oil
Oil was used for medicine, sanctification, appointment to office, and as a sign of fellowship. Oil symbolizes the Holy Spirit, who is all these things. Thank God for the power of the Holy Spirit to heal, restore, soothe, cleanse, appoint to His work, and give a sign of your fellowship with the Father and his Son.
Pray for others: Pray that your family and friends will walk in the Spirit.

My cup overflows
Exercise your attitude of gratitude.
Pray for others: Pray that your family and friends will praise God continually as their source.

Surely goodness and love with follow me all the days of my life
Thank God for a specific evidence of His goodness and love He has shown you daily.
Pray for others: Thank God for people who have shown His goodness and love to you. Tell them so at your first opportunity. Pray that they will see God's goodness to them.

And I will dwell in the house of the Lord forever
Ask God to show you how to practice His presence with you continually.
Pray for others: Ask God for the body of Christ to worship Him with their whole heart and be committed to living in His presence daily.

Scrumptious Rugby Snacks

The Mini Bunny Chow with Butter Chicken

In this recipe, I've taken the idea of a bunny chow and adapted it to create a light, bite-sized snack that I think will blow your socks off. I've used one of my all-time favourite curries, based on the classic butter chicken formula. There are many variations of butter chicken (in a nutshell, tandoori chicken tossed in a rich tomato-based sauce, enriched at the last minute with butter), but this formula is one that I've settled on after many attempts at coming up with the perfect taste and texture. 

This recipe is delicately spiced, which is the way I like it, but you are free to add more heat to it - some fresh chopped green chilli, perhaps, or red chilli flakes - if you prefer a tongue-blisterer of a curry.

I've miniaturized this recipe to make the bunnies easy to pop into your mouth, but there is no reason you should not use normal sized breadrolls or, indeed, cut a loaf of white bread in half and fill it to the brim with the mixture.

This is a complicated and long recipe, I admit. The chicken is marinated twice, and the same spices are added at different times. But follow the recipe to the letter, and I promise you won't be disappointed by the succulence and subtle spicing of this lovely dish.

You can make the chicken and its sauce in advance (see recipe) but the cold butter must be added to the hot gravy at the very last moment, and cooked for no longer than three minutes, or it will separate into a greasy muddle.

All the spices in this recipe can be bought from an Indian spice shop. Butter chicken is usually made with powdered dried fenugreek leaves (methi), but as these aren't that easy to find, I've used whole fenugreek seeds in this recipe. If you can lay your hands on ground methi, used 2 tsp (10 ml) in place of the teaspoon of seeds. 

The Mini Bunny Chow 
with Butter Chicken Recipe

You will need:
8 deboned, skinned chicken breasts

Marinade 1:
  • 2 fat cloves garlic, peeled 
  • 2 T (30 ml) grated fresh ginger 
  • the juice of a large lemon 
  • 1 tsp (5 ml) chilli powder 
  • ½ tsp (2.5 ml) salt 
Marinade 2:
  • 1 cup (250 ml) thick white yoghurt 
  • 1 tsp (5 ml) powdered cumin 
  • 1 tsp (5 ml) garam masala 
  • ½ tsp (2.5 ml) powdered coriander 
  • ½ tsp (2.5 ml) cinnamon 
  • ½ tsp (2.5 ml) turmeric 
  • ½ tsp (2.5 ml) salt 
  • 1 T (30 ml) vegetable oil 
Sauce:
  • 750 g ripe, juicy tomatoes 
  • 1 tsp (5 ml) fenugreek seeds 
  • 2 T (30 ml) vegetable oil 
  • 2 T (30 ml) tomato paste 
  • 1 tsp (5 ml) ground cumin 
  • 1 tsp (5 ml) chilli powder 
  • 1 tsp (5 ml) garam masala 
  • ½ tsp (2.5 ml) turmeric 
  • 1 cup (250 ml) cream 
  • 50 g cold butter 
  • salt and milled black pepper 
To serve:
  • 30 cocktail rolls 
  • melted butter 
  • sprigs of fresh coriander [cilantro] 
How to Prepare:
Cut three or four deep slashes into the chicken breasts and place in a bowl. Crush the garlic and add it to the bowl along with the ginger, lemon juice and chilli powder. Using your hands, rub the marinade into the chicken, pressing it well into the slashes. Set aside for 20 minutes.


In a separate bowl, combine all the ingredients for the second marinade. Pour this mixture over the chicken breasts, mix well, cover and place in the fridge for one to two hours. Don't allow it to marinate for more than 3 hours, which will make the chicken mushy.

Preheat the oven to 200°C. Remove the breasts from their marinade and, without wiping off the marinade, place in a flat ceramic dish. Discard any marinade left in the bowl. Bake at 200°C for seven minutes, then turn down the heat to 170°C and bake for a further 10-12 minutes, or until there is no trace of pinkness when you cut into the flesh of the chicken. Set aside.

In the meantime, make the gravy. Cut the tomatoes in half and grate by pressing the cut side of the tomato against the coarse teeth of a grater and vigorously grating until the skin flattens out under your palm. Discard the skin. (Alternatively, you can dip the tomatoes in boiling water for a few moments, peel of the skin, and then chop them finely). Coarsely crush the fenugreek seeds using a mortar and pestle. Heat the oil in a large saucepan and add the tomato pulp, tomato paste, crushed fenugreek seeds, cumin, garam masala, turmeric and salt. Cook over a brisk heat for about seven minutes, or until the pulp has thickened slightly (when you pull a wooden spoon through the pulp, it should leave a gap that closes reluctantly). Stir in the cream, reduce the heat, and simmer for another five minutes. (At this point, the sauce can be set aside for reheating later).

Heat the oven to 200°C. Cut the tops off the rolls and hollow out the insides, leaving a 5mm 'wall'. Brush the cut edges, lids and sides of the rolls with a little melted butter. Place the rolls and their lids on a baking sheet and bake for a few minutes - watch them like a hawk - or until the edges are golden and beginning to crisp. Keep warm.

Cut or pull the chicken breasts into bite-sized pieces and add to the tomato sauce. Stir well to combine. Heat, over a medium flame, and allow to bubble gently so the chicken is heated right through. Cut the cold butter into little pieces, add it to the sauce and cook, for no more than three minutes, stirring gently. Add the pepper, and more salt, if necessary.

Pile the butter chicken into the warm rolls, top each one with its lid, garnish with a sprig of fresh coriander and serve immediately.

Makes about 30, depending on the size of your cocktail rolls, or 8-10 servings if served in normal bread rolls.