Pages

Sunday, 31 March 2013

Easter Bunny Cake

Food Network Kitchens

Ingredients:
Frosting:

  • 3 sticks (12 ounces) unsalted butter, at room temperature
  • 6 cups confectioners' sugar
  • Pinch fine salt
  • 1 tablespoon vanilla extract
  • 2 to 3 tablespoons milk
Bunny:
  • 2 baked 9-inch round cake layers (your favorite recipe or a 18.25-ounce boxed cake mix)
  • 1 1/4 cup sweetened flaked coconut
  • 2 store-bought biscotti
  • 1 tube pink decorating icing
  • 2 black jelly beans
  • 2 marshmallows
  • 1 white jelly bean, halved lengthwise
  • 1 pink jelly bean
  • 1 black licorice wheel, such as Haribo
Directions:For the frosting: Combine the butter, sugar and salt in the bowl of a stand mixer fitted with a paddle attachment (or in a large bowl if using a hand-held electric mixer). Mix on low speed until mostly incorporated. Add the vanilla, increase the speed to medium-high and mix until smooth. Adjust the consistency with milk until the frosting is easy to spread.
  1. For the bunny: Spread a thin layer of frosting on the flat side of one cake layer, about 2/3 cup, and top with the flat side of the second cake layer. Measure 5 inches across the top of the cake and cut down through the layers, creating two layered pieces that are slightly different sizes.
  2. Place the larger piece of cake, cut-side down, on a large platter or cake board. If using a rectangular cake board, place the larger piece so that the long edges are parallel with the long edges of the board. This is the body of the bunny. Cut the smaller piece of cake in half crosswise, so you have two layered wedges. Place one wedge in front of the body, with one flat side on the board and the other flat side against the body. The curved side will be on top. Take a serrated knife and round off the sharp edges on top of the head. Cut the tip off (the nose) at a 45-degree angle. Reserve all scraps in a bowl.
  3. Separate the layers of the remaining wedge of cake. These will be the back legs. Round the sharp edges of the cake wedges with your knife, and add to the scrap bowl. Place one piece on each side of the bunny, with one flat side down and the other flat side facing forward (the round side towards the back of the bunny), about 1-inch from the end of the bunny's body.
  4. Mix the cake scraps in the bowl with a fork until mashed, and then pack into a ball with your hands. Place the ball behind the bunny's body and adhere with a dab of frosting. This is the bunny's tail. 
  5. Frost the entire bunny, tail and all, using 2 to 3 cups of the frosting, keeping some definition with the bunny parts, and frosting more generously around any sharp edges to give a rounded look to the bunny parts. Sprinkle the bunny with the coconut to fully cover. Gently pat to adhere.
  6. Insert the biscotti between the head and body, pressing into the cake to secure them. These are the ears. Place the base of the ears close together at the center of the head and angle them out. Frost the front of each biscotti with some frosting. Then, using the pink decorating icing, frost a smaller strip in the center of each biscotti, going down to where the ears meet the head but not going all the way to the top.
  7. To make the face, press a black jelly bean into each side of the head for the eyes. Cut one of the marshmallows into 3 circles, discard the middle piece, and press the 2 end circles, cut-sides-in, into the front of the face for the bunny cheeks. Take the white jelly bean halves and push them into face below the cheeks, round-sides-out, for the teeth. Place the pink jelly bean above for the nose.
  8. Unroll the licorice wheel and cut 2 pieces about 1 1/2 inches long each. For each piece, peel the strips apart halfway down, and then cut each separated strip in half lengthwise so you end up with a piece looking a bit like a broom. Repeat with the second piece of licorice. Tuck each piece, with a dab of frosting, behind a marshmallow cheek, with the cut ends facing out, for the whiskers.
  9. Cut the second marshmallow in half lengthwise. Make 3 slits in each half, going about halfway through (these are the toes), and place in front of the legs for the bunny's feet. Adhere the bottom of the feet with icing if necessary.

Cook's Note:
Take 2 1/2 sheets of parchment paper and cut in half. Line the edges of your cake board with these parchment rectangles so that they form a rectangle of open space in the middle. Build your cake on the edges of these pieces of parchment. When you are finished you can slide them away along with any excess icing and coconut.

Make sure your cakes are completely cooled before you being to ice and cut them.

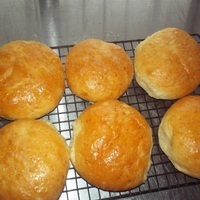
Easy Fluffy Potato Buns Recipe

by myra byanka

Fluffy Potato Buns

Soft and fluffy buns for burgers, hot dogs, and other sandwiches.
Prep time: 10 minutes
Cook time: 15 minutes

Ingredients:  (12 servings)
  • 1 medium potato, cooked in water, mashed, cooled
  • 1 cup warm potato water
  • 1 tbs. instant yeast
  • 2 tbs. sugar
  • 3 cups AP flour unbleached flour + more, if needed
  • 1 1/4 tsp seasoned salt
  • 2 1/2 tbs. melted butter
  • 1 beaten egg
  • 1/8 tsp. garlic powder
  • melted butter

Directions:
  1. Proof yeast in potato water and sugar.
  2. Add other ingredients, then flour.
  3. Mix well.
  4. Dough should ppull away from the side of the mixing bowl.
  5. Knead 5 minutes.
  6. Cover and let rise until doubled, about an hour.
  7. Punch down, shape into buns.
  8. Cover, let rise an hour.
  9. Heat oven to 375 F.
  10. Bake 12-15 minutes.
  11. Cool on rack.
  12. Brush butter on tops

Colourful Loopy Cap...

By: Patons

This free crochet hat pattern from Patons matches an equally loopy kids' poncho to make a cute set. This crochet hat pattern is for the beginner level crocheter and is fun to make!
Loopy Crochet Cap

MATERIALS:
Patons® Melody (100g/3.5oz) (Ombre)
Sizes 2/4 (6/8 Teen/Adult) 1 (1-1) ball
Crochet Hook: size 10 mm (U.S. N or 15) or size needed to obtain tension.

MEASUREMENT:
To fit head circumference
2/4 yrs 16-18 ins [40.5-45.5 cm]
6/8" 18½-20" [47-51"]
Teen/Adult 21¾" [55"]

TENSION:

6½ sc and 7 rows = 4 ins [10 cm].

ABBREVIATIONS

Ch = Chain.
Hdc = Half double crochet.
Rep = Repeat.
Rnd = Round.
RS = Right side.
Sc = Single crochet.
Sl st = Slip stitch.
St(s) = Stitch(es).

INSTRUCTIONS:
The instructions are written for smallest size. If changes are necessary for larger sizes the instructions will be written thus ( ).
Ch 3. Join with sl st to form a ring.
1st rnd: (RS). Ch 1. 7 sc in ring. Join with sl st to first sc.
2nd rnd: Ch 1. 2 sc in each sc around. Join with sl st to first sc. 14 sc.
3rd rnd: Ch 1. 1 sc in first sc. 2 sc in next sc. *1 sc in next sc. 2 sc in next sc. Rep from * around. Join with sl st to first sc. 21 sc.
4th rnd: Ch 1. 1 sc in each sc around. Join with sl st to first sc.
5th rnd: Ch 1. 1 sc in each of first 2 sc. 2 sc in next sc. *1 sc in each of next 2 sc. 2 sc in next sc. Rep from * around. Join with sl st to first sc. 28 sc.

Size 6/8 only: 6th rnd: Ch 1. 1 sc in each sc around. Join with sl st to first sc.
7th rnd: Ch 1. 1 sc in each of first 6 sc. 2 sc in next sc. *1 sc in each of next 6 sc. 2 sc in next sc. Rep from * around. Join with sl st to first sc. 32 sc.

Size Teen/Adult only: 6th rnd: Ch 1. 1 sc in each sc around. Join with sl st to first sc.
7th rnd: Ch 1. 1 sc in each of first 3 sc. 2 sc in next sc. *1 sc in each of next 3 sc. 2 sc in next sc. Rep from * around. Join with sl st to first sc. 35 sc.
8th rnd: Ch 1. 1 sc in each sc around. Join with sl st to first sc.

All Sizes: Note: Ch 2 does not count as stitch.
Next rnd: Ch 2. 1 hdc in each sc around. Join with sl st to first hdc.
Next rnd: Ch 1. 1 sc in each hdc around. Join with sl st to first sc.
Rep last 2 rnds 1 (1-2) time(s) more.
Next rnd: Ch 1. Working from left to right instead of from right to left as usual, work 1 reverse sc in each sc around. Join with sl st to first reverse sc.
Fasten off.

Colourful Loopy Poncho...

By: Patons

Get loopy with this colorful kids' poncho from Patons! Your little girl will love a stylish crocheted poncho.


MATERIALS:  

PINK VERSION
Sizes 2 (4/6-8/10-12) yrs
Patons® Astra (50 g/1.75 oz)
Main Color (MC)
(Ombre) 2 (3-4-4) balls
Patons® Melody (100 g/3.5 oz)
Contrast A (Pink) 1 (1-1-1) ball

PURPLE VERSION
Sizes 2 (4/6-8/10-12) yrs
Patons® Astra (50 g/1.75 oz)
Main Color (MC): (Ombre)
2 (3-4-4) balls
Patons® Melody (100 g/3.5 oz)
Contrast A: (Purple) 1 (1-1-1) ball

Crochet Hooks: sizes 5.5 mm (U.S. I or 9) and 10 mm (U.S. N or 15) or size needed to obtain tension.

SIZES:
To fit chest measurement
2 yrs 21 ins [53 cm]
4/6" 23-25" [58.5-64.5"]
8/10" 26½-28" [67-71"]
12" 30" [76"]

TENSION:
6 crosses and 6 rows = 4 ins [10 cm] in cross pat with smaller hook and Patons® Astra.

ABBREVIATIONS:
Ch = Chain.
Dc = Double crochet.
Pat = Pattern.
Rep = Repeat.
Rnd = Round.
RS = Right side.
Sc = Single crochet.
Sl st = Slip stitch.
Sp(s) = Space(s).
St(s) = Stitch(es).
Tog = Together.
WS =Wrong side.
ML = Draw up a loop in next sc, wrap yarn once around 3 fingers of left hand to make a loop 2½ ins [6 cm] long and hold firmly, yoh and draw through 2 loops on hook.

INSTRUCTIONS:
The instructions are written for smallest size. If changes are necessary for larger sizes the instructions will be written thus ( ).


Note: Poncho is worked in one piece from bottom edge up.


Loopy Border: With A and larger hook, ch 70 (72-76-82) loosely.
1st row: (WS). 1 sc in 2nd ch from hook. ML in each ch to last ch. 1 sc in last ch. Turn. 69 (71-75-81) sts.
2nd row: Ch 1. 1 sc in each st across. Turn.
3rd row: Ch 1. 1 sc in first sc. ML in each sc to last sc. 1 sc in last sc. Break A.
Sew center back seam of Contrast A
Next rnd: With RS facing and smaller hook, join MC with sl st in first sc of loopy border. Ch 1. 2 sc in same sp. *3 sc in next sc. 2 sc in next sc. Rep from * to last 0 (2-0-0) sc. (3 sc in each of last 2 sc) 0 (1-0-0) time(s). 172 (178- 187-202) sc. Join with sl st to first sc (center back).
Proceed in cross pat as follows:
1st rnd:
Ch 3 (counts as dc). *Miss next 2 sts. 1 dc in next st. Ch 1. 1 dc in first of 2 missed sts – cross made. Rep from * around. Join with sl st to top of ch 3. 57 (59-62-67) crosses.
2nd rnd: Ch 3. *Cross over next cross. Rep from * around. Join with sl st to top of ch 3.
3rd rnd: As 2nd rnd.
4th rnd: Ch 1. 1 sc in same sp as last sl st. 1 sc in each dc and ch-1 sp around. Join with sl st to first sc.
Last 4 rnds form cross pat.

Size 12 only: Rep 1st to 4th rnds once more.

Sizes 4/6, 8/10 and 12 only: Rep 1st to 3rd rnds once more.

All Sizes: Shape top: Next rnd: Ch 1. 1 sc in same sp as last sl st. 1 sc in each of next 1 (7-4-15) st(s) or ch-1 sp(s).*Draw up a loop in each of next 2 sts or ch-1 sps. Yoh and draw through all loops on hook – sc2tog made. 1 sc in each of next 6 (6-7-6) sts or ch-1 sps. Rep from * to last 2 sts. Sc2tog over last 2 sts. 150 (156-166-178) sts.
Work 1st to 3rd rnds of cross pat.
Next rnd: Ch 1. 1 sc in same sp as last sl st. 1 sc in each of next 0 (6-3-14) sts or ch-1 sps. *Sc2tog over next 2 sts or ch-1 sps. 1 sc in each of next 5 (5-6-5) sts or ch-1 sps. Rep from * to last 2 sts. Sc2tog over last 2 sts. 128 (134-145- 154) sts.
Work 1st to 3rd rnds of cross pat.
Next rnd: Ch 1. 1 sc in same sp as last sl st. 1 sc in each of next 5 (5-2-13) sts or ch-1 sps. *Sc2tog over next 2 sts or ch-1 sps. 1 sc in each of next 4 (4-5-4) sts or ch-1 sps. Rep from * to last 2 sts. Sc2tog over last 2 sts. 107 (112-124- 130) sts.
Work 1st to 3rd rnds of cross pat.
Next rnd: Ch 1. 1 sc in same sp as last sl st. 1 sc in each of next 8 (1-1-2) st(s) or ch-1 sps. *Sc2tog over next 2 sts or ch-1 sps. 1 sc in each of next 1 (2-3-3) st(s) or ch-1 sps. Rep from * to last 2 sts. Sc2tog over last 2 sts. 74 (84-99- 104) sts.
Next rnd: Ch 1. Working from left to right, instead of from right to left as usual, work 1 reverse sc in each st around. Join with sl st to first sc.
Fasten off.


God will NEVER Break your Heart.....


Do not hurt each other, remember that even the spoken word can offend people and hurt his heart, try to always treat each other with love, God and Jesus taught us to love and goodness, always help each other and give to people just love, always try to do good deeds and God will reward you for it, every thing you made drobroe brings joy to God because God is good, God is love and God and Jesus love us and we love each other and never hurt each other, love and kindness make our life is beautiful, remember that!

God will never hurt you, never break your heart, God loves you and all that he brought to you and does it all for the good, God is with you always and will always help you if you truly believe in God and if you take God your heart, open your heart to God and Jesus and your life will be bright and beautiful, God knows what is best for you and lead you on the right path, God will always take care of you because you create it, and He loves you!
God and Jesus with you always remember it!

Saturday, 30 March 2013

Little Girl Jumper with Granny Pockets

By: Sharon Mann from Premier YarnsA cute outfit for your little girl. She'll look so adorable in this jumper that has granny pockets for all her findings. Serenity sport weight yarn is used.

You will need:


  • Deborah Norville Collection: Serenity Sport Weight
  • 300-12 Pink (MC) – 1 (1, 2) balls 
  • 300-02 Ivory (CC) – 1 (1, 1) ball
  • Crochet hook: US G-6 (4mm)
  • Yarn needle
  • Two ¾" buttons
  • Sewing needle and thread (for attaching buttons)
  • Gauge 16 sc and 24 rows = 4" (10cm). Use any size hook necessary to obtain the specified gauge.
Instructions are for size 12 months; changes for sizes 2 and 4 are in parentheses.

Abbreviations:
ch(s) – chain(s)
cm – centimeter(s)
dc – double crochet(s)
hdc – half double crochet(s)
lp(s) – loop(s)
mm – millimeter(s)
rem – remaining
rep – repeat
sc – single crochet(s)
sk – skip
sl st – slip stitch
sp – space
st(s) – stitch(es)
* – repeat instructions after the asterisk the number of times specified.

Steps:
Bodice Front
Row 1 (RS):
With MC, ch 41 (47, 51), sc in second ch from hook and in each ch across; turn – 40 (46, 50) sc.
Row 2: Ch 1, sc in each sc across; turn.
Row 3: Ch 2 (does not count as a dc), dc in each sc across; turn.
Rows 4 and 5: Ch 1, sc in each st across; turn.
Row 6: Ch 2, dc in each sc across; turn.
Row 7: Ch 1, sc in each dc across. Fasten off.

Shape Armholes
Row 8:
With WS facing, skip first 4 sc and join MC with a sl st in next sc, ch 1, sc in same st and in each of next 31 (37, 41); turn, leaving rem sts unworked – 32 (38, 42) sc.
Row 9: Ch 1, sk first sc, sc in each sc across to last 2 sc, sk next sc, sc in last sc; turn – 30 (36, 40) sc.
Row 10: Ch 1, sc in each sc across; turn.
Rows 11-14: Rep Rows 9 and 10 twice – 26 (32, 36) sc.
Rows 15-17 (19, 21): Ch 1, sc in each sc across; turn.

Right Shoulder
Row 18 (20, 22):
Ch 1, sc in first 11 sc; turn, leaving rem sts unworked.
Row 19 (21, 23): Ch 1, sk first sc, sc in each sc across; turn – 10 sc.
Row 20 (22, 24): Ch 1, sc in each sc across; turn.
Rows 21 (23, 25) - 24 (26, 28): Rep last 2 rows, twice – 8 sc. Fasten off at end of last row.

Left Shoulder
Row 18 (20, 22):
With WS facing, skip next 4 (10, 14) sc on Row 17 (19, 21) and join MC with a sl st in next sc, ch 1, sc in same st and in each sc across; turn – 11 sc.
Row 19 (21, 23): Ch 1, sc in each sc across to last 2 sc, sk next sc, sc in last sc; turn – 10 sc.
Row 20 (22, 24): Ch 1, sc in each sc across; turn.
Rows 21 (23, 25) - 24 (26, 28): Rep last 2 rows, twice – 8 sc. Fasten off at end of last row.

Bodice Back
Work same as Bodice Front through Row 24 (26, 28) of Right Shoulder; do not fasten off; turn.
Row 25 (27, 29): Ch 2, dc in each sc across; turn.
Row 26 (28, 30): Ch 1, sk first dc, sc in each of next 5 dc, sk next dc, sc in last dc; turn – 6 sc.
Row 27 (29, 31): Ch 2, dc in each sc across; turn.
Row 28 (30, 32): Ch 1, sc in each dc across; fasten off.
Continue to work Left Shoulder same as Bodice Front Left Shoulder through Row 24 (26, 28); do not fasten off; turn.
Complete same as Right Shoulder.  Sew Bodice side seams.

Bodice Trim
Rnd 1:
With RS facing, join CC with a sl st at side seam, ch 2, hdc in same st, hdc evenly around the bodice armholes, straps and neckline; join with a sl st in first st.
Rnd 2: Sl st in each hdc around; fasten off.

Bodice Granny Square (make 2)
With MC, ch 4, join with a sl st in first ch to form a ring.
Rnd 1: Ch 5, * 3 dc in ring, ch 2, rep from * 2 more times, 2 dc in ring; join with a sl st in third ch of beg ch-5; fasten off.
Rnd 2: With RS facing, join CC with a sl st in any ch-2 sp, ch 5, 3 dc in same sp, * ch 1, (3 dc, ch 2, 3 dc) in next ch-2 sp, rep from * 2 more times, ch 1, 2 dc in same ch-2 sp as beg ch-5; join with a sl st in third ch of beg ch-5.
Rnd 3: Ch 5, 3 dc in same sp, ch 1, 3 dc in next ch-1 sp, ch 1, * (3 dc, ch 2, 3 dc) in next ch-2 sp, ch 1, 3 dc in next ch-1 sp, ch 1, rep from * 2 more times, 2 dc in same ch-2 sp as beg ch-5; join with a sl st in third ch of beg ch-5; fasten off.  Weave in loose ends.
Turn the granny 45 degrees for diamond shape, center one on the front and back of Bodice; sew in place.


Jumper Skirt
Rnd 1:
With RS facing and working in free lps of beg foundation ch, join MC with sl st to bottom of Bodice at side seam, ch 1, work 84 (96, 102) sc evenly spaced around, sl st in first sc.
Rnd 2: Ch 2, dc in each sc around; join with a sl st in first dc.
Rnd 3: Ch 5, sk next 2 dc, 5 dc in next dc, ch 2, sk next 2 dc, dc in next dc, ch 2, * sk next 2 dc, 5 dc in next dc, ch 2, sk next 2 dc, dc in next dc, ch 2, rep from * around; join with a sl st in third ch of beg ch-5.
Rnd 4: Ch 1, 2 sc in next ch-2 sp, sc in next 5 dc, 2 sc in next ch-2 sp, * sk next dc, 2 sc in next ch-2 sp, sc in next 5 dc, 2 sc in next ch-2 sp, rep from * around; join with a sl st in first sc – 126 (144, 153) sc.
Rnd 5: Ch 2, dc in each sc around; join with a sl st in first dc.
Rnd 6: Ch 1, sc in each dc around; join with a sl st in first sc.
Rep Rnds 5 and 6 until Skirt measures approximately 6 (8, 10)" from beg, or 1" above the knee or 2½" less than desired finished length.

Pocket Squares (make 2)
With CC, ch 4, join with a sl st in first ch to form a ring.
Rnd 1 (RS): Ch 5, * 3 dc in ring, ch 2, rep from * 2 more times, 2 dc in ring; join with a sl st in third ch of beg ch-5 – 12 sts.
Rnd 2: Sl st in next ch-2 sp, ch 5, 3 dc in same sp, * ch 1, (3 dc, ch 2, 3 dc) in next ch-2 sp, rep from * 2 more times, ch 1, 2 dc in same ch-2 sp as beg ch-5; join with a sl st in third ch of beg ch-5; fasten off.
Rnd 3: With RS facing, join MC with a sl st in any ch-2 sp, ch 5, 3 dc in same sp, ch 1, 3 dc in next ch-1 sp, ch 1, * (3 dc, ch 2, 3 dc) in next ch-2 sp, ch 1, 3 dc in next ch-1 sp, ch 1; rep from * 2 more times, 2 dc in same ch-2 sp as beg ch-5; join with a sl st in third ch of beg ch-5; fasten off.
Rnd 4: With RS facing, join CC with a sl st in any corner ch-2 sp, ch 1, * 3 sc in corner ch-2 sp, sc in each dc and in each ch-1 sp across to next corner ch-2 sp; rep from * around; join with a sl st in first sc; fasten off.
Sew Pockets to the front of the skirt.

Hem Squares—Make 13 (15, 16)
With CC, ch 4, join with a sl st in first ch to form a ring.
Rnd 1 (RS): Ch 5, * 3 dc in ring, ch 2; rep from * 2 more times, 2 dc in ring; join with a sl st in third ch of beg ch-5 – 12 sts.
Rnd 2: Sl st in next ch-2 sp, ch 5, 3 dc in same sp, * ch 1, (3 dc, ch 2, 3 dc) in next ch-2 sp; rep from * 2 more times, ch 1, 2 dc in same ch-2 sp as beg ch-5; join with a sl st in third ch of beg ch-5; fasten off.

Finishing
Sew Hem Squares together to form a ring, then sew ring to bottom of Skirt. With RS facing, join MC with a sl st in bottom edge of any Hem Square, ch 2, dc evenly around the bottom of the Hem Squares; join with a sl st in first dc; fasten off.
Sew buttons to front shoulder straps. Spaces between dc on back straps are used as buttonholes.


Bow: With a double strand of CC, make a 38 (40, 42)" chain; weave in and out of Rnd 2 of Skirt and tie in a bow at center front.

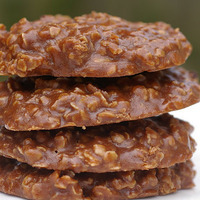
15 Minute No Bake Cookies Recipe!!!

by Veronica Gantley


These cookies are almost as easy to bake as they are to eat. 

This is a recipe my mom used to make when we were growing up. She used to make hers in bars not cookies. Somehow that seemed easier. So either way you make these, they are very easy to make. My daughter is fond of these cookies also. 
Prep time: 10 minutes
Cook time: 5 minutes
Ingredients:  (24 servings) 
  • 1/4 cup Cocoa
  • 2 cups Sugar 
  • 1/2 cup Butter
  • 1/2 cup Milk
  • 1/2 cup Peanut Butter
  • 1 tsp Vanilla
  • 3 cups Quick Cooking Oats

Directions:
Boil: Cocoa sugar and milk for 1-2 minutes. 
Add peanut butter and vanilla over low heat. Take off stove. 
Pour over quick oats and mix. 
Drop by spoonful on cookie sheet and cool.
Yield: 2 dozen

The Best Poem in the World...


I was shocked, confused, bewildered
As I entered Heaven's door,
Not by the beauty of it all,
Nor the lights or its decor.

But it was the folks in Heaven
Who made me sputter and gasp--
The thieves, the liars, the sinners,
the alcoholics and the trash.

There stood the kid from seventh grade
Who swiped my lunch money twice.
Next to him was my old neighbour
Who never said anything nice.

Herb, who I always thought
was rotting away in hell,
Was sitting pretty on cloud nine,
Looking incredibly well.

I nudged Jesus, "What's the deal?
I would love to hear Your take.
How'd all these sinners get up there?
God must've made a mistake.

'And why is everyone so quiet,
So somber - give me a clue.'
'Hush, child, 'He said, 'they're all in shock.
No one thought they'd be seeing you.'

JUDGE NOT!!

Remember... Just going to church doesn't make you a Christian any more then
standing in your garage makes you a car.

Every saint has a PAST...
Every sinner has a FUTURE!
JesusPlus.org

The doors of Paradise are opened for everyone who realized his sins and repented of them, Jesus forgives the repentant and takes to itself, let the God and Jesus in your heart, let the faith and know the truth, stand on the right path for you to open the doors of heaven and God bless you!

Crochet this cute Diaper Cover.....


Adjustable Diaper Cover Pattern:
Sizes 0-9 months, it is adjustable on waist and can fit most any baby.


You will need:
  • Hook size H
  • Yarn worsted weight (one ball of almost any worsted weight yarn will do, this pattern does not take too much yarn)
  • Tapestry needle
  • (Yarn and hook size can be altered to make size bigger or smaller.)
Abbreviations:Ch- chain Sc- single crochet
Dc- double crochet
Trc- triple crochetSs- slip stitch
Ch 55

Pattern:
Row 1:
sc 1 in second ch from hook, sc 1 in every st across, ch 1 and turn (54 st)
Row 2: trc across, ch 1 turn (54 st)
These Triple crochet are the button holes which makes these easily adjustable for different size babies.
 
Row 3: sc 1 in every st across, fasten off
(count in 16 stitches from the right on last row worked and attach yarn with a ss in the same st)
Row 4: ch 3 dc 1 in next 24 across, ch 1 turn (24 st)
Row 5: sc 1 in every st across, ch 3 turn (24 st)
Row 6-9: repeat rows 4-5 twice
Row 10: dc2tog, dc 1 in next 20, dc2tog, ch 1 turn (22 st)
Row 11: sc2tog, sc 1 in next 18, sc2tog, ch 3 turn (20 st)
Row 12: dc2tog, dc 1 in next 16, dc2tog, ch 1 turn (18 st)
Row 13: sc2tog, sc 1 in next 14, sc2tog, ch 3 turn (16 st)
Row 14: dc2tog, dc 1 in next 12, dc2tog, ch1 turn (14 st)
Row 15: sc 1 in every st across, ch 3 turn (14 st)
Row 16: Dc 1 in every st across, ch 1 turn (14 st)
Row 17-20: repeat row 15-16
Row 21: sc 1 in every st across ch 3 turn (14 st)
Row 22: dc 2 in first st, dc 1 in every st across ch 1, turn (15 st)
Row 23: sc 2 in first st, sc 1 in every st across ch 3 turn (16 st)
Row 24: dc 1 in every st across, ch 1, turn (16 st)
Row 25: sc 1 in every st across, ch 3 turn (16 st)
Row 26: dc 1 in every st across, ch 1 turn (16 st) Fasten off weave in ends
Switch to contrasting color, ch 1 and finish with sc all the way. Fasten off and weave in ends

Tip: use 2 st on the turns of each corner

Attach button on side of work where you are seeing the right side of the lining color. Fasten off, and weave in ends.

Add a large yarn pom pom for the tail. You can do this by using the cardboard method which I show in my Thing 1 and Thing 2 Hats tutorial, or you can wrap the yarn around your hand as seen HERE.

Crochet this cute Bunny Hat Pattern

by: Sarah - Repeat Crafter me

Get ready for Easter with this cute bunny hat and matching diaper cover! Although this hat would be cute on all ages, anytime of the year. Feel free to use your own colour combinations as well!

 I think grey/pink would be cute. 


NOTE:
Before we begin let me remind you of some basic directions you should follow while crocheting my hats:
- Always start your rounds in the same stitch as your chain.
- Always join your rounds to the first DC, NOT the chain.
- Your last stitch should be in the stitch before your chain.
- Do NOT count the chain 2 as a stitch.
(You can find pictures of how to start and join your rounds HERE)

Materials:

  • White worsted weight yarn 
  • Pink worsted weight yarn 
  • Two small black buttons for eyes
  • Crochet hook size H-8 (5.0 mm)
  • Tapestry needle

Abbreviations:

ch - chain
sl st- slip stitch
SC - Single Crochet
SC Decrease - Single Crochet Decrease
DC - Double Crochet
HDC - Half Double Crochet
TC - Triple Crochet
Magic Ring - Find a great tutorial including video HERE
Crochet Bunny Hat Pattern:
Size: 0-3 Months
Magic ring, 11 DC in magic ring, join to first DC, chain 2
Round 2: 2 DC in each around, join, chain 2 (22 DC)
Round 3: 2 DC in first, DC in next, repeat around, join, chain 2 (33 DC)
Round 4: 2 DC in first, DC in next 2, repeat around, join, chain 2 (44 DC)
Round 5-10: DC in each around, join, chain 2 (44 DC)
Round 11: SC in each around, join, fasten off, weave in ends (44 SC)

Size: 3-6 Months
Magic ring, 11 DC in magic ring, join to first DC, chain 2
Round 2: 2 DC in each around, join, chain 2 (22 DC)
Round 3: 2 DC in first, DC in next, repeat around, join, chain 2 (33 DC)
Round 4: 2 DC in first, DC in next 2, repeat around, join, chain 2 (44 DC)
Round 5: 2 DC in first, DC in next 10, repeat around, join, chain 2 (48 DC)
Round 6-11: DC in each around, join, chain 2 (48 DC)
Round 12: SC in each around, join, fasten off, weave in ends (48 SC)
Size: 6-9 Months
Magic ring, 11 DC in magic ring, join to first DC, chain 2
Round 2: 2 DC in each around, join, chain 2 (22 DC)
Round 3: 2 DC in first, DC in next, repeat around, join, chain 2 (33 DC)
Round 4: 2 DC in first, DC in next 2, repeat around, join, chain 2 (44 DC)
Round 5: 2 DC in first, DC in next 10, repeat around, join, chain 2 (48 DC)
Round 6: 2 DC in first, DC in next 11, join, chain 2 (52 DC)
Round 7-12: DC in each around, join, chain 2 (52 DC)
Round 13: SC in each around, join, fasten off, weave in ends (52 SC)

Size: 9-12 Months (Should fit up to about 16 months)
Magic ring, 11 DC in magic ring, join to first DC, chain 2
Round 2: 2 DC in each around, join, chain 2 (22 DC)
Round 3: 2 DC in first, DC in next, repeat around, join, chain 2 (33 DC)
Round 4: 2 DC in first, DC in next 2, repeat around, join, chain 2 (44 DC)
Round 5: 2 DC in first, DC in next 10, repeat around, join, chain 2 (48 DC)
Round 6: 2 DC in first, DC in next 11, join, chain 2 (52 DC)
Round 7: 2 DC in first, DC in next 12, join, chain 2 (56 DC)
Round 8-13: DC in each around, join, chain 2 (56 DC)
Round 14: SC in each around, join, fasten off, weave in ends (56 SC)

Size: Toddler/Preschooler
Magic ring, 11 DC in magic ring, join to first DC, chain 2
Round 2: 2 DC in each around, join, chain 2 (22 DC)
Round 3: 2 DC in first, DC in next, repeat around, join, chain 2 (33 DC)
Round 4: 2 DC in first, DC in next 2, repeat around, join, chain 2 (44 DC) 
Round 5: 2 DC in first, DC in next 10, repeat around, join, chain 2 (48 DC)
Round 6: 2 DC in first, DC in next 11, join, chain 2 (52 DC)
Round 7: 2 DC in first, DC in next 12, join, chain 2 (56 DC)
Round 8: 2 DC in first, DC in next 13, join, chain 2 (60 DC)
Round 9-14: DC in each around, join, chain 2 (60 DC)
Round 15: SC in each around, join, fasten off, weave in ends (60 SC)
Size: Child 
Magic ring, 11 DC in magic ring, join to first DC, chain 2
Round 2: 2 DC in each around, join, chain 2 (22 DC)
Round 3: 2 DC in first, DC in next, repeat around, join, chain 2 (33 DC)
Round 4: 2 DC in first, DC in next 2, repeat around, join, chain 2 (44 DC) 
Round 5: 2 DC in first, DC in next 10, repeat around, join, chain 2 (48 DC)
Round 6: 2 DC in first, DC in next 11, join, chain 2 (52 DC)
Round 7: 2 DC in first, DC in next 12, join, chain 2 (56 DC)
Round 8: 2 DC in first, DC in next 13, join, chain 2 (60 DC)
Round 9: 2 DC in first, DC in next 14, join, chain 2 (64 DC)
Round 10-15: DC in each around, join, chain 2 (64 DC)
Round 16: SC in each around, join, fasten off, weave in ends (64 SC)

Bunny Ears (Outside Ear): Make two
Chain 5, SC in 2nd chain from hook and in each across, ch 1, turn (4 SC)
Row 2: 2 SC in first stitch, SC in next 2 stitches, 2 SC in last stitch, ch 1, turn (6 SC)
Row 3: SC in each stitch across, ch 1, turn (6 SC)
Row 4: 2 SC in first stitch, SC in next 4 stitches, 2 SC in last stitch, ch 1, turn (8 SC)
Row 5-10: SC in each stitch across, ch 1, turn (8 SC)
This is where you can keep making rows of SC to make the ears longer. Keep in mind, the longer the ear, the floppier it will become (which would be cute too!)
Row 11: SC decrease, SC in next 4 stitches, SC decrease in last stitch, ch 1, turn
Row 12: SC in each stitch across, ch 1, turn (6 SC)
Row 13: SC decrease, SC in next 2 stitches, SC decrease in last stitch, ch 1 turn
Row 14: SC in each stitch across, ch 1, turn (4 SC)
Row 15: Make 2 SC decreases, ch 1, turn
Row 16: SC decrease, ch 1, and continue to sc around the edge of the entire ear. Slip stitch to first SC to join. Leave long tail to sew ears together.
Bunny Ears (Inside Ear): Make two
Follow the pattern above but with your accent color (such as pink as pictured). When you get to row 16, make your SC decrease and then switch color to white and continue to SC around the entire ear.
Sew ears together by taking your tapestry needle and the long tail and weave needle in and out just under the single crocheted edges. Consider using a pipe cleaner inside the ears to help them stand up. Otherwise they may flop over (which would be cut too!).
Sew ears onto hat between the 2nd and fourth round, along the crease of the hat that appears when you flatten it.


Bunny Nose and Mouth: 
The nose is stitched on with my yarn and tapestry needle. I just kept weaving the yarn into an upside down triangle shape. Don't over-think this. You can do it! Then you are going to want to stitch on the mouth using the same method as my puppy dog mouth. 

Download a free PDF of the pattern HERE  

NOTE:  Diaper to follow....


*** You may make and sell products from my patterns but if you do I ask that you link back to my post. Please do not copy and post this pattern and claim it as your own. Please do not re-publish photos as your own.***

Want more free patterns? Keep in touch on my Repeat Crafter Me Facebook Page for new pattern sneak peeks and when they will be available on my blog!

An Easter Prayer..


God, give us eyes to see
the beauty of the Spring,
And to behold Your majesty
in every living thing -

And may we see in lacy leaves
and every budding flower
The Hand that rules the universe
with gentleness and power -

And may this Easter grandeur
that Spring lavishly imparts
Awaken faded flowers of faith
lying dormant in our hearts,

And give us ears to hear, dear God,
the Springtime song of birds
With messages more meaningful
than man’s often empty words

Telling harried human beings
who are lost in dark despair -
‘Be like us and do not worry
for God has you in His care.
written by Helen Steiner Rice

Build A Happy Easter Bunny!!!


Build-A-Bunny!!
Easter's here--or near.  Here's our latest creation for the holiday--Easter Basket cupcakes complete with chocolate bunnies, jellybeans and green grass. Perfect for an Easter morning surprise!

CHOCOLATE PEANUT BUTTER BUNNIES
Recipe:  (Makes 12 cupcakes)
  • 12 vanilla cupcakes baked in green paper liners
  • 1 can vanilla frosting
  • Green and yellow food coloring
  • 18 peanut butter sandwich cookies (Nutter Butter)
  • 1 bag (14 ounces) dark cocoa candy melting wafers (Wilton)
  • 2 teaspoons vegetable shortening
  • 24 mini chocolate chips
  • 12 white non-pareils covered gummies (champagne bubbles) or mini marshmallows
  • 1/2 cup assorted speckled jellybeans
How to:
  1. Spoon 3 tablespoons of the vanilla frosting into a freezer weight ziplock bag, press out the excess air and seal the bag. Tint the remaining vanilla frosting bright green with the green and yellow food colouring. Spoon half of the green frosting into 2 freezer weight ziplock bags press out the excess air and seal the bags.
  2. For the ears, cut 6 of the peanut butter cookies in half lengthwise with a serrated knife. Trim 1/4 inch from the bottom of one short end of each cut cookie (this will be the side that goes against the head cookie). For the heads, cut 6 cookies in half crosswise using a serrated knife. Using the remaining 12 cookies, make angled cuts with a serrated knife on one short end.
  3. Line a cookie sheet with waxed paper. Arrange the cookies into 12 bunny shapes on the waxed paper (see photo).
  4. Spoon about 1/4 cup of the candy melts into a ziplock bag. Microwave the melts, massaging the bag every 5 seconds, until smooth. Seal the bag. Snip a small corner from the bag and pipe some of the melted candy where the cookies meet, to glue them together. Refrigerate until set, about 10 minutes.
  5. Place the remaining candy melts with any excess melted candy from the bag and the shortening in a measuring cup deep enough for dipping the cookies. Microwave, stopping frequently to stir, until smooth, about 1 minute. Dip the chilled cookie rabbits, ear end down, into the melted candy and use a spoon to coat any exposed cookie on both sides. Allow the excess to drip back into the bowl. Return the cookie to the waxed paper. Repeat with the remaining cookies. Refrigerate until the candy coating is set, about 10 minutes.
  6. Make a small slit in the top of the cupcakes. Insert the bottom tapered end of the bunny cookie, pressing into the cupcake to secure. Snip a small corner from the bags with the green and white frosting. To make the grass, pipe small dots of green frosting using a squeeze-stop-pull motion to create little peaks, to cover the top of the cupcake. Add the non-pareils candy as the tail and scatter a few jellybeans in the green grass frosting. Pipe a small dot of vanilla frosting on either side of the head. Add a mini chocolate chip, flat side out, to make the eye. Repeat with the remaining cupcakes.
Have a Happy Easter!
by: Karen and Alan

Wednesday, 27 March 2013

Olivier Potato Salad....


The salad is simple to make and can last your family for several days. Although mayonnaise always stays as a dressing, there are many varieties of ingredients. Every bite is full of flavour due to the mixture of ingredients, which are all chopped into small pieces.


You will need: (8 people)

  • medium Dill Pickles
  • 2 large Yellow Potatoes
  • 3 large Carrots
  • 5 Eggs
  • 1 medium Onion
  • 1 pound Bologna or Ham
  • 1 cup Mayonnaise
  • Salt and Pepper; to taste
  • Optional:  Canned Sweet Peas or Corn / Dill / Croutons.
How to:  
Step 1 - Cook carrots and potatoes in boiled water for about 20 minutes, until they are soft.


Step 2 - Cook eggs in separate pot for 13 minutes.
Step 3 -

Let cooked ingredients cool off.

Step 4 -


Dice bologna or ham, onion, pickles into tiny cubes. Also, clean potatoes, eggs and carrots.

Step 5 -


Mix all ingredients together really well. Add mayonnaise to the salad as a dressing before you serve and enjoy!.

Love and Marriage...


                                                                                             I came across this image this morning and it made me think about the relationship I have with my husband. We share a bond that is rare these days, and the reason our marriage has lasted for more than half our lives is because we quickly learned, that love is not just a feeling.
The honeymoon phase in relationships only lasts a short while and after that things begin to change. Being in relationships is not always easy and just as you will have moments of happiness there will also be moments of darkness. And depending on what your relationship is built upon will determine whether moments of darkness, make or break your love. Begin by building your foundation upon stone, surrounded in God’s love, and everything you build together will be strong enough to withstand any storms that come your way.

The source of Love is…
God, and without Him we would not know love.

Love is sharing…
Communication
Good times and bad
Laughter
Tears
Affection
Intimate moments

Love is showing…
Honor
Respect
Compassion
Unconditional love
Strength
Weakness

Love is being…
A friend
Balanced
Supportive
A good listener
Trustworthy
Honest
Comforting
Understanding
Devoted
Fearless
Humble
Selfless
Patient
Kind
Soft spoken

©Kimberly Dawn 2012

Just be you!


You are strong . . . .
when you take your grief and teach it to smile.

You are brave . . . .
when you overcome your fear and help others to do the same.

You are happy . . . .
when you see a flower and give it your blessing.

You are loving . . . .
when your own pain does not blind you to the pain of others.

You are wise . . . .
when you know the limits of your wisdom.

You are true . . . .
when you admit there are times you fool yourself.

You are alive . . . .
when tomorrow’s hope means more to you than yesterday’s mistake.

You are growing . . . .
when you know what you are but not what you will become.

You are free . . . .
when you are in control of yourself and do not wish to control others.

You are honourable . . . .
when you find your honour is to honour others.

You are generous . . . .
when you can take as sweetly as you can give.

You are humble . . . .
when you do not know how humble you are.

You are thoughtful . . . .
when you see me just as I am and treat me just as you are.

You are merciful . . . .
when you forgive in others the faults you condemn in yourself.

You are beautiful . . . .
when you don’t need a mirror to tell you.

You are rich . . . .
when you never need more than what you have.

You are you . . . .
when you are at peace with who you are not.

Tuesday, 26 March 2013

Elbow Prints on my Bed.......


By Georgy

I was but a youth and thoughtless,
As all youths are apt to be;
Though I had a Christian Mother
Who had taught me carefully.

There came a time when pleasure
Of the world came to allure,
And I no more sought the guidance
Of her love so good and pure.

Her tender admonitions fell
But lightly on my ear,
And for the gentle warnings
I felt an inward sneer.

But Mother would not yield her boy
To Satan’s sinful sway,
And though I spurned her counsel
She knew a better way.

She made my room an altar,
A place of secret prayer,
And there she took her burden
And left it in His care.

And morning, noon and evening
By that humble bedside low,
She sought the aid of Him who
Understands a Mother’s woe.

And I went my way unheeding,
Careless of the life I led,
Until one day I noticed
Prints of elbows on my bed.

Then I saw that she had been there
Praying for her wayward boy,
Who for love of worldly pleasure
Would her peace of mind destroy.

Long the conflict raged within me,
Sin against my Mother’s prayers,
Sin must yield – for Mother never
While she daily met Him there.

And her constant love and patience
Were like coals upon my head,
Together with the imprints
Of her elbows on my bed.

And so at last the fight was won,
And I to Christ was led,
And Mother’s prayers were answered
By her elbows on my bed.

Rice Pudding...


This is very easy recipe and something most of as ate as a child. 

You will need:  (For 6 people)
  • 2 quarts  Milk 
  • 2 ounces Oatmeal 
  • 1/2 cups White Rice 
  • 1 tablespoon Sugar 
  • 1 teaspoon Salt 
  • Butter and raisins for topping...

How to:
  1. Bring milk to boil in cooking pan, be sure to keep an eye on milk because it runs really quick once it boils. 
  2. Add rice, oatmeal, salt and sugar. Cook for 20-25 minutes, until rice is fully cooked. 
  3. Serve while warm with butter and raisins. Do you see that unhealthy piece of butter? Yes, that’s the only time I enjoy butter. 

Knit a Cabled Baby Vest.....

Knitted Cotton Cabled Vest that has buttons on the shoulder to minimize the over-the-head struggle, a super soft feel to prevent unpleasant baby rashes, and classic cables to make him look cute!
Materials:
  • 2 skeins of Rowan's Purelife DK, 100% organic cotton for the main colour. I used Natural #986.
  • 1 skein of Rowan's Purelife DK for the contrast color. This is Logwood #981.
  • A 24 inch US #5 circular needle.
  • A 16 inch US #5 circular needle.
  • A 24 inch US #6 circular needle.
  • 3 stitch holders (Optional: you can use scrap yarn to hold your stitches if you prefer.)
  • A cable stitch holder (Also optional: you can use a double pointed needle instead. Whether you use a cable stitch holder or a double pointed needle, make sure it is at least one size smaller than the main knitting needle you use.)
  • 2 buttons, 1/2 inch in diameter

Pattern:
Gauge:  7 1/2 stitches = 1 inch in the cable pattern with the larger needle (5 1/4 stitches = 1 inch in stockinette stitch)
Finished Size:  3 months to 6 months / Chest circumference = 19 inches / Hem to underarm = 6 inches / Hem to shoulder = 10 1/4 inches
How to Adjust the Size:
The easiest way to adjust the size of this vest is to alter the gauge. Instead of knitting the cable pattern at 7 1/2 stitches to the inch, change just the needle size (for slight size adjustments) or the yarn and needle size (for more extreme adjustments) to knit the pattern at a smaller or bigger gauge.

To figure out what gauge you need, divide 144 (the cast on number) by the chest circumference you want. So, for example, if you want a 22 inch chest: 144 divided by 22 = 6.5 stitches to the inch (in the stitch pattern and blocked).

You may have to alter the number of rounds and rows you knit in order to get the right length from the hem to the underarms and from the underarms to the shoulders. If the recipient of the vest isn't on hand to measure, I recommend referring to other sweater patterns that list or diagram these measurements for the size you want to make.


How to Make the Cable:
To make the cable used in this pattern, first slip two stitches onto a cable needle (or double pointed needle). Slip the stitches purlwise, which means, insert the right needle into each stitch as if you were purling it.


Bring the cable needle with the two slipped stitches to the front of the work. Let it hang there while you go on to knit the next stitches from the left knitting needle.


Slide the slipped stitches to the other end of the cable needle. Do not spin the cable needle or try to knit the stitches from the same end that you used to slip the stitches.


Now use the right knitting needle to knit the two stitches off the cable needle.


That's it! In this pattern the abbreviation for making a cable will be "mc".


The Ribbing:
With the contrast yarn and the 24 inch US #5 needle, cast on 144 stitches.
Place a marker and join for working in the round, being careful to not twist the stitches.

Rounds 1-5: *P1, k1, repeat from * to end of round.


The Body:Change to the main yarn and the US #6 needle.
Set Up Round: Knit.
Rounds 1-4: P1, *k4, p2, repeat from * to last 5 stitches, k4, p1.
Round 5: P1, *make a cable (mc), p2, repeat from * to last 5 stitches, mc, p1.
Round 6: Repeat Round 1 (P1, *k4, p2, repeat from * to last 5 stitches, k4, p1).
Repeat Rounds 1-6 six more times.
Next Round: Repeat Round 1..
Next Round: Bind off 5 stitches (always bind off in pattern, knitting the knit stitches and purling the purl stitches), p1, [k4, p2] 10 times, bind off 10 stitches, p1, [k4, p2] 10 times, bind off 4 stitches, cut the yarn and pull it through the last stitch.


Slip the next 62 stitches onto stitch holders or scrap yarn.

Front Armholes:
With the right side facing you, join new yarn and work back and forth on just the 62 stitches that are on the needles.
**Row 1 (right side): Bind off 3 stitches, k2, *p2, k4, repeat from * to last 2 stitches, p2. (59 stitches)
Row 2 (wrong side): Bind off 3 stitches, p2, *k2, p4, repeat from * to last 5 stitches, k2, p3. (56 stitches)
Row 3: Bind off 2 stitches, *p2, mc, repeat from * to last 5 stitches, p2, slip next 2 stitches to cable needle (cn), hold in front of work, k1, k2 from cn. (54 stitches)
Row 4: Bind off 2 stitches, *k2, p4, repeat from * to last 3 stitches, k2, p1. (52 stitches)
Row 5: K1, ssk, *k4, p2, repeat from * to last 7 stitches, k4, k2tog, k1. (50 stitches)
Row 6: P1, p2tog, p3, *k2, p4, repeat from * to last 8 stitches, k2, p3, p2tog through the back loop (tbl), k1. (48 stitches)
Row 7: K1, ssk, k2, *p2, k4, repeat from * to last 7 stitches, p2, k2, k2tog, k1. (46 stitches)
Row 8: *P4, k2, repeat from * to last 4 stitches, p4.
Row 9: K1, ssk, k1, *p2, mc, repeat from * to last 6 stitches, p2, k1, k2tog, k1. (44 stitches)
Row 10: P3, *k2, p4, repeat from * to last 5 stitches, k2, p3.
Row 11: K1, ssk, *p2, k4, repeat from * to last 5 stitches, p2, k2tog, k1. (42 stitches)
Row 12: P2, *k2, p4, repeat from * to last 4 stitches, k2, p2.
Row 13: K2, *p2, k4, repeat from * to last 4 stitches, p2, k2. ***


Row 14: P2, [k2, p4] 2 times, k2, p2, bind off 6 stitches, p1, [k2, p4] 2 times, k2, p2. (18 stitches remain for each shoulder)

Front Left Shoulder:
Work just the 18 stitches of the front left shoulder ("left" as if you were wearing the vest). The other 18 stitches can just remain on the needle or, if you prefer, you can put them on a stitch holder until later.
Row 1 (right side): K2, [p2, mc] two times, p2, k2.
Row 2: Bind off 2 stitches, k1, [p4, k2] two times, p2. (16 stitches)
Row 3: K2, p2, k4, p2, k3, k2tog, p1. (15 stitches)
Row 4: K1, [p4, k2] two times, p2.
Row 5: K2, p2, k4, p2, k2, k2tog, k1. (14 stitches)
Row 6: [P4, k2] two times, p2.
Row 7: K2, p2, mc, p2, k1, k2tog, k1. (13 stitches)
Row 8: P3, k2, p4, k2, p2.
Row 9: K2, p2, k4, p2, k2tog, k1. (12 stitches)
Row 10: P2, k2, p4, k2, p2.
Row 11: K2, p2, k4, p2, k2.
Row 12: Repeat Row 10.
Row 13: K2, p2, mc, p2, k2.
Rows 14-18: Repeat Rows 10 and 11, ending with Row 10.
Row 19: Repeat Row 13.
Rows 20 and 21: Repeat Rows 10 and 11.
Slip the stitches onto a stitch holder and cut the yarn.


Front Right Shoulder:
Working the 18 remaining stitches, join new yarn with the wrong side facing you.
Row 1 (wrong side): P2, [k2, p4] two times, k2, p2.
Row 2: Bind off 2 stitches, p1, [mc, p2] two times, k2. (16 stitches)
Row 3: P2, k2, p4, k2, p3, p2togtbl, k1. (15 stitches)
Row 4: P1, [k4, p2] two times, k2.
Row 5: P2, k2, p4, k2, p2, p2togtbl, p1. (14 stitches)
Row 6: K4, p2, k4, p2, k2.
Row 7: P2, k2, p4, k2, p1, p2togtbl, p1. (13 stitches)
Row 8: K3, p2, mc, p2, k2.
Row 9: P2, k2, p4, k2, p2togtbl, p1. (12 stitches)
Row 10: K2, p2, k4, p2, k2.
Row 11: P2, k2, p4, k2, p2.
Rows 12 and 13: Repeat Rows 10 and 11.
Row 14: K2, p2, mc, p2, k2.
Row 15: Repeat Row 11.
Row 16: Repeat Row 10.
Row 17: Repeat Row 11.
Change to US #5 needles and the contrast yarn.
Row 18: Knit.
Row 19: *K1, p1, repeat from * to end of row.
Row 20: [K1, p1] three times, yo, p2tog, [k1, p1] two times.
Row 21: Repeat Row 19.  Bind off.


Back Armholes:
Now working the 62 stitches that have been on hold, orient the work so the right side is facing you. Use the US #6 needle and join new yarn.
Repeat the Front Armholes section from the ** to the ***.
Row 14: Repeat Row 12. (P2, *k2, p4, repeat from * to last 4 stitches, k2, p2)
Row 15: K2, *p2, mc, repeat from * to last 4 stitches, p2, k2.
Row 16: Repeat Row 12.
Row 17: Repeat Row 13. (K2, *p2, k4, repeat from * to last 4 stitches, p2, k2)
Row 18: Repeat Row 12.
Row 19: K2, [p2, k4] two times, p2, bind off 10 stitches, p1, [k4, p2] two times, k2. (16 stitches remain for each shoulder)
Back Left Shoulder:
Work only the 16 stitches of the back left shoulder.
Row 1 (wrong side): P2, [k2, p4] two times, k2.
Row 2: Bind off 2 stitches, slip 1 stitch to the cn, hold in front of work, k next 2 stiches, k1 from cn, p2, mc, p2, k2. (14 stitches)
Row 3: P2, k2, p4, k2, p1, p2togtbl, p1. (13 stitches)
Row 4: K3, p2, k4, p2, k2.
Row 5: P2, k2, p4, k2, p2togtbl, p1. (12 stitches)
Row 6: K2, p2, k4, p2, k2.
Row 7: P2, k2, p4, k2, p2.
Row 8: K2, p2, mc, p2, k2.
Rows 9-13: Repeat Rows 7 and 6, ending with Row 7.
Row 14: Repeat Row 8.
Rows 15 and 16: Repeat Rows 7 and 6.


Join the Left Shoulders:
Join the shoulders using a three needle bind off. Here's how:
Orient the two left shoulders so that the right sides are facing each other. Hold the stitch holder and needle parallel to each other.


Insert the needle into the first stitch from each shoulder and knit them together.


Knit the next two stitches together, and then slip the first stitch over the second, just like a normal bind off.


Continue the three needle bind off in the stitch pattern so that you knit the knit stitches together and purl the purl stitches together. When you've completed the row, cut the yarn and pull it through the last stitch.


Back Right Shoulder:
Working the 16 remaining stitches, join new yarn with the wrong side facing you.
Row 1 (wrong side): Bind off 2 stitches, p3, k2, p4, k2, p2. (14 stitches)
Row 2: K2, p2, mc, p2, k1, k2tog, k1. (13 stitches)
Row 3: P3, k2, p4, k2, p2.
Row 4: K2, p2, k4, p2, k2tog, k1. (12 stitches)
Row 5: P2, k2, p4, k2, p2.
Row 6: K2, p2, k4, p2, k2.
Row 7: Repeat Row 5.
Row 8: K2, p2, mc, p2, k2.
Rows 9-12: Repeat Rows 5 and 6.
Change to US #5 needles and the contrast yarn.
Row 13: Purl.
Rows 14-16: *P1, k1, repeat from * to end of row.  Bind off.


Right Armhole Edging

With the right side facing you and starting at the middle of the underarm, use the contrast yarn and the 16 inch US #5 needle to pick up 64 stitches around the entire armhole.
Place a marker, and join to knit in the round.
Rounds 1-3: *K1, p1, repeat from * to end of round.   Bind off.


Left Armhole Edging:
With the right side facing you, use the contrast yarn and the 16 inch US #5 needle to pick up 3 stitches through both layers of the left shoulder ribbing (joining them together).


Pick up 61 more stitches around the left armhole, place a marker and join for knitting in the round. (64 stitches total)
Rounds 1-3: *K1, p1, repeat from * to end of round.   Bind off.


Neckband:
With the contrast yarn, the 16 inch US#5 needle and the right side facing you, pick up the first stitch at the corner of the inside layer of the left shoulder ribbing.


Pick up a total of 71 stitches around the entire neckband. Work the neckband back and forth, turning the work between rows.
Row 1 (wrong side): *P1, k1, repeat from * to end of row.
Row 2: *K1, p1, repeat from * to last 4 stitches, p2tog, yo, p1, k1.


Row 3: Repeat Row 1.   Bind off.


Buttons:
Sew on two buttons right below the buttonholes on the left shoulder.


Your vest is all done!