
By: Kim Guzman
What a great homemade gift for a baby to wear in colder weather!


Materials:
Pattern 2
Pattern 3


Instructions:SIZES - 6 (12, 8, 24) monthsFINISHED MEASUREMENTS
Chest 19 (20, 21, 22)"/48.5 (51, 53.5, 56)cm, with fronts overlapped and tied closedLength 10 (10 1/2, 11, 11 1/2)"/25.5 (26.5, 28, 29)cm
GAUGE - In Diagonal Eyelet pattern, using circular needle, 20 sts and 38 rows = 4"/10cm;In Stockinette stitch, using larger needles, 22 sts and 32 rows = 4"/10cm.
PATTERN STITCHES
Garter stitch: Knit all sts every row.Reverse Stockinette st (Rev St st): Purl on RS, knit on WS.
Stockinette stitch (St st): Knit on RS, purl on WS.
Diagonal Eyelet (multiple of 4 sts + 6)Row 1 (RS): K2, *p2tog, yo, k2; repeat from * across.
Row 2: Purl.
Row 3: K4, *p2tog, yo, k2; repeat from * to last 2 sts, k2.
Row 4: Purl.
Repeat Rows 1–4 for Diagonal Eyelet.
NOTES:
Body of jacket is worked in one piece, from lower edge up to armholes. The piece is then divided (beginning armholes), and fronts and back worked separately. Sleeves are worked separately and sewn to body.
When using circular needle, work back and forth in rows as if working with straight needles. Circular needle is required to ensure that neck trim can be worked without difficulty.
When a specific increase or decrease method is not specified, increase or decrease using preferred method.
BODY:
With circular needle and A, CO 150 (166, 182, 198). Note: Work back and forth in rows, as if working with straight needles.
Rows 1–4: Work 4 rows in Garter st (k every row).
Row 5: Purl.
Row 6 (RS): Work Row1 of Diagonal Eyelet.
Continue in Diagonal Eyelet until piece measures 5 (5, 5 1/2, 5 1/2)"/12.5 (12.5, 14, 14)cm from beginning; end with a WS row. Change to larger needles.
Next 4 Rows: Work 4 rows in Stockinette st (k on RS, p on WS).
First Front
Shape Neck
Row 3: BO 12 (14, 14, 16) sts (for neck), k across to last 2 sts, k2tog—32 (34, 39, 42) sts.
Work in St st, dec 1 st at beg and end of every row 1 (2, 4, 5) times—30 (30, 31, 32) sts.
Continue in St st, dec 1 st at neck edge on every row 23 (22, 23, 23) rows—7 (8, 8, 9) sts.
Continue even in St st until armhole measures 4 1/2 (5, 5, 5 1/2)"/11.5 (12.5, 12.5, 14)cm.
Bind off.
Back
Return 52 (59, 65, 70) back sts from holder to larger needles.
Row 1 (RS): BO 6 (7, 7, 8) sts (for armhole), k across—46 (52, 58, 62).
Work in St st, dec 1 st at beg and end of every row 3 (4, 6, 7) times—40 (44, 46, 48) sts.
Continue even in St st until armhole measures 4 (4 1/2, 4 1/2, 5)"/10 (11.5, 11.5, 12.5)cm; end with a WS row.
Shape First Shoulder
Row 1 (RS): K7 (8, 8, 9), place rem 33 (36, 38, 39) sts on stitch holder (for neck and 2nd shoulder).
Continue even over the 7 (8, 8, 9) shoulder sts only until armhole measures 4 1/2 (5, 5, 5 1/2)"/11.5 (12.5, 12.5, 14)cm. Bind off.
Shape Neck and Second Shoulder
Return 33 (36, 38, 39) neck and 2nd shoulder sts from holder to larger needles.
Row 1 (RS): BO 26 (28, 30, 30) sts (for neck), k across—7 (8, 8, 9) sts (for shoulder).
Continue even over the 7 (8, 8, 9) shoulder sts only until armhole measures 4 1/2 (5, 5, 5 1/2)"/11.5 (12.5, 12.5, 14)cm. Bind off.
Second Front
Return 52 (57, 62, 68) second front sts from holder to larger needles.
Row 1 (RS): BO 6 (7, 7, 8) sts (for armhole), k across—46 (50, 55, 60) sts.
Row 2: Purl to last 2 sts, p2tog—45 (49, 54, 59) sts.
Row 3: K2tog, k across—44 (48, 53, 58) sts.
Shape Neck
Row 4: BO 13 (15, 15, 17) sts (for neck), p to last 2 sts, p2tog—30 (32, 37, 40) sts.
Work in St st, dec 1 st at beg and end of every row 0 (1, 3, 4) times—30 (30, 31, 32) sts.
Continue in St st, dec 1 st at neck edge on every row 23 (22, 23, 23) rows—7 (8, 8, 9) sts.
Continue even in St st until armhole measures 4 1/2 (5, 5, 5 1/2)"/11.5 (12.5, 12.5, 14)cm.
Bind off.
SLEEVE (make 2)
With circular needle and A, CO 31 (33, 33, 35) sts.
Rows 1–5: Work 5 rows in Garter st.
Change to larger needles.
Beg with a WS row, work in St st, inc 1 st at beg and end of every RS row 5 (5, 4, 4) times—41 (43, 41, 43) sts.
Continue in St st, inc 1 st at beg and end of every 6th row 5 (5, 7, 8) times—51 (53, 55, 59) sts.
Continue even in St st until sleeve measures 6 1/2 (7 1/4, 8 1/2, 9 1/4)"/16.5 (18.5, 21.5, 23.5)cm from beginning; end with a WS row.
Shape Cap
Continue in St st, dec 1 st at beg and end of every RS row 3 (3, 3, 4) times—45 (47, 49, 51) sts. Bind off.
FINISHING
Sew shoulder seams. Sew sleeve seams. Set in sleeves.
Neck Trim
Row 1 (RS): With RS facing, circular needle and B, pick up and k sts evenly around entire neckline, beginning at one end of front neck shaping, working up front neck edge, across back neck, and down other front neck edge to end of front neck shaping.
Rows 2 and 3: Work 2 rows in Reverse St st (p on RS, k on WS). Bind off.
Side Trim
With RS facing and crochet hook, join A with sl st in lower front corner to work across front edge.
Row 1: Ch 1, sc evenly across front edge to 1/4"/6mm below beginning of neck shaping, ch 5 (for tie loop), sl st in edge at beginning of neck shaping. Fasten off.
Repeat, working from beginning of neck shaping down to lower edge of other front, and working ch 5 loop at beginning of Row 1.
Ties (make 2 – 1 each with A and B)
Inside Tie: With crochet hook and A, ch 65. Fasten off.
Outside Tie: With B, work same as inside tie. Fasten off.
Embroidery
With yarn needle and B.
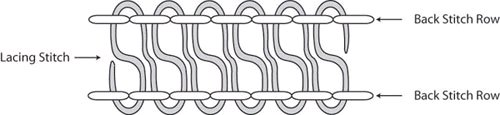
Back Stitch Lines: Working in sts 2 rows below neck trim and following curve of neckline, work back stitch as follows: Insert needle from WS to RS through center of 2nd st, draw yarn through (leave a long tail on WS to weave in later), insert needle from RS to WS through center of first st and draw yarn through, insert needle from WS to RS through center of 3rd st (skipping forward 2 sts) and draw yarn through, insert needle from RS to WS through center of 2nd st (skipping back 1 st) and draw yarn through, *sk forward 2 sts, insert needle from WS to RS through center of next st and draw yarn through, sk back 1 st, insert needle from RS to WS through center of st and draw yarn through; repeat from * all the way around neck edge.
Repeat Back Stitch Line, working another line, 2 rows below the first.
Lacing Stitch: With yarn needle and B, anchor yarn around first st of lower back stitch line by inserting needle from WS to RS just above first st of lower back stitch line and insert needle from top to bottom through first st of lower back stitch line (leave a long tail on WS of work to weave in later). Working from RS throughout, continue lacing stitch between the 2 rows of back stitch, as follows: Insert needle from bottom to top through next st in lower back stitch line, insert needle from bottom to top through first st in upper back stitch line, *insert needle from top to bottom through next st in upper back stitch line, insert needle from top to bottom through same st in lower back stitch line, insert needle from bottom to top through next st in lower back stitch line, insert needle from bottom to top through same st in upper back stitch line; repeat from * across to work lacing stitch all the way across the back stitch lines. Cut yarn and draw tail to inside. Weave in ends.
Thread the outside tie through the fabric at beginning of underarm of right front, bringing the ends of the tie to the RS. Thread the inside tie through the fabric at beginning of underarm of left front, bringing the ends of the tie to the WS. To secure cardigan, thread ends of ties through tie loops and tie ends into a bow.
Using yarn needle, weave in all ends.
What a great homemade gift for a baby to wear in colder weather!
Materials:
- NaturallyCaron.com Spa
- (75% Microdenier Acrylic/25% Bamboo;): 5 (5, 6, 7) oz (A), 1 oz (B). Shown in: #0003 Soft Sunshine (A); #0007 Naturally (B).
- One pair size US 6 (4mm) needles, or size to obtain gauge
- One size US 5 (3.75mm) circular needle, 30"/76cm long, or size to obtain gauge
- One size US F-5 (3.75mm) crochet hook (for ties)
- Stitch holders (or scrap yarn to be used as a "life line")
- Stitch markers
- Yarn needle
Pattern 2
Pattern 3
Instructions:SIZES - 6 (12, 8, 24) monthsFINISHED MEASUREMENTS
Chest 19 (20, 21, 22)"/48.5 (51, 53.5, 56)cm, with fronts overlapped and tied closedLength 10 (10 1/2, 11, 11 1/2)"/25.5 (26.5, 28, 29)cm
GAUGE - In Diagonal Eyelet pattern, using circular needle, 20 sts and 38 rows = 4"/10cm;In Stockinette stitch, using larger needles, 22 sts and 32 rows = 4"/10cm.
PATTERN STITCHES
Garter stitch: Knit all sts every row.Reverse Stockinette st (Rev St st): Purl on RS, knit on WS.
Stockinette stitch (St st): Knit on RS, purl on WS.
Diagonal Eyelet (multiple of 4 sts + 6)Row 1 (RS): K2, *p2tog, yo, k2; repeat from * across.
Row 2: Purl.
Row 3: K4, *p2tog, yo, k2; repeat from * to last 2 sts, k2.
Row 4: Purl.
Repeat Rows 1–4 for Diagonal Eyelet.
NOTES:
Body of jacket is worked in one piece, from lower edge up to armholes. The piece is then divided (beginning armholes), and fronts and back worked separately. Sleeves are worked separately and sewn to body.
When using circular needle, work back and forth in rows as if working with straight needles. Circular needle is required to ensure that neck trim can be worked without difficulty.
When a specific increase or decrease method is not specified, increase or decrease using preferred method.
BODY:
With circular needle and A, CO 150 (166, 182, 198). Note: Work back and forth in rows, as if working with straight needles.
Rows 1–4: Work 4 rows in Garter st (k every row).
Row 5: Purl.
Row 6 (RS): Work Row1 of Diagonal Eyelet.
Continue in Diagonal Eyelet until piece measures 5 (5, 5 1/2, 5 1/2)"/12.5 (12.5, 14, 14)cm from beginning; end with a WS row. Change to larger needles.
Next 4 Rows: Work 4 rows in Stockinette st (k on RS, p on WS).
First Front
Note: Work is now divided, to begin forming armholes, and the fronts and back are worked separately.
Row 1 (RS): K46 (50, 55, 60), place rem sts on stitch holder (for back and second front). Note: The next 52 (59, 65, 70) sts are for back, and the following 52 (57, 62, 68) sts are for second front. Row 2: P2tog, p across—45 (49, 54, 59) sts.Shape Neck
Row 3: BO 12 (14, 14, 16) sts (for neck), k across to last 2 sts, k2tog—32 (34, 39, 42) sts.
Work in St st, dec 1 st at beg and end of every row 1 (2, 4, 5) times—30 (30, 31, 32) sts.
Continue in St st, dec 1 st at neck edge on every row 23 (22, 23, 23) rows—7 (8, 8, 9) sts.
Continue even in St st until armhole measures 4 1/2 (5, 5, 5 1/2)"/11.5 (12.5, 12.5, 14)cm.
Bind off.
Back
Return 52 (59, 65, 70) back sts from holder to larger needles.
Row 1 (RS): BO 6 (7, 7, 8) sts (for armhole), k across—46 (52, 58, 62).
Work in St st, dec 1 st at beg and end of every row 3 (4, 6, 7) times—40 (44, 46, 48) sts.
Continue even in St st until armhole measures 4 (4 1/2, 4 1/2, 5)"/10 (11.5, 11.5, 12.5)cm; end with a WS row.
Shape First Shoulder
Row 1 (RS): K7 (8, 8, 9), place rem 33 (36, 38, 39) sts on stitch holder (for neck and 2nd shoulder).
Continue even over the 7 (8, 8, 9) shoulder sts only until armhole measures 4 1/2 (5, 5, 5 1/2)"/11.5 (12.5, 12.5, 14)cm. Bind off.
Shape Neck and Second Shoulder
Return 33 (36, 38, 39) neck and 2nd shoulder sts from holder to larger needles.
Row 1 (RS): BO 26 (28, 30, 30) sts (for neck), k across—7 (8, 8, 9) sts (for shoulder).
Continue even over the 7 (8, 8, 9) shoulder sts only until armhole measures 4 1/2 (5, 5, 5 1/2)"/11.5 (12.5, 12.5, 14)cm. Bind off.
Second Front
Return 52 (57, 62, 68) second front sts from holder to larger needles.
Row 1 (RS): BO 6 (7, 7, 8) sts (for armhole), k across—46 (50, 55, 60) sts.
Row 2: Purl to last 2 sts, p2tog—45 (49, 54, 59) sts.
Row 3: K2tog, k across—44 (48, 53, 58) sts.
Shape Neck
Row 4: BO 13 (15, 15, 17) sts (for neck), p to last 2 sts, p2tog—30 (32, 37, 40) sts.
Work in St st, dec 1 st at beg and end of every row 0 (1, 3, 4) times—30 (30, 31, 32) sts.
Continue in St st, dec 1 st at neck edge on every row 23 (22, 23, 23) rows—7 (8, 8, 9) sts.
Continue even in St st until armhole measures 4 1/2 (5, 5, 5 1/2)"/11.5 (12.5, 12.5, 14)cm.
Bind off.
SLEEVE (make 2)
With circular needle and A, CO 31 (33, 33, 35) sts.
Rows 1–5: Work 5 rows in Garter st.
Change to larger needles.
Beg with a WS row, work in St st, inc 1 st at beg and end of every RS row 5 (5, 4, 4) times—41 (43, 41, 43) sts.
Continue in St st, inc 1 st at beg and end of every 6th row 5 (5, 7, 8) times—51 (53, 55, 59) sts.
Continue even in St st until sleeve measures 6 1/2 (7 1/4, 8 1/2, 9 1/4)"/16.5 (18.5, 21.5, 23.5)cm from beginning; end with a WS row.
Shape Cap
Continue in St st, dec 1 st at beg and end of every RS row 3 (3, 3, 4) times—45 (47, 49, 51) sts. Bind off.
FINISHING
Sew shoulder seams. Sew sleeve seams. Set in sleeves.
Neck Trim
Row 1 (RS): With RS facing, circular needle and B, pick up and k sts evenly around entire neckline, beginning at one end of front neck shaping, working up front neck edge, across back neck, and down other front neck edge to end of front neck shaping.
Rows 2 and 3: Work 2 rows in Reverse St st (p on RS, k on WS). Bind off.
Side Trim
With RS facing and crochet hook, join A with sl st in lower front corner to work across front edge.
Row 1: Ch 1, sc evenly across front edge to 1/4"/6mm below beginning of neck shaping, ch 5 (for tie loop), sl st in edge at beginning of neck shaping. Fasten off.
Repeat, working from beginning of neck shaping down to lower edge of other front, and working ch 5 loop at beginning of Row 1.
Ties (make 2 – 1 each with A and B)
Inside Tie: With crochet hook and A, ch 65. Fasten off.
Outside Tie: With B, work same as inside tie. Fasten off.
Embroidery
With yarn needle and B.
Back Stitch Lines: Working in sts 2 rows below neck trim and following curve of neckline, work back stitch as follows: Insert needle from WS to RS through center of 2nd st, draw yarn through (leave a long tail on WS to weave in later), insert needle from RS to WS through center of first st and draw yarn through, insert needle from WS to RS through center of 3rd st (skipping forward 2 sts) and draw yarn through, insert needle from RS to WS through center of 2nd st (skipping back 1 st) and draw yarn through, *sk forward 2 sts, insert needle from WS to RS through center of next st and draw yarn through, sk back 1 st, insert needle from RS to WS through center of st and draw yarn through; repeat from * all the way around neck edge.
Repeat Back Stitch Line, working another line, 2 rows below the first.
Lacing Stitch: With yarn needle and B, anchor yarn around first st of lower back stitch line by inserting needle from WS to RS just above first st of lower back stitch line and insert needle from top to bottom through first st of lower back stitch line (leave a long tail on WS of work to weave in later). Working from RS throughout, continue lacing stitch between the 2 rows of back stitch, as follows: Insert needle from bottom to top through next st in lower back stitch line, insert needle from bottom to top through first st in upper back stitch line, *insert needle from top to bottom through next st in upper back stitch line, insert needle from top to bottom through same st in lower back stitch line, insert needle from bottom to top through next st in lower back stitch line, insert needle from bottom to top through same st in upper back stitch line; repeat from * across to work lacing stitch all the way across the back stitch lines. Cut yarn and draw tail to inside. Weave in ends.
Thread the outside tie through the fabric at beginning of underarm of right front, bringing the ends of the tie to the RS. Thread the inside tie through the fabric at beginning of underarm of left front, bringing the ends of the tie to the WS. To secure cardigan, thread ends of ties through tie loops and tie ends into a bow.
Using yarn needle, weave in all ends.