Antjie

Antjie

Friday 29 June 2012

Making the lining for the Crocheted Flower Purse....


Making the lining
The lines are just examples, the lines she sews are not so far apart , it's about a cm apart. 

Crochet a Lovely Flower Purse.....


You will need:

  • A size 3.50 mm hook, Size E for US and size 9 for UK
  • The yarn needed for this project is two to three different colours, your choice.
  • One colour for the center of the flower, one color for the petals of the flower and one color for the connector piece and the handles. I usually make the connector pieces and the handle the same colour, because in my experience it looks better.
  • Medium size worst weight yarn for the flower petals, connector pieces and handle (number 4)
  • You can use worst weight (4) for the middle of the flower as well, but if you find a size (3) light worsted weight colour you like it is preferred, because it makes the flower petals stick out more. Keep in mind if you use the (3) light worst weight yarn that your purse will be slightly smaller.
To make a small purse: You will need 35 flowers total, 7 rows going horizontally and 5 going vertical. Like the graph shows below:
To make a medium purse: You will need 48 flowers total, 8 rows going horizontally and 6 going vertical.
To make a large purse: You will need 63 flowers total, 9 rows going horizontally and 7 going vertical.

Just add one extra row to the side and bottom.


Abbreviations are:
ch = Chain
sl st = Slip Stitch
st = stitch
sp = space
dc = Double Crochet
*( )* = repeat what is in the brackets til end of row.


Making the center of the flower
Ch 4 and sl st into beginning ch to form a ring. Ch 1 and DC 17 inside the ring, sl st into the first DC of the round, ch 1 and fasten off your yarn.
Making the petals of the flower
To make your first flower take your circle and sl st the color you chose for your flower petals into any DC st. Ch 10 and sl st into the next st to the left, ch 10 and repeat all the way til you get to the end, you should have 16 petals in total. Ch 1 and fasten off your yarn. Picture of first flower below

Picture of first flower

ROW ONE

To make the second flower and the remaining flowers for the first rowyou will need to make it like you did the first flower, only stop after the 14th petal chain, do not attach the 14th petal to the center of the flower YET you need to stop and give yourself a tail of about 150 cms (meter and a half) or about 59 inches of yarn and then cut it, because you are going to need to do some weaving.
Take your 14th petal ch and weave it into one of the first flowers petals, then sl st. Ch 10 and weave it into the next petal on first flower. Sl st and ch 1 fasten off.

Continue doing this for the remaining 5 flowers on this row.

ROW TWO and REST
For row two, you connect your first flower of the row, like you did the second flower of the first row, only leave two petals in between. You will need the two loops later.

To connect the inside flowers, make the flower like before, only this time stop after the 11th flower and do not connect # 11 chain yet, first weave it into the second flower from the top, using the two bottom petals, leaving two open petals to the left on the top flower, sl st to join and ch 10, sl st to make petal numbers 13 and 14, ch 10 for petal 15 but weave it into first flower of the row, leaving two petals in between as seen in picture below.

It’s important to leave two petals in between each connection for the connector pieces later.

Continue working the rest of the flowers in this row and the three remaining rows (for small size purse) Until you have a flat 7 by 5 row rectangle.

Making the Handles for the Purse
Ch 3 and sl st into beginning ch to form a ring, ch 6 and leave about 150 cms (meter and a half) or about 59 inches of yarn and then cut it. Weave the ch 6 piece into one of the loose center loops and sl st into center ring, ch 6 and weave it into the next petal and sl st into ring, then repeat to the next flower.

Continue around till you have all 8 petals connected.

Continue to do this to all the open loops in between, making sure you grab all 8 petals, leave no loose ones.

To start to make the handles, lay your work horizontally, with the longer side at the top, 7 flower side, and start at the top left corner. The corner flowers have 10 petals loose. You want to use 5 petals for each side, so separate 5 of the petals and sl st your desired color for the handles into the first of the 5 petals, then sc into next petal to the left.

Now next your doing a normal decrease st, by gathering up the next three petals one at a time and pulling up a loop like shown in the first picture, and pull through all 4 loops on your hook. Continue doing this to the next flower, gather up 3 more petals on the next flower and pull through all 4 loops.

Continue this till you get to the last flower.

When you get to the last flower, you will be working with 5 of the 10 loops again. You gather the first 3 petals of the flower like you usually do and pull through all 4 loops, but the next st you gather only 2 flower petals and pull through 2.
Then you need to ch 1 and TURN your work, sc down the sts you just made by decreasing the flowers, on a small bag you will have 14 sts. When you’re done TURN your work and sc down those 14 sts again. You need to do this until you have 6 sc rows, ending with the front side of the purse facing you. Make sure to count every row of sc’s that you do only 14 sts, keep consistence. If you your doing a medium size bag I believe its 16 sts, and 18 sts for large. Whatever the size, stay consistent.

After 6 rows and the bag is facing you, ch 1 and now you need to work down the side of the sc rows you just made, sc into the last sc you just made before the ch 1 and work along the side, getting back to the flowers again.

Now your continuing your corner, and the other 5 petals of this flower. Gather 2 petals and sc them together, then continue as normally, gathering 3 petals at a time and decreasing, pulling through all 4 loops. Continue until you get to the corner flower again. Again separate the 10 loops into 5, Decrease through 3, then decrease through 2. This is the end of this side of the bag so put a marker into this last st to mark the end of the row.

Continue making the corner like before, gathering first 2 petals, then 3 and continue to the next corner where you gather 3 of the corner flower then the last 2 petals. Like in the picture example above Finishing a corner. Ch 1 and TURN and sc 14 sts like you did before to make a total of 6 sc rows, making sure to count the 14 sts to stay consistent with this side of the bag. Your don’t want your bag to be off centered. Working between your marker and the end of the row. Once you have your 6 sc’s rows on this side, just like before, work down the side of the sc rows to get back to the flowers to be able to start gathering them again. This will be your last row of gathering, remember to start with 2 petals, then 3 until end of row, then gather 2 loops at the end of the row and start to sc up the other side of the original 6 rows of sc that you did, where back at the beginning.
Now you will want to put a marker somewhere in the sc rows to mark that this is the beginning of the row.

Once you sc to the top of the sc rows you want to sl st into the top of the first st of the horizontal sts and ch 2. Now we do 60 foundation sc’s , unless you want small handles to hold in your hand that won’t fit on your shoulder do 40. If you want a medium strap that you hang off your arm but you can’t get anything out of the bag while on your arm, do 60. If you want to be able to hold the bag on your shoulder but still beable to open it and get stuff out of it while still hanging off your shoulder do 70. For small bags I do 60 because the bag itself isn’t as deep as the medium or large, so if your making a small bag like in this tutorial, I would sudjest not doing any longer than 60 foundation sc’s. Once you have your 60 sl st your handle to the other side of the sc rows.

Continue your sc’s down the side of the bag until you get to the other side where your other set of 6 sc rows and repeat for that side the 60 foundation sc’s. And connect them to the bag like before. Continue your sc’s back around the bag till you reach your marker.
That is your first row! Now to match your 6 sc rows, you must do 5 more rows of sc’s all around the sts at the top of your bag. Going up the handles and side of the bag. Then you’re done with the crochet part of the bag! Now all you need to do is sew in a lining because this purse will absolutely need one!

Continue around the whole round 5 more times.


How to Make a Snickers Candy Bar Pie


If you love Snickers Candy Bars and Chocolate Pie then you will love this Sweet Recipe and so will the kids.


Here is what you need:
  • 4 Ounces of Cream Cheese – Softened 
  • 1 3/4 Cups of Milk plus 1 Tbsp – Divided 
  • 1 (12 ounce) Tub of Cool Whip – Thawed 
  • 3 Regular Size Snickers Candy Bars 
  • 1 (4 serving size) package of Jell-O Chocolate Pudding & Pie Filling 
  • 1 (6 ounce) Ready Crust Chocolate Pie Crust 


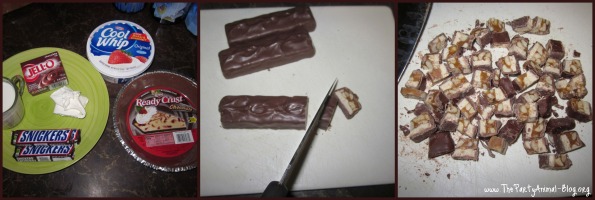
So gather all your Pie Goodies !! Then chop up your Snickers Candy Bars. Chop up 2 of them for the Pie into smaller pieces and then slice up the other one a little bigger and set aside to use for the top of the Pie later.


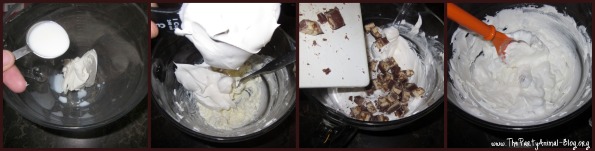
In a Medium Bowl Mix together Cream Cheese and 1 Tablespoon of Milk and whisk until smooth. Then gently stir in 2 Cups of Cool Whip and the 2 Chopped Snickers Bars and set aside.


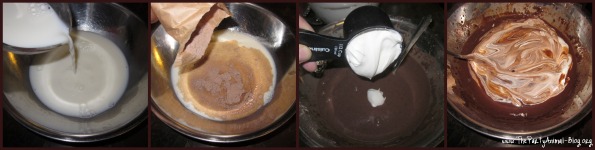
In another Medium Bowl pour in remaining 1 1/4 Cup of Milk. Add Chocolate Pudding Mix and whisk together. Then gently stir in 1/2 Cup of Cool Whip. Lick Spoon (lol).


Now spread half of the Pudding mixture on the bottom of the Pie Crust. Then spread Cream Cheese mixture over the Pudding mixture. Top that with the remaining Pudding Mixture.


Then i just added the leftover Cool Whip to the top of the Pie and garnished with the sliced up Snickers Bar. Refrigerate your Pie for about 4 Hours to set. Was that EASY or what?

Enjoy!!!!!!!

Beautiful Day Quote....


To be in love is the best way to see the life at it's best.

TGIF


"Thank God it's Friday!"  That's how the saying goes as sometimes because people dislike working so much that they are relieved this is the last day before freedom and the weekend!  Or if you are a stay-at-home Mom, you are happy that you have relief from getting up early, sending everyone off to school and work, cleaning house, making supper, cleaning up, running kids to sports, dance lessons, etc. and plopping exhausted into bed each day!  But seriously, we really can praise and thank God for every precious day he gives to us!
  What happened on Friday in the Bible??

   Our precious Lord and Savior was crucified, died for us, and was buried...  So we should be thanking God for Friday, that the Lord loved us so much, he gave his only begotten son so that we might have eternal life.  Jesus took our place and paid dearly for our sins.  Shouldn't we thank him?

Thursday 28 June 2012

Baby Green & Gold Granny Jacket.....


Materials: 3-6 month size

  • Size G crochet hook
  • 4 oz of Caron's Simply Soft yarn (soft 4 ply worsted weight), 2 oz contrasting color
  • (Jacket in photo made from Dk Sage and Mango)
  • Jacket Measurements: 
  • underarm to cuff = 6"
  • shoulder to bottom of jacket = 11"
  • Across jacket under arm front = 9 1/2"
Ch 4, join to make a ring.

Rnd 1: Ch 3, (counts as 1st DC), 2 dc inside ring. *Ch 2, 3 dc in ring. Rep from * 4 more times. Ch 2. Join w/ sl st to 3rd ch of beg ch3. (6 groups of 3 dcs. you will be making a hexagon so go round and round...)
Rnd 2: Sl st to ch 2 space. Ch 3, 2 dc in same space. Ch 2, 3 dc in same space. *Ch 1, (3 dc, ch 2, 3 dc) in next ch 2 space. Rep from * 4 more times. Ch 1, join w/ sl st to 3rd ch of beg ch 3.
( You now have 6 shells, 6 ch 2 spaces, 6 ch 1 spaces)
Rnd 3: Sl st to ch 2 space. Ch 3, 2 dc in same space. Ch 2, 3 dc in same space. *Ch 1, 3 dc in next ch 1 space. Ch 1, (3 dc, ch 2, 3 dc) in next corner.
Rep from * 4 more times around. Ch 2, join with sl st to top of beginning ch 3.
Change colors for a stripe - 
Rnd 4: Sl st to ch 2 space. (now form the corner) Ch 3, 2 dc in same space, ch


2, 3 dc in same space. * (Ch 1, 3 dc in next ch 1 space) twice. Ch 1 (3 dc, ch 2, 3 dc) in next corner space. Rep from * 4 more times. Ch 2, join w/ sl st to top of the ch 3.
Rnd 5: Repeat pattern established in round 4 with a ch 1 between sets of 3dc except at corners where you ch 2 between sets of 3 dc.
Rnd 6-10: Switch back to main color and repeat pattern established in round 4. End off.
Make a 2nd one so you have 2 halves of the jacket.
Fold Hexagon in half to form the 2 sides of the jacket.
Stitch the 2 halves together at the back seam.

(Sorry it's blurry, but place the jacket seams together and stitch through the closest loop of what looks like a 'chain' edge until the entire back seam looks like this...)
Stitch across the top of the jacket at the shoulder seams in the same manner to the 3rd "3dc" from the front neck edge. Repeat across the shoulder of other side.

CUFFS:
Rnd 1: Join contrast yarn on cuff 'bottom', Ch 2 (counts as a HDC), HDC in every other stitch around, and in every ch 1 space.
Rnd 2: Make HDC front post stitch, then make HDC back post, repeat around cuff. Join in top of ch 2. Ch 2.
Rnd 3: Repeat this same round once. You will be making front posts into front posts, and back posts into back posts.
Chain 1 and turn.
Now, *Sc in next stitch, skip 1 st, sc in next, repeat from * around. End off, weave in 3" yarn tail.
Repeat on opposite cuff.

Sweater edging
Join contrast color in back center of jacket - sc in each st around entire sweater, 1 sc in each stitch including the ch 1 spaces. At corners (2 sc, ch 2, 2 sc) - sc to end. End off

Bottom edge of Jacket
Join yarn in a corner of bottom of sweater, ch 3, - DC around to other side. Ch 2, turn.
Alternate Front post DC, back post DC, across. Ch 3 at end of row, turn and repeat across one more row.
Ch 1 and start sc up the front in each stitch to the top of jacket front.

NECK: Ch 3, now 1 DC in each st across to other side of neck. Ch 3 and turn. Front post DC, back post DC alternate across neck, ch 3, turn and repeat previous row. 

You are now at the right side of the jacket as it faces you.

Sc down front right hand side making four button loops evenly spaced. The first button loop will be made approx. 18 scs in where the collar if folded down.   (See photo)
To make button loop... sc, ch 4, skip 1 st, sc in next. *Sc in next 8 scs, ch 4, skip 1 st, sc in next. Repeat from * to bottom of jacket.

End off. Weave in all ends.

Step-by-step how to make your own SNICKERS BARS.......

Homemade Snicker Bars

1st Layer: Chocolate Peanut Butter
  • 1 1/4 cups milk chocolate chips
  • 1/4 cup peanut butter
Grease your 9x13 baking pan with butter. Melt ingredients together in the microwave, then pour into the baking dish and spread until even. Place pan into the fridge and allow to cool and harden.
2nd Layer: Nougat
  • 1/4 cup butter
  • 1 cup granulated sugar
  • 1/4 cup milk
  • 7 ounce jar marshmallow fluff
  • 1/4 cup peanut butter
  • 1 1/2 cup chopped salted peanuts
  • 1 tsp vanilla extract
Melt butter in a saucepan over medium heat. Add in sugar and milk, stirring until dissolved and bring to a boil. Let cook for 5 minutes, stirring occasionally. Add in fluff, peanut butter and vanilla, stirring until smooth. Turn off heat and fold in peanuts, then pour over bottom chocolate layer. Place into the fridge allow it to cool and set completely. 
3rd Layer: Caramel:
  • 1 14-ounce bag of caramels
  • 1/4 cup whipping cream
  • 1 teaspoon vanilla extract
Combine ingredients in a saucepan over low heat. Let melt, stirring occasionally, until smooth. Pour over nougat layer and let cool completely in the fridge until set.
4th Layer: Chocolate Peanut Butter:
  • 1 1/4 cups milk chocolate chips
  • 1/4 cup peanut butter
Melt ingredients together in the microwave, then pour over caramel and spread until even. Allow the final layer to cool and harden in the fridge. 

Keep in mind that this recipe takes some time because you have to allow each layer to cool and set before moving on to the next layer. Trust me, it is totally worth it! I stored my bars in the fridge. You may need to let them set out for a few minutes to soften before cutting. 

Enjoy!


Making Homemade Snickers, Part Two
Okay, so this is part two of the making the Snicks, aka Snickers. In the late afternoon I came back and whipped up the peanut butter nougat type layer. It was a tad sticky, but dried fast so I needed to work efficiently to work it out across the carame/peanut layer.

I found the best way to go about it was to use a cookie scoop to drop the mixture across the caramel/peanut layer. Then I used a smooth edged butter knife to spread the mixture evenly.
I used my pastry cutter to cut the candy into fun size bars. This was very easy, I highly recommend using the pastry cutter for this step.


I enjoyed making this recipe because unlike truffles and many of ther candies I dip into chocolate, this required no refrigeration or freezing to set before dipping. The caramel is soft and buttery with peanuts in it, but firm enough that it holds its shape. I began the tempering process of milk chocolate for my final step.


After tempering I began to dip the bars into the milk chocolate. These bars were by far the easiest thing I have ever dipped into chocolate. They came off of my dipping tool easily and without making a mess.


Enjoy!