Antjie

Antjie

Tuesday 30 April 2013

Breakfast Casserole Bites

By Lisa

This recipe could go two ways. You could make this dish the next time you have guests over for brunch, especially since the mixture could be made and put into the muffin cups in advance.                                                              Or you could bake a big double batch this weekend and freeze them for those busy weekday mornings. If you decide to freeze them with the foil muffin holders still on then you’ll be able to pop them right into the toaster oven. Or if you take the muffin holders off before freezing they’ll be microwave ready. Either way I do recommend taking them out of the freezer the night before so they can thaw out overnight. Whatever you decide to do with this recipe though I don’t think you’ll be disappointed…it’s hard to go wrong with breakfast food!

Breakfast Casserole Bites:   (MAKES 12)INGREDIENTS:
  • 2 pieces whole-wheat sandwich bread
  • 8 eggs,
  • ½ cup milk, any kind will work
  • salt and pepper, to taste 
  • 4 oz grated cheese, cheddar recommended 
  • ½ lb cooked and crumbled breakfast sausage or bacon
Also need: Foil muffin holders for baking
INSTRUCTIONS:
  1. Preheat the oven to 350 degrees F. 
  2. Distribute 12 foil muffin holders into a muffin baking pan. If the foil holders are lined with paper either don’t use those or make sure they are on the outside as shown in the picture. 
  3. Cut the sandwich bread into half inch squares and evenly distribute them on the bottom of the muffin cups (pictured above). 
  4. In a mixing bowl or large measuring cup that has a pour spout thoroughly whisk together the eggs and milk. Add a few dashes of salt and pepper if desired. 
  5. Evenly distribute the egg mixture into each muffin cup. It’s okay if the bread pieces float to the top. 
  6. Sprinkle an equal amount of both the grated cheese and the crumbled bacon (or sausage) into each muffin cup on top of the egg mixture. 
  7. Bake at 350 for 15 minutes or until eggs are set.
  8. Enjoy or freeze (in-between sheets of wax paper) for another day! 
PIE ON COALS!!!!


This pie that can be on the coals, we (everyone's) favourite and we have to try many variations with different fillings. Some with meat and some completely vegetarian.


Try your own variation.
The pie can be cold again the next day and then eat just so nice.

INGREDIENTS:
  • Two rolls of puff pastry (just buy finished at the supermarket)
  • Two dual handfuls of chopped spinach
  • Any type of cooked meat, but smoked hoederborsies nice
  • 250 gm bacon 1 large onion 1 red pepper 1 yellow pepper
  • 250 gm mushrooms
  • 100 gm FETTA cheese
  • 100 gm cheddar cheese
  • 100 gm Mozzarella cheese
  • 1 chicken egg ¼ cup milk

METHOD:
Thaw the dough and roll out on a snyplank advance.
Fry the onion and bacon and let cool slightly.
Carve the meat, spinach, cheese and peppers coarsely.
Place first half of the raw spinach dough, pack the meat, then the bacon and onions, followed by the mushrooms.
Now and then sprinkle a bit of Ina Paarman's Rosemary and Olive spices and black pepper - no salt.
The ingredients are salty enough.
Now follow the three cheeses and finally everything is rounded off with the other half of the spinach.
Put the top layer of dough and fold the edges tightly.
This is quite a high pile of ingredients, but flatten it but a little advance and then put the dough.
Brush the dough with a mixture of egg and milk
Use a sandwich board with edges and cook the pie too low on the coals.
Constantly turn over and cook for about 20 minutes until the pastry is nicely browned.
Cut into portions and enjoy it.

For a vegetarian meat pie just be left alone.
It's still delicious.
Make your own combinations.

Vicious Fry spawning is ready after 20 minutes

Crochet this beautiful Lacy Poncho set....

By: Bernat

The lacy poncho is gorgeous and matches with the cap. This is an easy crochet pattern you will love. The cap can be made with a floral embellishment as well.


Materials:
Poncho and Cap
Sizes: 30-36 (38-46)
Bernat® Soft BouclĂ© (140 g/5 oz)
Main Color (MC): 3 (3) balls
Bernat® Boa (50 g/1.75 oz)
Contrast A: 3 (3) balls
Sizes 5.5 mm (U.S. I or 9) and 6 mm (U.S. J or 10) crochet hooks or size needed to obtain gauge.

GAUGE
Poncho:
11 sts and 5 rnds = 4 ins [10 cm] in pat with larger hook.
Cap: 12 sts and 5½ rnds = 4 ins [10 cm] in pat with smaller hook.

INSTRUCTIONS

The instructions are written for smaller size. If changes are necessary for larger size the instructions will be written thus ( ).

Poncho
With MC and larger hook, ch 156 (168). Taking care not to twist chain, join with sl st in first ch to form a ring.
1st rnd: Ch 4 (counts as dc and ch 1). *Miss next ch. 1 dc in next ch. Ch 1. Rep from * around. Miss last ch. Join with sl st in 3rd ch of ch 4.
2nd rnd: Sl st in next ch-1 sp. Ch 4 (counts as dc and ch 1). *1 dc in next ch-1 sp. Ch 1. Miss next dc. Rep from * around. Join with sl st in 3rd ch of ch 4.
Rep last rnd for pat until work from beg measures 7½ ins [19 cm].

Shape poncho: Next rnd: Sl st in next ch-1 sp. Ch 4 (counts as dc and ch 1). (1 dc in next ch-1 sp. Ch 1. Miss next dc) twice. *(Yoh and draw up a loop. Yoh and draw through 2 loops on hook) in next ch-1 sp. Miss next dc. (Yoh and draw up a loop. Yoh and draw through 2 loops on hook) in next ch-1 sp. Yoh and draw through all loops on hook – dec over 3 sts made. (Ch 1. Miss next dc. 1 dc in next ch-1 sp) 4 times. Ch 1. Miss next dc. Rep from * around to last 6 sts. Dec over next 2 ch-1 sps. Ch 1. Miss next dc. 1 dc in next ch-1 sp. Ch 1. Miss next dc . Join with sl st in 3rd ch of ch 4. 130 (140) sts.
Cont even in pat until work from beg measures 11 ins [28 cm].
Next rnd: Sl st in next ch-1 sp. Ch 4 (counts as dc and ch 1). (1 dc in next ch-1 sp. Ch 1. Miss next dc) twice. *Dec over next 3 sts. (Ch 1. Miss next dc. 1 dc in next ch-1 sp) 3 times. Ch 1. Miss next dc. Rep from * around to last 4 sts. Dec over next 3 sts. Ch 1. Miss next dc. Join with sl st in 3rd ch of ch 4. 104 (112) sts.
Cont even in pat until work from beg measures 14 ins [35.5 cm].
Next rnd: Sl st in next ch-1 sp. Ch 4 (counts as dc and ch 1). 1 dc in next ch-1 sp. Ch 1. Miss next dc. *Dec over next 3 sts. Ch 1. Miss next dc. 1 dc in next ch-1 sp. Ch 1. Miss next dc. Rep from * around to last 4 (6) sts. Dec over next 3 sts. Ch 1. Miss next dc. (1 dc in next ch-1 sp. Ch 1. Miss next dc ) 0 (1) time. Join with sl st in 3rd ch of ch 4. 70 (76) sts.
Next rnd: Sl st in next ch-1 sp. Ch 4 (counts as dc and ch 1). 1 dc in next ch-1 sp. Ch 1. Miss next dc. *Dec over next 3 sts. (Ch 1. Miss next dc. 1 dc in next ch-1 sp) twice. Ch 1. Miss next dc. Rep from * around to last 2 (0) sts. (1 dc in next ch-1 sp. Ch 1. Miss next dc) 1 (0) time . Join with sl st in 3rd ch of ch 4. 54 (58) sts.
Work 1 rnd even in pat (eyelet rnd).
Next rnd: Ch 1. 1 sc in same sp as last sl st. *1 sc in next dc. 1 sc in next
ch-1 sp. Rep from * around. Join with sl st to first sc.
Next rnd: Ch 1. 1 sc in each sc around. Join with sl st to first sc. Break
MC
Next rnd: Join A with sl st in first sc. Ch 1. 1 sc in each sc around. Join with sl st to first sc. Fasten off.

Ruffle Edging: 1st rnd: With larger hook, join MC with sl st in ch-1 sp after join on foundation row. Ch 6 (counts as tr and ch 2). *Miss next dc. 1 tr in next ch-1 sp. Ch 2. Rep from * around. Join with sl st in 4th ch of ch 6.
2nd rnd: Sl st in next ch-2 sp. Ch 7 (counts as tr and ch 3).
*1 tr in next ch-2 sp. Ch 3. Miss next tr. Rep from * around.
Join with sl st in 4th ch of ch 7.
3rd rnd: Sl st in 2nd ch of ch-3 sp. Ch 8 (counts as tr and ch 4). *1 tr in 2nd ch of ch-3 sp. Ch 4. Miss next tr. Rep from * around. Join with sl st in 4th ch of ch 8.
4th rnd: Ch 6 (counts as tr and ch 2). 1 tr in same sp as last sl st. *Ch 2. Miss next ch-4 sp. (1 tr. Ch 2. 1 tr) in next tr. Rep from * around, ending with ch 2. Miss last ch-4 sp. Join with sl st in 4th ch of ch 6. Break MC.
5th rnd: Join A with sl st in next ch-2 sp. Ch 1. 2 sc in same sp. Work 1 sc in each tr and 2 sc in each ch-2 sp around. Join with sl st to first sc. Fasten off.

Drawstring: With 2 strands of A and larger hook, make a chain 56 ins [142 cm] long. Fasten off. Weave drawstring through eyelet rnd of Poncho having ends meet at center front.

Cap
With MC and smaller hook, ch 60. Taking care not to twist ch, join into ring with sl st in first ch.
1st rnd: Ch 4 (counts as dc and ch 1). *Miss next ch. 1 dc in next ch. Ch 1. Rep from * to last ch. Miss last ch. Join with sl st in 3rd ch of ch 4.
2nd rnd: Sl st in next ch-1 sp. Ch 4 (counts as dc and ch 1). *Miss next dc. 1 dc in next ch-1 sp. Ch 1. Rep from * to last dc. Miss last ch. Join with sl st in 3rd ch of ch 4.
3rd to 5th rnds: As 2nd rnd.
6th rnd: Sl st in next ch-1 sp. Ch 4 (counts as dc and ch 1). (Miss next dc. 1 dc in next ch-1 sp. Ch 1) twice. (Yoh and draw up a loop in next ch-1 sp. Yoh and draw through 2 loops on hook) twice. Yoh and draw through all loops on hook – dec made. *(Ch 1. Miss next dc. 1 dc in next ch-1 sp) 3 times. Ch 1. Dec over next 2 ch-1 sps. Rep from * to end of rnd. Join with sl st in 3rd ch of ch 4.
7th rnd: Sl st in next ch-1 sp. Ch 4 (counts as dc and ch 1). Miss next dc. 1 dc in next ch-1 sp. Ch 1. Dec over next 2 ch-1 sps. *(Ch 1. Miss next dc. 1 dc in next ch-1 sp) twice. Ch 1. Dec over next 2 ch-1 sps. Rep from * to end of rnd. Join with sl st in 3rd ch of ch 4.
8th rnd: Sl st in next ch-1 sp. Ch 4 (counts as dc and ch 1). Miss next dc. Dec over next 2 ch-1 sps. *Ch 1. Miss next dc. 1 dc in next ch-1 sp. Ch 1. Dec over next 2 ch-1 sps. Rep from * to end of rnd. Join with sl st in 3rd ch of ch 4.
9th rnd: Sl st in next ch-1 sp. Ch 3. 1 dc in next ch-1 sp – counts as dec. *Ch 1. Dec over next 2 ch-1 sps. Rep from * to end of rnd. Join with sl st in top of ch 3. Break yarn leaving a long end. Thread end through tapestry needle and gather up remaining sts tightly.

Rose:With MC and smaller hook, ch 14.
1st row: (RS). 2 dc in 4th ch from hook (counts as 3 dc). *3 dc in next ch. Rep from * to end of ch. Fasten off.
2nd row: Join A with sl st in top of ch 3 at beg of 1st row. Ch 1. 1 sc in same sp. 1 sc in each dc across. Fasten off.
Coil into rose shape and sew tog through all thicknesses.
Sew to Cap as shown in picture.

Love for the mother....


A mother’s love and the love of the mother is very strong and pure love that connects mother and her child, God teaches us that love, Jesus always said, and tells us that we have to take care of his mother and her love for no one can love as a mother and give motherly warmth, nothing in the world can compare to a mother’s love, it is a special and more it can only be the love of God, no matter where you are, no one will never understand you as a mother and God, the Father’s love is also very important in my life but the We will talk about in our next article, now let’s talk about his mother and about how important it is in life and how strong her love.
Every mother can sacrifice his life for the sake of her child because the mother loves her child more than anyone can love. It is no accident when we are always difficult or painful we utter, the mother, or, God,this is because the love of the mother and the love of God is very strong and well developed in man, the mother has a large role in life, she man is born into the world, she feeds and educates, it protects and gives heat, so a mother’s love is different from all others, it is big and strong.
Every mother loves her child no matter what, she always tries to make sure that the child was better and does everything for the welfare of their child, which is not surprising because the mother of his life trying to dedicate a child, unfortunately there are mothers who leave their children and it is very bad, this is a very big sin, no matter what happens you can never leave a child that God gave and trust, what difficulties did not happen, go to church, ask for help but never leave a child whom God has given you, remember that God will help you as would be hard you may be, do not leave your child, because it is a gift of God, and the day will come when you will regret the fact that they left their child and gave it up so never do not do that because it can not be a great gift of life than a child God trusts you and through you is born a new life that is given to you by God and you sin of rejecting the mother is the most positive person in everyone’s life, and nothing can replace a mother’s love and a mother, nothing can replace God, these two emotions are indispensable in life, a woman is given this, be a mother, to bring to light a new life, and it’s awesome love and grace of God and the happiness of every woman.
The mother loves her child endlessly, but the child must love your mother, you have to love and respect their parents, the mother gave birth to you in the light and at least for that you should be grateful, never hurt your mother, never to hurt her, respect and love your parents taught us that God and Jesus, even if you are offended, learn to forgive, it will make you happy, forgiveness solves a lot of problems and is the key to good, always remember that the mother and her child is oromnaya love that conquers all and that does not seem to nothing, love your parents, love of God and know God and Jesus love you and look at you from heaven. Stronger than a mother’s love is only love of God and Jesus!

Yes, God bless you!

Faith is Stronger Than my Fears

By Georgy


Sometimes my cross is hard to bear

for there is darkness everywhere

and troubles pile around my door

like autumn leaves forevermore.

The morning light seems far away

like I am stuck in yesterday

My heart is beating like a drum

I try to pray, but words won’t come

But then the sun begins to rise

and hope is born within my eyes

A rainbow forms among my tears

for faith is stronger than my fears

Monday 29 April 2013

Amarula Carrot Cake!!!!


Amarula Carrot Cake
Ingredients:

  • 4 large eggs at room temperature
  • 1¼ cups (300g) castor sugar
  • 1¼ cups (310ml) grapeseed oil
  • 2 cups (about 3) grated carrots
  • 1 canned pineapple, grated and drained well
  • 1 cup chopped pecan nuts
  • ¼ cup Amarula Cream, plus extra ¼ cup for soaking later
  • ½ cup (125ml) apricot jam
  • 2 cups (240g) plain flour.
  • 2 tsp baking powder
  • 1 tsp bicarbonate of soda
  • 1 tbsp mixed spice
  • 1 tsp salt
  • Extra chopped pecan nuts and pistachio, for garnish
Cream Cheese icing:
  • 125g cream cheese, room temperature
  • ¼ cup (100g) butter, room temperature
  • 2 cups sifted icing sugar
  • 1 tbsp Amarula Cream

Method:

  1. Beat the eggs in a food mixer (or handheld mixer) for 3 minutes until thick, add the sugar gradually and whisk for another 2 minutes until the mixture is pale and thick. Add the oil slowly and beat for another 2 minutes. Pour mixture into a mixing bowl.
  2. Add carrots, pineapple, nuts, Amarula and apricot jam and stir well with a spatula. Sift the dry ingredients into the mixture and fold in with a spatula until well mixed.
  3. Preheat the oven to 180°C (350°F). Line and grease a springform tin then pour the mixture into the prepared tin and for 1 hour and 10 minutes or until a skewer inserted into centre of the cake and came out clean. Once ready, remove from oven and allow to cool in the tin for 10 minutes before turning out onto wire rack, and leave to cool completely.
  4. Use a skewer stick, poke tiny holes all over the top of the cake. Use a spoon and slowly pour amarula and let it soak into the cake. Make sure the liqueur is evenly spread through the cake and do not over soak it.
  5. Add cream cheese and butter into a mixing bowl of a mixer, beat on high speed until creamy. Turn the speed to slow, gradually add the icing sugar a tablespoon at a time until all blended in. Pour amarula cream and give it another quick mix.
  6. Ice the cake with the cream cheese frosting, from side first, then the top. Grab a handful of chopped pecans and in a clockwise rotation, stick the nuts onto the side of the cake. Finally decorate the top with whole pecans, and sprinkle pistachio on top.
Enjoy!!!

Chunky Crocheted Basket Pattern

Crochet in Color


Materials:

  • 3 Skeins super bulky yarn (I used Lion Brand Wool Ease Thick and Quick in Linen)
  • Size L (8.0mm) crochet hook
  • Yarn needle

Just a little note about the materials:  I would recommend using super bulky to create a stiff or sturdy texture. If you use a smaller weight yarn you will have to hold 3 or more strands together.  Do not use a larger hook. The stitches need to be tight so the basket will be stiff and stand up. Crochet pretty tightly (but try not to make your hands too sore) My next basket will be made with hemp doubled (the thick kind you can find at Walmart). That stuff is a real hand killer. But it's the sturdiest stuff you can use.

Measurements:
smaller basket
8.5 inches in diameter
5.5 inches in height
larger basket
10 inches in diameter
10 inches in height

Pattern:

Note: You will hold two strands of yarn together.  Do not turn when you finish each round. I joined each round. You can work in a continuous spiral if you prefer to get rid of the seam. (If you choose to make the seamless version I would recommend working the bottom with a seam and then work the body in a continuous round or spiral, marking your first st as you go)
Holding 2 strands together

Smaller basket
Ch 2
Rnd 1: 8 sc in 2nd ch from hook
Rnd 2: 2 hdc in each st. Join with sl st. (16 hdc)
Rnd 3: Ch 2, hdc in same st, hdc in next st, (2 hdc in next st, hdc in next st) around. Join with sl st. (24 hdc)
Rnd 4: Ch 2, hdc in same st, hdc in next 2 sts, (2 hdc in next st, hdc in next 2 sts) around. Join with sl st. (32 hdc)
Rnd 5: Ch 2, hdc in same st, hdc in next 3 sts, (2 hdc in next st, hdc in next 3 sts) around. Join with sl st. (40 hdc)
Rnd 6: Ch 2, hdc in same st, hdc in next 4 sts, (2 hdc in next st, hdc in next 4 sts) around. Join with sl st. (48 hdc)
The next round will be the first row of the body of the basket. You will be working into the back of each hdc.
Rnd 7: Ch 1, sc under the line or ridge on the back of the first st of previous round. (Half double crochet stitches have a line or ridge on the back of the stitch). You will be working under this line or ridge, not into the regular loops.

This will leave the two loops of the stitch

creating a seam separating the bottom and body of the basket

Continue working sc around. Join with a sl st.
Rnd 8: Ch 2, hdc into next st and in each st around. Join with sl st.
Rnd 9: Ch 1, Working in the back loop only, sc in the same st and in each st around. Join with sl st.
Rnd 10: Ch 2, hdc in next st and in each st around. Join with sl st.
Rnd 11: Ch 1. Sc in same st and in each st around. Join with sl st.
Rnd 12: Ch 2, hdc in next st and in each st around. Join with sl st.
Rnd 13: Ch 1, working in back loops only, sc in same st, and in each st around. Join with sl st.
You will create the handles in rnd 14

Rnd 14: Ch 2, hdc in next 8 sts. Ch 7, skip the next 5 sts. Hdc in the next 19 sts. Ch 7, skip the next 5 sts. Hdc in the next 10 sts. Join with sl st
Rnd 15: Ch 1, sc in same st and in the next 8 sts. Work 8 sc under the ch 7 space. (Do not work into the sts). Sc in next 19 sts. Work 8 sc under the ch 7 space. Sc in next 10 sts.
Finish off with the no knot finishing method. You can find a photo tutorial on this finishing method here

Larger Basket
You will increase the bottom by one round.
Rnds 1-6: Refer to the instructions above
Rnd 7: Ch 2, hdc in same st. Hdc in next 5 sts. (2 hdc in next st, 5 hdc in next st) around, join with sl st. (56 hdc)
Rnd 8: Working under the line or ridge on the back of the hdc, sc in each st around. This round creates the seam (described above)
I added 3 rows to the body of the basket for the larger size. (if you need more detailed instructions for beginning and joining each round refer to the details of each round for the smaller basket)
Rnd 9: Hdc round
Rnd 10: Sc round
Rnd 11: Sc round in the back loop only
Rnd 12: Hdc round
Rnd 13: Sc round
Rnd 14: Hdc round
Rnd 15: Sc round
Rnd 16: Sc in the back loop only
Rnd 17: Ch 2, hdc in the next 9 sts, Ch 9, skip 8 sts, hdc in next 20 sts, Ch 9, skip next 8 sts, hdc in next 9 sts. Join with sl st.
Rnd 18: Sc round, working 10 sc under the ch 9 spaces (not into each st). Join and finish off.
Please feel free to leave me a comment or send me an email if you have any questions about the pattern.

by: Liz at 9:54 AM Crochet in colour

Easy CHOCOLATE FONDUE Braai Dessert...

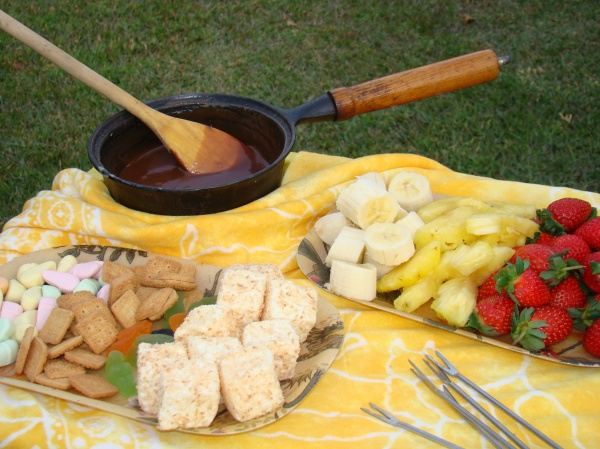
Camp-fire Chocolate Fondue


You will need:
  • 200 gr bar of milk chocolate
  • ½ cup of cream 
How to:
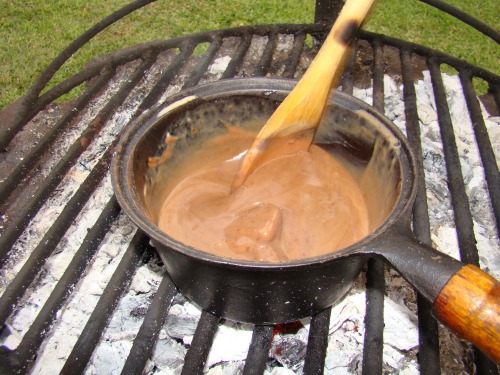
Place a small cast iron pot over hot coals – no flames, you want a gentle steady heat, and pour in the cream
Allow the cream to almost come to the boil – small bubbles will appear around the edges
Add the chocolate a chunk at a time, stirring well with a wooden spoon to blend the melting chocolate into the cream
As each piece melts completely, add the next piece
 
Keep stirring until all the chocolate is melted and the mixture is smooth and glossy
Serve with dipping goodies
What to dip: start with the obvious – strawberries, bananas and marshmallows are all delicious. So are chunks of fresh pineapple, or dried mangoes. Mini biscuits went down a treat, and someone in our crowd wanted jelly babies (and that’s an acquired taste, I feel, not too sure about chocolate covered jelly babies). Let your imagination run free, and try other goodies, anything you fancy which you feel would be good coated in hot chocolate!

What Heaven Is – A Glimpse of Glory

by L.M.Reeves


Heaven is God’s Dwelling Place
Job 22:12-14 “Is not God in the height of heaven? and behold the height of the stars, how high they are! …; and he walketh in the circuit of heaven.”
Psalms 103:19 “The Lord hath prepared his throne in the heavens; and his kingdom ruleth over all.”

Heaven is Where All is Witnessed
Psalms 11:4
“The Lord is in his holy temple, the Lord’s throne is in heaven: his eyes behold, his eyelids try, the children of men.” (1 Peter 1:7 “That the trial of your faith, being much more precious than of gold that perisheth, though it be tried with fire, might be found unto praise and
honour and glory at the appearing of Jesus Christ:”)
Psalms 33:13 “The Lord looketh from heaven; he beholdeth all the sons of men.”
Psalms 102:19 “For he hath looked down from the height of his sanctuary; from heaven did the Lord behold the earth;”
Jeremiah 23:24 “Can any hide himself in secret places that I shall not see him? saith the LORD. Do not I fill heaven and earth?  saith the LORD.”

Heaven is a Place of Protection
Matthew 18:10 “Take heed that ye despise not one of these little ones; for I say unto you, That in heaven their angels do always behold the face of my Father which is in heaven.”

Heaven is a Place of Holiness
Romans 1:18
“For the wrath of God is revealed from heaven against all ungodliness and untrighteousness of men, who hold the truth in unrighteousness.”
Revelation 12:7-9 “And there was war in heaven: … And the great dragon was cast out, that old serpent, called the Devil, and Satan, which deceiveth the whole world: he was cast out into the earth, and his angels were cast out with him.”

Heaven is a Place of Peace
John 14:1-3
“Let not your heart be troubled: ye believe in God, believe also in me. In my Father's house are many mansions: if it were not so, I would have told you. I go to prepare a place for you. And if I go and prepare a place for you, I will come again, and receive you unto myself; that where I am, there ye may be also.”

Heaven is a Place of Rest
Hebrews 4:9
“ There remaineth therefore a rest to the people of God.”
Revelation 14:13b “Yea, saith the Spirit, that they may rest from their labours; and their works do follow them.”
Revelation 22:15 “For without are dogs, and sorcerers, and whoremongers, and murderers, and idolaters, and whosoever loveth and maketh a lie.”

Heaven is Where Prayers Are Answered
Matthew 12:50
“For whosoever shall do the will of my Father which is in heaven, the same is my brother, and sister and mother.” (John 6:40 “And this is the will of him that sent me, that every one which seeth the Son, and believeth on him, may have everlasting life:  and I will raise him up at the last day.”)
Romans 10:9 “That if thou shalt confess with thy mouth the Lord Jesus, and shalt believe in thine heart that God hath raised him from the dead, thou shalt be saved.”
Romans 10:10 “For with the heart man believeth unto righteousness; and with the mouth confession is made unto salvation.”
Psalms 20:6 “Now know I that the Lord saveth his anointed: he will hear him from his holy heaven with the saving strength of his right hand.”

Heaven is the Home of Believers
Hebrews 11:16
“But now they desire a better country, that is, an heavenly: wherefore God is not ashamed to be called their God: for he hath prepared for them a city.”
Luke 16: 2 “And it came to pass, that the beggar died, and was carried by the angels into Abraham's bosom: the rich man also died, and was buried;”
Ephesians 5:5 “For this ye know, that no whoremonger, nor unclean person, nor covetous man, who is an idolater, hath any inheritance in the kingdom of Christ and of God.”
2 Peter 3:13 “Nevertheless we, according to his promise, look for new heavens and a new earth, wherein dwelleth righteousness.”

Heaven is a Place of Blessing, Purity, Plenty, Glory & Light – its Paradise!
Revelation 21:1-4
“And I saw a new heaven and a new earth: for the first heaven and the first earth were passed away; and there was no more sea. 2) And I John saw the holy city, a new Jerusalem, coming down from God out of heaven, prepared as a bride adorned for her husband. 3) And I heard a great voice out of heaven saying, Behold, the tabernacle of God is with men, and he will dwell with them, and they shall be his people, and God himself shall be with them, and be their God. 4) And God shall wipe away all tears from their eyes; and there shall be no more death, neither sorrow, nor crying, neither shall there be any more pain:
for the former things are passed away. 5) And he that sat upon the throne said, Behold, I make all things new.  And he said unto me, Write: for these words are true and faithful.”
Revelation 21:22-27 “And I saw no temple therein: for the Lord God Almighty and the Lamb are the temple of it. 23) And the city had no need of the sun, neither of the moon, to shine in it: for the glory of God did lighten it, and the Lamb is the light thereof.  24) And the nations of them which are saved shall walk in the light of it: and the kings of the earth do bring their glory and
into it. 25) And the gates of it shall not be shut at all by day: for there shall be no night there. 26) And they shall bring the glory and honour of the nations into it. 27) And there shall in no wise enter into it any thing that defileth, neither whatsoever worketh abomination, or maketh a lie: but they which are written in the Lamb's book of life.”

Heaven is:
  • Where God lives and rules
  • Where all is seen by God
  • A place of protection
  • A place of complete holiness
  • A place of peace for believers
  • A place of rest for believers
  • Where God hears and answers prayers
  • Our future home (if we are among the saved) 
  • Paradise!

Revelation 2:7
“He that hath an ear, let him hear what the Spirit saith unto the churches;
To him that overcometh will I give to eat of the tree of life, which is in the midst of the paradise of God.”

Friday 26 April 2013

Step-by-step 8 Minute Microwave Apple Pie...


This Recipe Makes Four Servings.

Step 1: Preperation


Here are the ingredients you need:
  • 3 good sized apples
  • 2/3 cup of packed brown sugar
  • 2/3 cup of oats (whole or regular)
  • 1/2 cup of bisquick mix
  • 3 tablespoons of soft butter
  • 3/4 teaspoons of ground cinnamon
  • 3/4 teaspoons of nutmeg....

Tools:
  • 1 fruit peeler
  • 1 8 in. pyrex (or other microwave safe) dish
  • 1 wooden spoon
  • 1 apple slicer
  • 1 bowl
Step 2: The Hard Part:
    
    
Show All 8 Images
This is definitely the hardest part of the cooking process...
Peeling the skins off the apples...

First, start by washing all of the apples in cold water.

Then, grab your fruit peeler, and start peeling from one side until you've gone all the way around the apple.

Now that you have finished peeling the apples, get the apple slicer and place it in the middle of the apple, as in picture 5.

Next, with a little aggressive force push down with two hands to slice the entire apple, as in picture 6.

Finally, place your sliced apples in the pyrex dish, picture 7.

Step 3: Mixing
  
After you have finished the last step, it's time to mix all of your remaining ingredients into your bowl.

Remember to mix these ingredients:
  • 2/3 cup of packed brown sugar
  • 2/3 cup of oats (whole or regular)
  • 1/2 cup of bisquick mix
  • 3 tablespoons of soft butter
  • 3/4 teaspoons of ground cinnamon
  • 3/4 teaspoons of nutmeg
  • To soften my butter, I put it in the microwave for about 12 seconds.
TIP:  Use your wooden spoon to mix ingredients quicker. 
Step 4: The Final Stretch...
    
Next, you will need to pour the contents of your mixing bowl onto the apples, see picture 1.

Then, place the pirex dish into the microwave for about 8-9 minutes.

After, the pie is done, take it out of the microwave and let it cool off for about two minutes, see picture 2.

Then, it's ready to serve...

I normally serve in a small bowl with ice cream. (see picture 3)
Step 5: Extra Step, Bisquick Alternative..
This is a step for people you can't get their hands on bisquick.

To make your own bisquick, mix the following ingredients until crumbly:
  • 2 3/4 cups sifted flour
  • 1/2 teaspoon baking soda
  • 1/2 tablespoons baking powder
  • 1/2 cup vegetable shortening
  • This makes 3 cups...
recipe courtesy of bettycrocker.com 

A Pom Pom Knit Baby Jacket...

By: Bernat

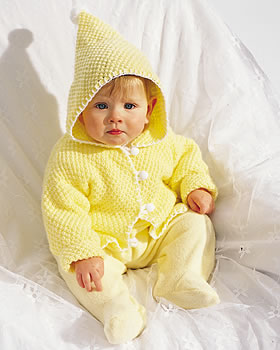
This free baby jacket knitting pattern from Bernat Yarns finishes off with a sweet pom-pom on top and a button closure. This adorable jacket will keep baby warm through the winter. The baby sweater knitting pattern works for babies up to 18 months.


Materials:
Yarn:
Bernat Softee Baby (120g/4.25 oz) Main Color (MC) : 1 (2-2) ball(s), Contrast A: 1 ball
Knitting Needles: Size 4 mm (U.S. 6) or size needed to obtain gauge.
3 (4-4) buttons.
Gauge: 22 sts and 30 rows = 4 ins 10 cm in stocking st.
Sizes:
To fit chest

6 mos 16 ins 40.5 cm
12 mos 18 ins 45.5 cm
18 mos 20 ins 51 cm
Finished chest
6 mos 18 ins 45.5 cm
12 mos 20½ ins 52 cm
18 mos 22½ ins 57 cm

Instructions:
The instructions are written for smallest size. If changes are necessary for larger sizes the instructions will be written thus ( ).
Note: 1st row of pat is RS for Boy or WS for Girl.

BACK:  With MC cast on 53 (61-67) sts.
1st row: K1. P1. K1. Rep from to end of row.
2nd row: P1. K1. P1. Rep from to end of row.
3rd row: P1. K1. P1. Rep from to end of row.
4th row: K1. P1. K1. Rep from to end of row.
These 4 rows form moss st pat.
Cont in moss st pat until Back from beg measures 9½ (10½-12) ins 24 (26.5-30.5) cm, ending with RS facing for next row.

Shoulder shaping: Keeping cont of pat, cast off 6 (7-7) sts beg next 4 rows, then 5 (6-8) sts beg following 2 rows. Cast off rem 19 (21-23) sts.

Left Front for Boy or Right Front for Girl: With MC cast on 25 (29-33) sts and proceed in moss st pat as given for Back until 11 (11-13) rows less than Back have been worked before beg of shoulder shaping, thus ending with WS facing for next row.

Shape neck: Next row: Cast off 3 (4-5) sts. Pat to end of row.
Keeping cont of pat, dec 1 st at neck edge on next 3 rows, then on following 2 (2-3) alt rows. 17 (20-22) sts.
Work 3 rows even, thus ending with RS facing for next row.

Shoulder shaping:
Cast off 6 (7-7) sts beg next and following alt row.
Work 1 row even. Cast off rem 5 (6-8) sts.

Right Front for Boy or Left Front for Girl: With MC cast on 31 (35-39) sts and proceed in moss st pat as given for Back until 12 (12-14) rows less than Back have been worked before beg of shoulder shaping, thus ending with RS facing for next row.

Shape neck: Next row: Cast off 9 (10-11) sts. Pat to end of row.
Work 1 row even in pat.
Keeping cont of pat, dec 1 st at neck edge on next 3 rows, then on following 2 (2-3) alt rows. 17 (20-22) sts.
Work 3 rows even, thus ending with WS facing for next row.

Shoulder shaping:
Cast off 6 (7-7) sts beg next and following alt row.
Work 1 row even. Cast off rem 5 (6-8) sts.

SLEEVES:
With MC cast on 31 (33-35) sts and proceed in moss st pat as given for Back, inc 1 st each end of needle on 5th and every following 2nd (4th-4th) row to 35 (47-43) sts, then every following 4th (6th-6th) row until there are 49 (53-57) sts, taking inc sts into moss st pat.
Cont even in pat until sleeve from beg measures 5¼ (6½-7½) ins 13 (16.5-19) cm ending with RS facing for next row. Cast off.

HOOD:
With MC cast on 95 (103-111) sts and work 8 rows in moss st pat as given for Back.
Keeping cont of pat, dec 1 st at each end of needle on next 10 rows. 75 (83-91) sts.
Cont even in pat until Hood from beg measures 5 (5½-6) ins 12.5 (14-15) cm ending with RS facing for next row. Place marker at each end of last row.
Cast off 4 sts beg every row until 3 sts rem. Cast off.

FINISHING:
Sew shoulder seams. Place markers on Front and Back side edges 4¼ (4¾-5¼) ins 11 (12-13) cm down from shoulder seams. Sew in sleeves between markers. Sew side and sleeve seams. Fold hood in half and sew cast off edges from markers. Sew hood in position around neck edge beg at the edge of the Left Front for Boy or Right Front for Girl and ending 6 sts from Right Front edge for boy or Left Front edge for Girl. With A, work blanket st around sleeve, bottom, front and hood edges as illustrated.

Buttonloops Make 3 (4-4):
With A cast on 14 sts. Cast off knitways. Sew buttonloops to inside edge of Left Front for Boy or Right Front for Girl having bottom button 4 ins 10 cm up from bottom edge and top button at beg of neck shaping and rem button(s) evenly spaced. Sew on buttons 9 sts in from opposite edge to correspond to buttonloops.

The Death of Pretty...

by Pat Archbold 

This post is intended as a lament of sorts, a lament for something in the culture that is dying and may never been seen again.

Pretty, pretty is dying.

People will define pretty differently. For the purposes of this piece, I define pretty as a mutually enriching balanced combination of beauty and projected innocence.

Once upon a time, women wanted to project an innocence. I am not idealizing another age and I have no illusions about the virtues of our grandparents, concupiscence being what it is. But some things were different in the back then. First and foremost, many beautiful women, whatever the state of their souls, still wished to project a public innocence and virtue. And that combination of beauty and innocence is what I define as pretty.

By nature, generally when men see this combination in women it brings out their better qualities, their best in fact. That special combination of beauty and innocence, the pretty inspires men to protect and defend it.

Young women today do not seem to aspire to pretty, they prefer to be regarded as hot. Hotness is something altogether different. When women want to be hot instead of pretty, they must view themselves in a certain way and consequently men view them differently as well.

As I said, pretty inspires men’s nobler instincts to protect and defend. Pretty is cherished. Hotness, on the other hand, is a commodity. Its value is temporary and must be used. It is a consumable.

Nowhere is this pretty deficit more obvious than in our “stars,” the people we elevate as the “ideal.” The stars of the fifties surely suffered from the same sin as do stars of today. Stars of the fifties weren’t ideal but they pursued a public ideal different from today.

The merits of hotness over pretty is easy enough to understand, they made an entire musical about it. Who can forget how pretty Olivia Newton John was at the beginning of Grease. Beautiful and innocent. But her desire to be desired leads her to throw away all that is valuable in herself in the vain hopes of getting the attention of a boy. In the process, she destroys her innocence and thus destroys the pretty. What we are left with is hotness.

Hotness is a consumable. A consumable that consumes as it is consumed but brings no warmth.

Most girls don’t want to be pretty anymore even if they understand what it is. It is ironic that 40 years of women’s liberation has succeeded only in turning women into a commodity. Something to be used up and thrown out.

Of course men play a role in this as well, but women should know better and they once did. Once upon a time you would hear girls talk about kind of women men date and the kind they marry. You don’t hear things like that anymore.

But here is the real truth. Most men prefer pretty over hot. Even back in 6th grade I hated the “hot” Olivia Newton John and felt sorry for her that she had to debase herself in such a way. Still do.

Our problem is that society doesn’t value innocence anymore, real or imagined. Nobody aspires to innocence anymore. Nobody wants to be thought of as innocent, the good girl. They want to be hot, not pretty.

I still hope that pretty comes back, although I think it not likely any time soon. For every Taylor Swift, there are a hundred Megan Foxs, or Lindsay Lohans, or Miley Cyruses etc.

Girls, please, bring back the pretty.

Lunch with God...

A little boy wanted to meet God. He knew it was a long trip to where God lived, so he packed his suitcase with Twinkies and a six-pack of Root Beer and he started his journey.

When he had gone about three blocks, he met an elderly man. The man was sitting in the park just feeding some pigeons. 

The boy sat down next to him and opened his suitcase. He was about to take a drink from his root beer when he noticed that the man looked hungry, so he offered him a Twinkie.

The man gratefully accepted it and smiled at boy. His smile was so pleasant that the boy wanted to see it again, so he offered him a root beer.

Again, the man smiled at him. The boy was delighted! They sat there all afternoon eating and smiling, but they never said a word.

As it grew dark, the boy realized how tired he was and he got up to leave, but before he had gone more than a few steps, he turned around, ran back to the man, and gave him a hug. The man gave him his biggest smile ever.

When the boy opened the door to his own house a short time later, his mother was surprised by the look of joy on his face. She asked him, "What did you do today that made you so happy?

"He replied, "I had lunch with God." But before his mother could respond, he added, "You know what? God's got the most beautiful smile I've ever seen!"

Meanwhile, the elderly man, also radiant with joy, returned to his home. His son was stunned by the look of peace on his face and he asked," Dad, what did you do today that made you so happy?"

He replied, "I ate Twinkies in the park with God." However, before his son responded, he added," 

You know, he's much younger than I expected."

Too often we underestimate the power of a touch, a smile, a kind word, a listening ear, an honest compliment, or the smallest act of caring, all of which have the potential to turn a life around. 

People come into our lives for a reason, a season, or a lifetime. Embrace all equally!
~author unknown~


And so we know and rely on the love God has for us.
God is love.
Whoever lives in love lives in God, and God in him.
1 John 4:16 NIV

Thursday 25 April 2013

Cable and Blocks Baby Sweater and Hat

By: Patons


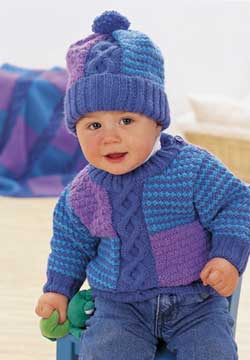
Knit colour blocks with different texture and a chunky cable column combine in this baby sweater and hat set. Use this unique baby knitting pattern from Patons for 
any little boy age 6-24 months.

Materials:
  • Yarn: Patons Astra (50 g/1.75 oz)
  • PULLOVER Size 6 12 18 24 mos
  • Main color (MC) (Blue) 2 2 2 3 balls
  • Contrast A (Puirple) 1 1 2 2 balls
  • Contrast B (Aqua) 1 1 2 2 balls
  • TOQUE Size 6-12 18-24 mos
  • Main color (MC) (Blue) 1 1 ball
  • Contrast A (Purple) 1 1 ball
  • Contrast B (Aqua) 1 1 ball
  • Knitting Needles: Sizes 3.75 mm (U.S. 5) and 4 mm (U.S. 6) knitting needles or size needed to obtain tension
  • One cable needle
  • 2 buttons for Pullover
Sizes:  Chest measurement
6 mos 16ins [41 cm]
12 mos 18ins [45 cm]
18 mos 20ins [51 cm]
24 mos 22ins [56 cm]
Finished chest
6 mos 20ins [51 cm]
12 mos 22ins [56 cm]
18 mos 25ins [63.5 cm]
24 mos 28ins [71 cm]

Gauge: 22 sts and 30 rows = 4 ins [10 cm] with larger needles in stocking st.

Abbreviations:
C6B = slip next 3 sts onto a cable needle and leave at back of work. K3, then K3 from cable needle.
Cr5B = slip next 2 sts onto a cable needle and leave at back of work. K3, then P2 from cable needle.
Cr5F = slip next 3 sts onto a cable needle and leave at front of work. P2, then K3 from cable needle.
MK = P2tog without slipping sts off needle, then K2tog over same sts.

Instructions:
The instructions are written for smallest size. If changes are necessary for larger sizes the instructions will be written thus ( ).

Note: When working separate sections of colors, wind small balls of the colors to be used, one for each area of colour in the design.
Start new colors as indicated in instructions. To change colors, twist the two colors around each other where they meet, on WS, to avoid a hole.

Panel Pat (worked over 18 sts)
1st row: (RS). P6. C6B. P6.
2nd and alt rows: Knit all knit sts and purl all purl sts as they appear.
3rd row: P4. Cr5B. Cr5F. P4.
5th row: P2. Cr5B. P4. Cr5F. P2.
7th row: P2. K3. P8. K3. P2.
9th row: P2. Cr5F. P4. Cr5B. P2.
11th row: P4. Cr5F. Cr5B. P4.
12th row: As 2nd row.
These 12 rows form panel pat.

BACK:
**With MC and smaller needles cast on 58 (66-74-82) sts.
1st row: (RS). K2. *P2. K2. Rep from * to end of row.
2nd row: P2. *K2. P2. Rep from * to end of row.
Rep these 2 rows (K2. P2) ribbing for 1½ ins [4 cm] ending on a 2nd row and inc 2 sts evenly across last row. 60 (68-76-84) sts.
Change to larger needles and proceed in pat as follows: 1st row: (RS). With A, K21 (25-29-33). With MC, work 1st row panel pat. Knit to end of row.
2nd row: With MC, P1. (MK) 10 (12-14-16) times. Work 2nd row panel pat. With A, purl to end of row.
3rd row: With A, P0 (0-2-0). K3 (1-3-3). (P3. K3) 3 (4-4-5) times. With MC, work 3rd row panel pat. With B, knit to end of row.
4th row: With B, (MK) 10 (12-14-16) times. P1. With MC, work 4th row panel pat. With A, (P3. K3) 3 (4-4-5) times. P3 (1-3-3). K0 (0-2-0).
5th row: With A, P0 (0-2-0). K3 (1-3-3). (P3. K3) 3 (4-4-5) times. With MC, work 5th row panel pat. Knit to end of row.
6th row: With MC, P1. (MK) 10 (12-14-16) times. Work 6th row panel pat. With A, purl to end of row.
7th row: With A, K0 (0-2-0). P3 (1-3-3). (K3. P3) 3 (4-4-5) times. With MC, work 7th row panel pat. With B, knit to end of row.
8th row: With B, (MK) 10 (12-14-16) times. P1. With MC, work 8th row panel pat. With A, (K3. P3) 3 (4-4-5) times. K3 (1-3-3). P0 (0-2-0).
9th row: With A, K0 (0-2-0). P3 (1-3-3). (K3. P3) 3 (4-4-5) times.
With MC, work 9th row panel pat.
Knit to end of row.
10th row: With MC, P1. (MK) 10 (12-14-16) times. Work 10th row panel pat. With A, purl to end of row.
Rows 3 to 10 form side pats. Panel pat is now in position.
Work a further 24 (32-36-44) rows pat, thus ending with RS facing for next row.

Proceed as follows:
1st row:
With MC, K21 (25-29-33). Work appropriate row panel pat. With A, knit to end of row.
2nd row: With A, P21 (25-29-33). With MC, work appropriate row panel pat. (MK) 10 (12-14-16) times. P1.
3rd row:With B, K21 (25-29-33). With MC, work appropriate row panel pat. With A, (K3. P3) 3 (4-4-5) times. K3 (1-3-3). P0 (0-2-0).
4th row: With A, K0 (0-2-0). P3 (1-3-3). (K3. P3) 3 (4-4-5) times.
With MC, work appropriate row panel pat. With B, P1. (MK) 10 (12-14-16) times.
Side pats are now in position.
Shape armholes: Keeping cont of pat, cast off 5 (8-9-10) sts beg next 2 rows. 50 (52-58-64) sts.**
Cont even in pat until armhole measures 4½ (5-5½-6) ins [11.5 (12.5-14-15) cm] ending with RS facing for next row.
Shoulder shaping: Cast off 8 (8-10-12) sts beg next 2 rows.
Leave rem 34 (36-38-40) sts on a st holder.

FRONT:
Work from ** to ** as given for Back.
Cont even in pat until armhole measures 2¾ (3¼-3½-3¾) ins [7 (8.5-9-9.5) cm] ending with RS facing for next row.
Neck shaping: Next row: Pat across 14 (14-17-20) sts (neck edge). Turn. Leave rem sts on a spare needle.
Dec 1 st at neck edge on next 4 rows, then on following alt rows until there are 8 (8-10-12) sts.
Cont even in pat until armhole measures same length as Back to shoulder ending with RS facing for next row. Cast off.
With RS of work facing slip next 22 (24-24-24) sts from spare needle onto a st holder. Join yarn to rem sts and pat to end of row.
Dec 1 st at neck edge on next 4 rows, then on following alt rows until there are 8 (8-10-12) sts.
Cont even in pat until armhole measures same length as Back to shoulder ending with RS facing for next row. Cast off.
Sleeves
With MC and smaller needles cast on 34 (38-38-42) sts. Work 1½ ins [4 cm] in (K2. P2) ribbing as given for Back ending on a 2nd row and inc 5 (7-7-7) sts evenly across last row. 39 (45-45-49) sts.
Change to larger needles and proceed in pat as follows:
1st row:
(RS). With MC, knit.
2nd row: With MC, P1. *MK. Rep from * to end of row.
3rd row: With B, knit.
4th row: With B, *MK. Rep from * to last st. P1. These 4 rows form pat.
Cont in pat inc 1 st each end of needle on next and following 6th (6th-4th-4th) rows to 47 (53-53-55) sts, taking inc sts into pat.

Sizes 18 mos and 2 yrs only:

Inc 1 st each end of needle on following 6th rows to (59-63) sts.

All sizes: Cont even in pat until Sleeve from beg measures 5½ (6-7-8) ins [14 (15-18-20.5) cm] ending with RS facing for next row. Place a marker at each end of last row.
Work a further 6 (10-10-12) rows in pat. Cast off.

FINISHING
Pin garment pieces to measurements. Cover with a damp cloth leaving to dry. Sew shoulder seams.
Neckband: Sew right shoulder seam. With RS of work facing, MC and smaller needles, pick up and knit 12 (12-13-16) sts down left front neck edge. Knit across 22 (24-24-24) sts from front st holder dec 4 sts evenly across. Pick up and knit 12 (12-13-16) sts up right front neck edge. Knit across 34 (36-38-40) sts from back st holder dec 6 sts evenly across. 70 (74-78-86) sts.
Beg and ending on a 2nd row, work 1¼ ins [3 cm] in (K2. P2) ribbing as given for Back. Cast off in ribbing.
Sew left shoulder and neckband seam leaving a 2 ins [5 cm] opening from neck edge.
Shoulder Edging: With RS of work facing, MC and smaller needles, pick up and knit 21 sts evenly along shoulder opening of Front and Back. Cast off knitways (WS).
Make 2 button loops on Front shoulder edge having first loop ½ inch [1 cm] in from neck edge and rem loop 1¼ ins [3 cm] in from first loop. Sew buttons of Back shoulder edge to correspond to loops.
Sew in sleeves placing rows above markers along cast off sts at armholes to form square armholes. Sew side and sleeve seams.

TOQUE

With MC and smaller needles cast on 98 (106) sts and work 3 ins [8 cm] in (K2. P2) ribbing as given for Back of Pullover ending on a 2nd row and inc 6 (10) sts evenly across last row. 104 (116) sts.
Change to larger needles and proceed in pat as follows:
1st row:
(RS). With MC, P1. Work 1st row panel pat. With A, K33 (39). With MC, work 1st row panel pat. Knit to end of row.
2nd row: With MC, P2. (MK) 16 (19) times. Work 2nd row panel pat. With A, P33 (39). With MC, work 2nd row panel pat. K1.
3rd row: With MC, P1. Work 3rd row panel pat. With A, P3. (K3. P3) 5 (6) times. With MC, work 3rd row panel pat. With B, knit to end of row.
4th row: With B, P1. (MK) 16 (19) times. P1. With MC, work 4th row panel pat. With A, (K3. P3) 5 (6) times. K3. With MC, work 4th row panel pat. K1.
5th row: With MC, P1. Work 5th row panel pat. With A, P3. (K3. P3) 5 (6) times. With MC, work 5th row panel pat. Knit to end of row.
6th row: With MC, P2. (MK) 16 (19) times. Work 6th row panel pat. With A, P33 (39). With MC, work 6th row panel pat. K1.
7th row: With MC, P1. Work 7th row panel pat. With A, K3. (P3. K3) 5 (6) times. With MC, work 7th row panel pat. With B, knit to end of row.
8th row: With B, P1. (MK) 16 (19) times. P1. With MC, work 8th row panel pat. With A, (P3. K3) 5 (6) times. P3. With MC, work 8th row panel pat. K1.
9th row: With MC, P1. Work 9th row panel pat. With A, K3. (P3. K3) 5 (6) times. With MC, work 9th row panel pat. Knit to end of row.
10th row: With MC, P2. (MK) 16 (19) times. Work 10th row panel pat. With A, P33 (39). With MC, work 10th row panel pat. K1.
Rows 3 to 10 form side pat.
Panel pats are now in position.
Cont in pat until work from beg measures 8½ (9) ins [21.5 (23) cm] ending with RS facing for next row.
Next row: With MC, P1. (K2tog) 9 times. Pat across 33 (39) sts. With MC, (K2tog) 9 times. Pat to end of row. 86 (98) sts.
Next row: P2. (P2tog) 16 (19) times. With MC, P9. With A, (P2tog) 16 (19) times. P1. With MC, P10. 54 (60) sts. Break yarn leaving a long end. Draw end through rem sts and fasten securely. Sew centre back seam, reversing seam for cuff turn back.

Make pom-pom: Wind MC around 3 fingers approx 70 times.
Remove from fingers and tie tightly in centre. Cut through each side of loops. Trim to a smooth round shape. Sew to top of Toque.

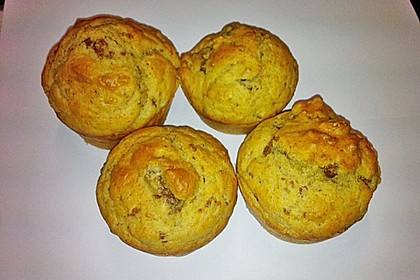
Corned Beef Muffins

by: Chefkoch.De


Ingredients:
  • 1 tin / s Corned beef (about 400 g) 
  • 250 g Flour 
  • 125 g Flour (whole wheat) 
  • 3 tsp Baking powder 
  • 1 / 2 tsp Bicarbonate of soda 
  • 3 Eggs 
  • 1 tsp Mustard 
  • 380 ml Milk 
  • 75 ml Oil 

Preparation:
  1. Preheat oven to 190 ° C and grease muffin tin well. 
  2. Cut corned beef into small cubes. Combine flour, baking powder and baking soda in a bowl.
  3. In another bowl, whisk together egg, mustard, milk and oil. 
  4. Add Flour mixture and corned beef and mix everything together. 
  5. Pour batter into the muffin cups, will fill about 20.
  6. Bake for 25 minutes.      

Jelly Boats...great for kids parties!


These cute little jelly boats are set in oranges halves and are great for kids parties.


Ingredients:

  • 4 oranges
  • 2 packets blue jelly
  • 1 packet red jelly
  • 1 packet green jelly

Method:
  1. Slice the oranges in half and scoop out the flesh.
  2. Make up the jelly as per the packet directions.
  3. Use the 2 quantities of blue jelly to make the sea, pour into a clear rectangular container and refrigerate.
  4. Place the orange halves into a muffin tin and fill half with the green and half with the red jelly mixture. Refrigerate until set.
  5. Make paper sales with rectangles of heavyweight paper and stick them on toothpicks to form a mast. When the jelly has set, slice oranges in half again to make quarters and place the paper sails into each quarter. Place boats on the blue sea and serve to a delighted crowd.

Solution For Keeping Little Ones In Bed {so you can have your quiet time}


Lately, I have seen a lot of status updates on Facebook from parents that mention their small children – toddlers and preschoolers – waking up WAY too early in the morning. And I know that when the children wake before mommy wakes – a quiet time is sure to not happen.Children need our full attention so having our eyes on the Bible is not best when our eyes need to be watching them!

I know there are mothers desperate to get their quiet time in, in the morning. So this post is for you! I have two solutions –

Number 1:
  • My sisters taught me a trick that they both used. I tried their trick and it worked!! Cover the last two numbers of the clock with a piece of paper. Then write on the paper the hour that you would like your child to come out of their room in the morning. In our home, it has always been 7. Then teach your child to match the two numbers! When the two numbers match they can come out of their room. At bedtime, I would show them how the 7′s were matching (they usually went to bed around 7:30pm) and I’d remind them to not come out of their room until there was a matching 7.
  • I’d lay books beside their bed and they had permission to get up and read or play quietly in their rooms – just not come out until there was a matching 7. Sometimes there were rewards for obeying. If they mistakenly came out, I gently took them back to the room – showed them that the numbers were not matching and encouraged them to read and play until they saw matching numbers. This took time and training to get them to this point – but once they got it, it was so worth the training time! This is still the “rule” in our home to this day.  (If you have tried other solutions to no avail AND you have tried #1 – go to solution #2!)
Number 2:
  • Do not try to have a morning quiet time alone…oh I know it’s painful to not have that time that you dream of having – but some seasons of life do not permit this possibility. Either you have to get up very very very early (which may make you sleep deprived and not such a nice mommy or wife) – OR simply give yourself grace during this season of life. Read the Bible with your children during breakfast or lunch or wait until after they are down for afternoon naps or bedtime, and then spend quality time with Lord.
  • Please remember, this season of life is NOT forever. Add ten years to your children’s lives. If you have a 1, 3 and 5 year old in ten years they will be 10, 13, and 15. You will not be bathing them, cutting up their food, and dressing them forever. In ten years, the opposite will be happening. Perhaps they will be preparing the food for you and doing the laundry to help you!
So persevere during this season of life. Remember Philippians 3:14“I press on toward the goal to win the prize for which God has called me heavenward in Christ Jesus.”
Press on sweet sisters and mommies! Strain toward the prize. We are not home to heaven yet. These days may be hard – but we have great hope in knowing that one day all the pain and trials we face will be over and we will step onto the shores of heaven!!! Oh what a glorious day it will be!!!

Walk with the King!

You are made of stardust

by:  Heavenletter

God said:
How can I not be pleased with you? I see well.
It is you who is not pleased with yourself.
It is you who finds fault, not I.
If you did not find fault, you would not make fault.
Let go of fault, and you will be more of what you are.
Oh, the glance of fault — let it go! The superiority of fault. No less superior is the fault you find in yourself — let it go! Enough faultfinding! It leads you nowhere.
Be a joy-finder. Be pleased. Be pleased.
Laugh at yourself a lot.
But do not mock yourself.
Make yourself true.
Remember Whose child you are. You are not a child of mockery. You are a child of sweetness.
Do not look so much outside yourself for knowledge. Knowledge is within you, for I am within you, and I am the Father of Knowledge.
Do not look so much to your performance to evaluate yourself or others' performance to evaluate them. Performance is not always true.
Your performance is not always you. Your performance is not you. You are you. Performance is something glommed outside of you. Actions can please or displease, but action is not the story. There is much pretending.
Do not evaluate. Look to Me. That is where to look. That is all you need do. Look to Me, and you will not chase hither and yon so much. Do not chase rainbows, and you will find them right outside your window. They are already there.
There is a rainbow from Heaven that reaches you on Earth. Surely you will admit that there is light, and there is light within you. Light has not gone out of you. You just have ignored it. You thought light was somewhere else.
You are My light for all to see. Just shine My light. Blaze it. Do not interpret others so much or the words of others. Listen to My words, and listen to My light that wishes to shine forth from your imposed boundaries.
Do not call your innocence ignorance.
Do not learn God terminology.
Learn God.
Find Me.
Accept Me.
Enjoin Me.
I am not far.
I am close.
I am closer than you know.
I am closer to you than anything else in the world.
Make no mistake about it.
Look for Me to lead you.
Follow Me, not others.
Draw your breaths with Me.
I am your Father, and I bring you Home.
Heaven is your home.
I ask you to come live with Me in Heaven while you are on Earth.
Make earth Heaven.
Be aware of other dimensions of living.
There are many lives that go on around you.
There are worlds around you — the animal world, the plant world, and worlds unnamed that you are not yet aware of.
There are insects unseen, and yet you believe in them. Germs impervious to view you believe in. Illness you believe in. Even future illness you believe in.
But in your yet unseen greatness, you do not believe.
I am well-pleased with you because I know your greatness. I do not predict it. I see it. It is already there. It has yet to be accepted. You have yet to accept it. Your greatness is already in use.
Greatness may be great simpleness.
Perhaps you can already acknowledge your great simpleness.
You thought greatness was something complex, or one great Roman candle going off in the night sky. You thought greatness was something other than you. But you are My sparkler on Earth. Never mind the big blasts in the sky that everyone calls attention to. I call attention to you.
I made you simple, not complex. I made you of stardust. I made you of light. You are light from light. You are the light of light. You are My simplicity on Earth. You are the great occasion of My Being. You are for Me. So be for Me. 
Just be My beautifulness on Earth.