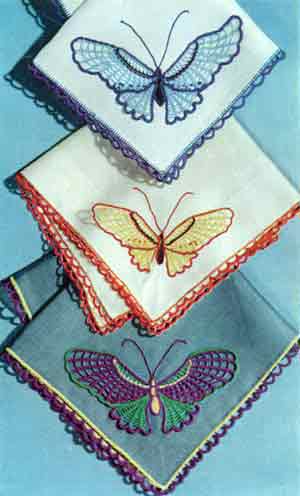
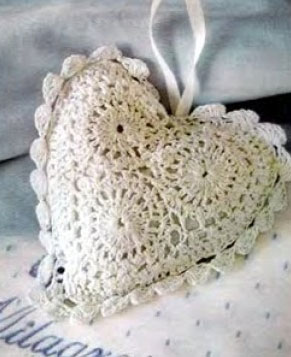
Antjie

Antjie

Wednesday 19 September 2012

Todays Printable Message Card...


Encourage others! Free Christian Pass it Around Cards that you can download and print from your own computer. They print out on a regular 8 x 11.5 inch sheet of paper or card. Each individual card will measure 2 x 3 inches. The verse reads Let us run with Perseverance the race that is set before us Hebrews 12:1
Download or print the PDF page here 

EASY and frugal coffee cake!!

When I first got this recipe, I thought it would be strange to make this cake then refrigerate it and bake the next morning. But it's great. The cake is so moist and delicious. It's wonderful when you have company staying at your house. It makes a great breakfast with a cup of coffee.

 
I love this Overnight (or not) coffee cake recipe!! I have made it so many times. It does not require any expensive ingredients, is easy to assemble and is ALWAYS a hit. I also love it because you can mix it up the night before if you want and then all you have to do is put the topping on and pop it in the oven. If I don't have enough fridge space for a 9*13 pan I will mix up the dry ingredients and the liquid ingredients the night before (storing the liquid in the fridge) and then quickly mixing them together in the morning. It is a flexible recipe and does not require sour cream. Don't get me wrong, I enjoy coffee cake made with sour cream, but the price adds up....

Overnight (or not) Coffee Cake

Ingredients:
Mix together in a large bowl:
  • 2 cups flour
  • 1 cup white sugar
  • 1/2 cup brown sugar
  • 1/2 tsp salt
  • 1/2 tsp baking soda
  • 1 tsp baking powder
  • 2 tsp cinnamon
  • 1/2 tsp cloves
  • 1/2 tsp nutmeg

Stir in:
  • 1 cup sour milk (1 tsp vinegar or lemon juice with the milk)
  • 3/4 cup oil
  • 2 eggs
  • 2 tsp vanilla

Crumb topping:
Cut the following together with a pastry cutter or with two knives until well blended.
  • 2/3 cup flour
  • 1/4 cup butter or margarine
  • 1/2 cup brown sugar
  • 1 tsp cinnamon
Mix and refrigerate overnight in a 9*13 GREASED baking pan. Top with crunch topping in the morning. Bake at 350 for 30-40 minutes until tooth pick in center comes out clean. You can also just bake it right away without refrigeration. If I am going to make it the night before I prepare the crumb topping and just store it separate till morning. ENJOY!!

I made a double batch of this coffee cake ( I have posted the recipe before) this week.... trust me, it is GONE!!! I did share some with some neighbours, but we ate our fair share!!! Sharing home made baked goods is a fabulous way to bless others. I enjoy baking and I know lots of folks that love eating!!

Have a BLESSED day, BE a BLESSING!
by:  Heather

Scalloped Potatoes with Ham ....


A ham slice is cut up and cooked with potatoes. An easy recipe for scalloped potatoes, and more recipes below.
Cook Time: 1 hour, 45 minutes

Ingredients: (Serves 6)
  • 1 pound fully cooked ham slice, 1/2-inch thick 
  • 5 cup thinly sliced potatoes 
  • 1 can (10 1/2 ounces) cream of mushroom soup or cream of celery soup 
  • 1/4 cup milk 
  • 1/2 cup chopped onion 
  • 1/4 cup chopped green bell pepper 
  • dash pepper 
  • 2 tablespoons butter 
  • 1 cup shredded Cheddar cheese, optional 

Preparation:
Cut ham in bite-size cubes. Place half of the potatoes in a greased, shallow, 2-quart baking dish. Cover with ham pieces. Top with remaining potatoes. Combine soup with milk, onion, green bell pepper, and ground black pepper; pour over potatoes. Dot with butter. Cover with foil and bake at 350° for 1 hour. Remove covering; bake 30 to 45 minutes longer, or until potatoes are done. If desired, sprinkle shredded Cheddar cheese over the top of scalloped potatoes the last 15 minutes of baking time.

Do you know the Ten Commandments?


Fill in the blanks for the Ten Commandments. If you need to, you can look them up in your Bible or see page below. I would encourage you to memorize the Ten Commandments. 


1. Thou shalt have no other ________ before me.

2. Thou shalt not make unto thee any graven ________.

3. Thou shalt not take the ______ of the LORD thy God in ______.

4. Remember the ________ day, to keep it holy.

5. _________ thy father and thy mother. 

6. Thou shalt not_______. 

7. Thou shalt not commit _________.

8. Thou shalt not ________. 

9. Thou shalt not bear false witness against thy _________.

10. Thou shalt not ________. 


The Ten Commandments - God's Revelation in the Old Testament

Five truths you SHOULD KNOW ABOUT Jesus Christ


1. JESUS CHRIST LOVES YOU!
“For God so loved the world, that He gave His only begotten Son, that whosoever believeth in Him should not perish but have everlasting life.” (John 3:16)
Millions of people have never heard these words - they do not know that the great God of Heaven - the Creator of man and the universe, loves them. Many sit in pagan darkness, fearful, tormented, sick and lost without hope and without peace; still others have heard the message of God’s love but seemingly it has not penetrated their heart or their minds - their understanding had been clouded and their spiritual eyes blinded.
No more beautiful words were ever spoken by men or angels than these, “I know God loves me!” Praise God. Say these precious words and believe them and you will see what a change will be affected within your life.

2.  JESUS CHRIST KNOWS ALL ABOUT YOU!
“For the eyes of the Lord run to and fro throughout the whole earth, to show himself strong in the behalf of them whose heart is perfect toward him.” (2 Chron. 16:9)
“Tis so sweet to trust in Jesus, just to take Him as His word; Just to rest up on His promise; Just to know, “Thus saith the Lord”.
In every situation of life God knows about you during every trial, heartbreak and is couragement. In the temptations and struggles of life Jesus knows about us and makes a way of escape. 
(1 Cor. 10:13) He knows and He is ready to help - Say it to yourself, “God knows about my existence and loves me - His eyes are upon me and I know everything will be alright”.

3.  JESUS CHRIST CARES ABOUT YOU!
“Casting all your care upon Him, for He careth for you.” (1 Peter 5:7)
Life often seems like a rat race with dog eat dog and whoever gets in first gets what he needs and whoever gets in last misses everything. People can often be hardhearted and cruel - circumstances and situations can make life almost unbearable and many times Satan has filled peoples’ hearts and minds with such tremendous disillusionment and depression that they have in utter hopelessness taken their own lives.
The hymnwriter penned the words, “What a Friend we have in Jesus, All our sins and griefs to bear! What a privilege to carry Everything to God in prayer!” I am thrilled with the great news of God’s love every time I hear it - that He loves me, knows all about me and that He cares about me - my difficulties and my needs. Thank God “He knows and He cares”! Praise God! Say it to yourself - “I know God cares about me and will help me”.

4.  JESUS CHRIST DIES FOR YOU!
“But God commendeth His love toward us, in that, while we were yet sinners, Christ died for us.” (Rom. 5:8)
“Oh love of God so rich and pure, so measureless and strong. It shall forever more endure, the saints and angels song.”
You can give without loving but you cannot love without giving. No wonder the Apostle John wrote, “We love Him because He first loved us”. There is a word that is seldom used in today’s world but one which is probably one of the most powerful in our vocabulary. It is the word “Apodeictic” and it means “Evident beyond contradictions”. It is one of my foremost words because it relates to the gospel and to Christ our wonderful Lord. When you speak about God, His power, His words, His promises, His grace, His goodness and His mercy and love - the word Apodeictic covers them all.
Evident beyond Contradiction! His existence is so real that only a fool could try to contradict the fact. No wonder the Bible says, “The fool hath said in his heart, There is no God”. (Psalm 14:1)
THE LOVE OF GOD IS APODEICTIC - EVIDENT BEYOND CONTRADICTION - CALVARY PROVED THAT!
“For God so loved the world, that He gave His only begotten Son, that whosoever believeth in Him should not perish but have everlasting life.” (John 3:16)
“A rugged cross, became His throne. His kingdom was in hearts alone. He wrote His love in crimson red, And wore the thorns upon His head.” Praise God. What a wonderful Saviour. He died that we might live - that is real love and no one can dispute it!
He died for me and He died for you - Say it to yourself, “Jesus Christ actually died for me in order to save me”.

5.  JESUS CHRIST ROSE FROM THE DEAD AND WILL HELP YOU TODAY!
A dead man has no power to help anyone - He cannot even help himself! That is why so many traditional churches and nominal Christians receive no answers to their prayers and have no victory in their lives. They believe in and worship a dead Christ. They wear crucifixes that have a resemblance of Christ, dead on the cross. Beloved friends, the cross is empty - Jesus Christ is alive for evermore with all power at His disposal.
He has the power to set His children free from every bondage and situation in which we find ourselves that is embarrassing, improper, humiliating and painful.
“Lo behold the man of sorrow, lo behold Him in plain view. There He stands that mighty conqueror, since He rent the veil in two.”
“I serve a risen Saviour, He’s in the world today; I know that He is living, whatever men may say; I see His hand of mercy, I hear His voice of cheer and just the time I need Him, He’s always near. He lives, He lives, Christ Jesus lives today. He walks with me and talks with me, along life’s narrow way. You ask me how I know He lives, He lives within my heart.” Hallelujah!
The very essence of Christianity, the heart of the gospel and the foundation truth of the church is that Jesus Christ, God’s Son died upon a cross for our sins and that He was raised from the dead on the third day for our Justification! (1 Cor. 15:1-4)
Of all religions only Christianity can boast a resurrection and only Christ is a Saviour, for He only is Alive Forevermore. Praise His Name!

Tuesday 18 September 2012

Betsy McCall Paperdol!!!


Click here for...
High-Quality Print

Today's FREE Printable Christian Message Card...


Encourage others! Free Christian Pass it Around Cards that you can download and print from your own computer. They print out on a regular 8 x 11.5 inch sheet of paper or card. Each individual card will measure 2 x 3 inches. The verse reads God is only a prayer away.
Download or print the PDF page here <

Chicken Caesar Salad with Parmesan Crisps


Ingredients:
Dressing

  • 2 Cloves Garlic 
  • 4-6 Anchovies 
  • 1/2 t Salt 
  • 1 T Dijon Mustard 
  • Juice of one Lemon 
  • 1/2 C Olive Oil 
  • 1 oz Finely Grated Parmesan Cheese 
Chicken:
  • 1/2 Lb Boneless Chicken Breast 
  • 2 TBSP Dressing 
  • 1 TBSP Olive or Canola Oil 
Parmesan Crisps:
  • 4 TBSP Coarsely Grated Parmesan Cheese 
Salad:
  • 4 C Coarsely Chopped Romaine Lettuce 
  • 3-4 TBSP Dressing 
  • Cooked Chicken Breast, Sliced into bite sized pieces 
  • Parmesan Crisps 
Instructions:
Dressing

In the bowl of a food processor pulse garlic, anchovies and salt until they form a paste. Add mustard and lemon juice and blend. Add oil and blend until mixture has emulsified. Add cheese and blend until mixed in.

Chicken
Pound chicken breast in a gallon size ziplock bag until 1/4 inch thick.
Pour 2 TBSP of dressing into the bag, coat chicken with dressing, seal bag and let marinate for 10 minutes.
Preheat a grill pan with 1 TBSP of Olive or Canola Oil.
Remove chicken from bag and cook 3-4 minutes per side until golden brown and cooked through.
Cut into bite size strips, set aside.

Parmesan Crisps
Preheat oven to 400.
On a nonstick baking sheet or sheet lined with parchment paper, make 4 piles of parmesan cheese in 3 inch circles.
Bake 10 minutes until golden. Let cool 5 minutes.
Gently remove from baking sheet to a piece of parchment or wax paper and let sit until hard enough to handle.

Salad
Toss lettuce with dressing and top with chicken and parmesan crisps.

Beautiful lacy costume for girls in summer .


Size: 2-3 years
Costume linked from 100% cotton. Lightweight knit top is decorated with flowers and lace shorts border. In this dress your fashionistas will not be hot and comfortable.

Knitting costume you will need: 
  • Yarn Soso (100% cotton, 240 m / 50 g) -60 g of white, 50 g of pink, green residues, 
  • hook number 2.
Description of costume and knitting scheme

Top: 

Warning Before knitting pattern do flirt in full size.

Dial chain of temperature. n equal to the circumference of the chest + 3 cm for the free fit, and work even under the scheme 1 to the desired length. Coquette: Attach the thread to the front row and typesetting work even 1 line art. b / n, then work even in Scheme 2. After this, at the front of the yoke vyvyazyvayte follow a pattern, doing subtraction in the early series. Assembly: pink tie thread coquette next one as well. b / n and 1 number of "pico", near the hem -1 "pico". Tie a pink thread on Figure 3 for yoke 1 flower of seven petals to hem - 3 of 6 flower petals. Sew flowers to topu, as shown in the photo. Green thread tie two leaflets on the scheme 4, sew a yoke.

Shorts:
Dial chain of temperature. n equal to the circumference of the waist + 3 cm for a free fit. Lock the chain in the ring and work even exactly art. s / n to the desired length. Divide Loop knitting in 2 parts and work even each leg separately around 9 more rows. Next, perform the delicate outline, this Knit 3 rows of Figure 1. Twist the string and insert it into the hole pattern on the waist line.

Knitting scheme:

Pray For Your Husband...


I must confess that I forget to pray for my husband (more often than not). Oh yes, I think about him, text him throughout the day, and anticipate his return in the evening... but pray? I forget.

What does praying for your husband do for you {the wife}?
1) It keeps your thoughts pure.
2) It keeps your mind and heart positive about him.
3) It keeps you humble.
4) It keeps you safe (there is protection in God's will).
5) It keeps you in communion with your Heavenly Father.
6) It keeps you content.
7) It keeps you watchful for God's blessings in his life.
8) It keeps you eager for answered prayer in his life.
9) It keeps you free from a negative spirit.
10) It keeps your words praise-worthy about him in front of your children.

Do you struggle with remembering to pray for your husband? Try this with me:

At the top of each hour, spend 2 minutes praying for him {specifically}. Do this between the hours of 8 am and 5 pm (give or take depending on your schedule). THAT'S 20 MINUTES A DAY!

8 am (Pray for his walk with the Lord)
9 am (Pray for his purity)
10 am (Pray for his friendships)
11 am (Pray for his witness)
12 am (Pray for his work to be honorable)
1 pm (Pray for him as a father)
2 pm (Pray for his safety)
3 pm (Pray for God to bless him)
4 pm (Pray for God's strength in his life)
5 pm (Pray for his visions and dreams)


Praying Schedule

Monday 17 September 2012

Crochet this beautiful Newborn Set....


Sizes: 56-62 and 68-74
The data for the larger listed in brackets if only one number is given, it applies to both sizes.

You will need: 
  • 250 (300) g of white yarn (100% cotton, 193 m/50 g) 
  • hook № 2,5.
Basic pattern: the number of loops multiple of 8 + 2. Knit for the scheme. It shows only the front rows in the ranks backstitches knit all sts in pattern, yo provyazyvayut Wrong. Unless otherwise noted, to begin with loops before rapport, then repeat loop repeat, after finishing loops repeat. 1 x run from the 1st to the 5th p., Then repeat with the 2nd to the 5th row.

Density knitting 4 rapport n = 32 temperature. n = 8 inlaid edge knobs and 17p. = 10 x 10 cm.

Jacket:
Begin to knit a whole. + The back shelf: to link the chain of 162 (194) for air. section and perform the 2nd paragraph of the hook 1 tbsp. b / n, then knit the basic pattern for the scheme. Run 20 (24) repeat. In 12 (14) cm from the edge of the dial pad made armholes. For the right shelves continue to knit loop 4 (5) repeats. After 19 (23) cm from the left edge of the dial pad to neckline in every 2 p. 4 x 4 in A by 24 (28) cm from the edge of the dial pad to finish the shelf.

Left front: symmetrical finish. Then finish the back. For this medium knit 9 (11) repeats. 24 (28) cm from the edge of the dial pad to finish.

Sleeve: knit top in the direction of the arrow in the diagram. Link in the chain of 82 (90) for air. section and perform the 2nd paragraph of the hook 1 tbsp. b / n, then knit pattern on the main circuit, complete 10 (12) repeats. Simultaneously, to turn down the bevels on both sides, starting at 2 cm from the edge of the dial pad, 4 (6) x 1 st alternately every 4th and 6th p. and 1 x 4 in the 6th p. In 15 (19) cm from the edge of the dial pad to finish.

Assembly: do stitches, Sew sleeve. Tie the edge of the neck, down jacket and vertical edges of the shelves from the inside one circular p. Art. b / n and perform the 1st p. scheme. Unscrew the two cords, each of the 4 strands of length 50 cm and sew the cords to the neckline.

Coif:
Assign a chain of 34 temperature. section and perform the 2nd paragraph of the hook 1 tbsp. b / n, then knit the basic pattern for the scheme. At 11 cm from the edge of the dial pad to add on both sides 1 x 4 1/2 repeat, that is, the temperature 36. § Worked on 13 repeats. After 21 cm from the edge of the dial pad to finish. Run rear side seams cap. The lower edge of cap tie as the edges of the jacket. Run 2 cord for both the jacket and sew cap.

Shoes:
For the bottom part of the chain link 13 temperature. section and perform the 2nd paragraph of the hook 1 tbsp. b / n. 1st circular p.: In the next 10 temperature. n run for 1 st. b / n, in the next st 3 tbsp. b / n the other hand the chain link 10 st. b / n, 2 tbsp. b / n in the next st, finish circular p. Comm. Art. N = 26

Mark for the additions to 3 external st each side. From 2 to 7 and the circular p.: Art. b / n, to perform the addition of rounding as follows: in the 2nd circular p. 3 double marked loops in the 3rd circle, p. double the 1st, 3rd, 4th and 6th loop. In the 4th circle, p. double 3rd and 8th paragraph in the 5th circle, p. double the 1st, 5th, 8th and 12th paragraph in the 6th circle, p. double the 4th, 7th, 10th and 13th paragraph in the 7th circle, p. double 3rd, 8th, 13th and 18th n = 68 n then all loops run 1 and p. scheme. 9th circular p.: Run Comm. Art. in Art. b / n the 8th round r., with 14 x miss every 4 n = 53 n Beginning in the 10th round r., knit semistable. with trebles. From the 11th round r. average mark 9 § front and perform further subtraction, provyazyvaya on both sides of the loop labeled 1 x 2 sts together.

11th and circular p.: subtract loops on both sides of the middle section 9 of the 12th circular p.: dec loops on both sides of the average 7 sts 13th circular p.: subtract the loop on both sides of the average 6 § 14th circular p.: subtract loops on both sides of the middle section 5 of the 15th circular p. : turn down the loop on both sides of the middle 3 sts 16th circular p.: knit middle section 9 of Art. b / n and then leave these loops. The remaining 33 para knit direct and inverse series for the top of the shoe. Openings for cable run 1 p. as follows: * 1 semistable. snakidom, 1 temperature. sts, skip 1 st of the previous row, repeat from *. From the 17th to the 20th p.: Semistable. snakidom. 21 and p.: Tie edge shoe 1 p. knobs = 2nd p. scheme.

Roll up to 1 cord length of 40 cm and to pass them through the hole openwork series.

Crumbed Chicken Strips


INGREDIENTS:
  • 4 Chicken Breasts – de boned, skinned and cut into 4 strips each
  • 6 tb Margarine
  • 50ml oil
  • 1½ Cups Bread Crumbs – must be fresh breadcrumbs and not dried
  • ¾ Cup Finely Grated Cheddar Cheese
  • 1 tb Thyme
  • 1 tb Salt
  • 1 tb Barbeque Spice
  • ½ ts Lemon Pepper
HOW TO:
  1. Melt the margarine, add the oil, mix together well and let it cool off.
  2. Mix together the bread crumbs, cheese, thyme, salt, barbecue & lemon pepper
  3. Dip the chicken strips into the margarine mixture and then roll it in the crumbs
  4. Place on a greased baking tray and let it set in the fridge for an hour or so
  5. Bake on 180 Degrees until crisp & golden brown, turning it halfway through.
Enjoy!!!

Butterfly Handkerchiefs


Materials:
J. & P. Coats Tatting-Crochet, Size 70, 1 ball each of No. 8 Blue, No. 76 China Blue and No. 12 Black; or 1 ball each of No. 32 Purple, No. 43 Dk. Yellow and No. 48 Hunter's Green ... Milwards Steel Crochet Hook No. 13 ... A rolled edge handkerchief.
(For a finer variety, butterfly and edging may be crocheted with J. & P. Coats or Clark's O.N.T. Mercerized Sewing Thread, Size 50, any color desired, and a Milwards Steel Crochet Hook No. 15.)

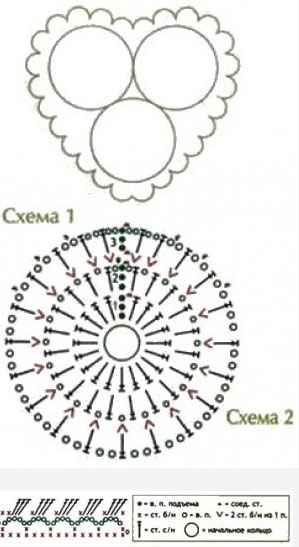
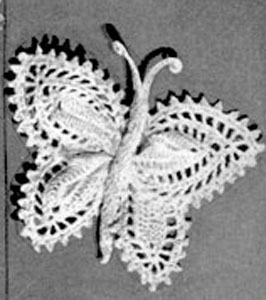
BUTTERFLY -Large Wing ••• 
Starting at inner edge with Blue, ch 33. 
1st row: Half dc in 6th ch from hook, ch 2, skip 2 ch, dc in next ch, (ch 2, skip 2 ch, tr in next 
ch ) 5 times; ch 2, skip 2 ch, dc in next ch, ch 2, skip 2 ch, half dc in next ch, ch 2, skip 2 ch, 
sl st in next ch.
Now work around as follows: Working along opposite side of starting chain, make 5 sc in first sp, (sc in next ch, 2 sc in next sp) 8 times; sc in next ch, 9 sc in end sp, (sc in next st, 2 sc
 in next sp) 8 times; sc in next st, 4 sc in next sp. Join and break off. 
Next row: Attach Black to same sc as sl st, sc in same place, sc in next 4 sc, * sc at base of next sc (long sc made), sc in next 2 sc. Repeat from * 7 more times; sc at base of next sc, sc
in next 5 sc. Break off. Next rnd: Attach China Blue to first Black sc, sc in each st across, sc closely around remaining side. Join and break off.
Now work in rows as follows: 
1st row: Attach Blue to same place as sl st, ch 3, dc in same place, (ch 2, skip 2 sc, 2 dc in next sc) 8 times; (ch 2, skip 2 sc, 2 tr in next sc) 4 times. Ch 4, turn. 
2nd row: Skip first tr, tr in next tr, (ch 3, tr in next 2 tr) 3 times; (ch 3, dc in next 2 dc) 7 times; 
ch 3, skip 1 dc, sl st in next dc. Turn. 
3rd row: Sl st in next 3 ch, ch 4, skip 2 de, dc in next 2 dc, (ch 4, dc in next 2 dc ) 5 times; 
(ch 4, tr in next 2 tr) 3 times; ch 4, tr in next tr and in top of turning chain. Ch 4, turn. 
4th row: Skip first tr, tr in next tr, (ch 5, tr in next 2 tr ) 3 times; (ch 5, dc in next 2 dc) 5 times; 
ch 5, skip 1 dc, sl st in next dc. Turn. 
5th row: Sl st in next 5 ch, ch 6, skip 2 dc, dc in next 2 dc, (ch 6, dc in next 2 dc) 3 times; 
(ch 6, tr in next 2 tr) 3 times; ch 6, tr in next tr and in top of turning chain. Ch 4, turn.
6th row: Skip first tr, tr in next tr, (ch 7, tr in next 2 tr ) 3 times; (ch 7, dc in next 2 dc) 3 times; 
ch 7, skip 1 dc, sl st in next dc. Break off.

EDGING ••• Attach China Blue to end st of first Blue row, sc closely around to opposite side 
of same row. Break off.
Make another Wing the same way, being careful to have sc's of Edging on right side of both Wings.

SMALL WING (Make 2) ••• Starting at long side with Blue, ch 33. 
1st row: D tr in 11th ch from hook, ch 1, skip 1 ch, d tr in next ch, (ch 1, skip 1 ch, tr in next ch) twice; (ch 1, skip 1 ch, dc in next ch ) twice; ch 1, skip 1 ch, half dc in next ch, ch 1, skip 1 ch, 
sc in next 9 ch. Ch 1, turn. 
2nd row: Dec 1 sc-to dec 1 sc, work off 2 sc as 1 sc-sc in each sc across sc-group, sc in 
each ch-1 sp and in each st across, ending with sc in last d tr. Ch 10, turn. 
3rd row: D tr in first sc, ch 1, skip 1 sc, d tr in next sc, (ch 1, skip 1 sc, tr in next sc) twice; 
(ch 1, skip 1 sc, dc in next sc) twice; ch 1, skip 1 sc, half dc in next sc, ch 1, skip 1 sc, sc in each sc across group to within last 2 sc, dec 1 se. Ch 1, turn.
Repeat 2nd and 3rd rows alternately until 9 rows in all are completed (1 sc in last sc-group), Break off. Attach China Blue and sc closely around, making 16 sc in each ch-10 loop. 
Join and break off.

BODY ••• Starting at long side with Black, ch 24. 
1st row: Sc in 2nd ch from hook, half dc in next ch, dc in next ch, half dc in next ch, sc in next
ch (Head), half dc in next ch, dc in next 3 ch, half dc in next ch, sc in next ch, half dc in next ch, dc in next ch, tr in next 7 ch, dc in next ch, half dc in next ch, sc in next ch. Break off. 
Attach China Blue to first sc, sc in same place, sc in next 3 sts, sl st at base of next sc 
(long st made), sc in next 5 sts, sl st at base of next sc, sc in each remaining st across; 
working along opposite side of starting chain make sc in each ch across, making long sts 
over sc's to correspond with opposite side. Join and break off.

ANTENNAE ••• With China Blue make a chain 2 inches long, sl st in center st of Head and make another chain 2 inches long. Break off.

Sew Wings and Body together. Sew Butterfly to corner of handkerchief.

EDGING ••• 
1st rnd: Attach China Blue to corner of handkerchief, 3 sc in same place, sc closely around, making 3 sc in each corner and having number of sc's on each side divisible by 6 plus 3. 
Join to first sc. 
2nd rnd: Sl st in next sc, sc in same place as sl st, * ch 10, skip 5 sc, sc in next sc. 
Repeat from * around. Join. 3rd rnd: 16 sc in each loop around. Join and break off.

Putting Order On Your Tongue

The Proverbs 31 Woman


Proverbs 31:26 says: 

 “She speaks with wisdom, and faithful instruction is on her tongue.”  NIV


Putting order on our tongues can be an uphill battle. James 3:2 says there is no one who speaks without fault – none of us are perfect. I testify to this truth as just this week I said something unkind about someone I love and had to apologize.  This scenario reminded me that I can memorize verses and know what I SHOULD and should NOT say – but unless I THINK before I speak – I am going to falter with my words and hurt others. 

As women striving to be like the Proverbs 31 woman – we need to:
  1. Practice self-control with our emotions. When we speak rapidly – for example when we are lecturing our kids – usually we become unkind.
  2. Watch sarcasm – it usually reveals a bitter heart.
  3. Watch critical remarks – they are red flags revealing a proud, envious, selfish or angry heart.
Challenge: 
Be quick to notice others’ strengths and slow to point out others’ flaws. 
Let your husband hear you teaching your children God’s wisdom. I think this encourages them to see and hear their wise wife. 
Work on filtering your words. Strive to be gentle and gracious toward your husband, and children FIRST (who you are at home is who you really are!) and then to others outside the home. 
Purify your heart through the reading of God’s word and put aside all anger, bitterness, malice, slander, envy and self-pity.  

It’s your turn – chime in – what part of this challenge is hardest for you?

Walk with the King, by

Friday 14 September 2012

Men Need To Rise Up.....


Everywhere you turn, there are ladies bible studies, brunches, sewing committees, prayer groups... you name it! There never seems to be a lack of opportunity for women to participate in fellowship and mentoring. But what about our husbands?

I believe there is a great need for men to rise up and set the example for other men. For men to be men and not boys; I know in part that men will always be boys, but you get me right?

How will this happen? Well, I can tell you one way it won't happen... by nagging your husband to get off the couch and stop watching too much football. Oh no... that will only feed their boyish tendencies.

1) PRAYER. (1 Thes. 5:17) Pray for them daily. It's an easy and fun way to remember to pray for him. Why not print off the chart for your home? Also, pray specifically that your man will be a leader and not a follower.

2) MAKE HIM FEEL LIKE A MAN. (Proverbs 27:17) Encourage him to have godly male relationships. Let them do fun and exciting things. They may seem silly to you, maybe even unspiritual in comparison to a bible study, like a car show, a flag football competition, or a fun and healthy guys night out. Trust me... encourage him to find some good friends and have fun with them.

3) WIN HIM BY YOUR CHARACTER. (1 Peter 3:1-6) Don't hide what the Lord is doing in your life. The bible talks about a wife winning her husband to the Lord by her chaste character. If a wife can win her husband to the Lord by prayer and a godly countenance, don't you think she may be used of God to deepen her husband's relationship with the Lord? Just be patient, dear wife. Don't nag. Don't beg. Let your gentle spirit win. Just walk close to Jesus and your husband will see Christ shine through your words, actions, and steadfast love.

4) RESPECT HIM. (Eph. 5:22-24)  It is important that our little ones see us respecting their daddy.

5) TREAT HIM LIKE HE IS THE SPIRITUAL LEADER. Cheer him on. Encourage him. Never dream of having someone else's husband. Let your husband pray. Ask him spiritual questions. Have you taken over that role in your home because you are doing a better job at it? Don't. Give it back and let God do the work.

by Traci Michele

Camp-fire Amarula Pancake Delights!!


Ingredients: 

You will need 12 ordinary baked pancakes...
  • 1/2 cup of sugar
  • 1 tablespoon cinnamon
  • pinch Nutmeg
  • pinch pimento
  • 3/4 cup Amarula-liqueur 
  • 3/4 cup cream  

How to:
Mix sugar and spices, and sprinkle 'n thin base of mixture over each pancake.
Roll pancakes and cut in half and place in braaipan
Mix liqueur and cream and spread over pancakes
Heat on braai until sauce starts bubbling.
Cook for 5 - 10 minutes and remove from braai .
Let it cool for 10 minutes and serve with custard

Note:  Any cream liqueur can be used in this recipe, try Nachtmusik...awesome!

Make a Scented Sachet for your home....

Scented Sachet pad, add a cozy feeling to your home. Put into dried flowers, such as lavender flowers, and your home will be filled with sunny flavours of Provence.


Material:

  • 100 g of fine yarn (100% acrylic), white, 
  • 2 flap cotton fabric 12 cm x 11 cm, 
  • zipper length of 6 cm, 
  • dry lavender flowers 
  • satin ribbon with a white strip 0.5 cm 
  • Hook number 2.


Types of loops: air loop (VP), sc (v. b / n) column with trebles (v. s / n).

Connecting bar (soed. cent.): Hook type in item chains, grab the thread and stretch it by section and subsection of the chain on the hook.

Motive: to Figure 1.  (see below)

The density of knitting: the diameter of each motif of about 4 cm

Description:
According to Figure 1 3 tie motif, fastened together by a Comm. Art. in the process of knitting the last p., having two motifs at the top and one at the bottom of the motif in the center, guided drawing. Tie motives, performing for 2 tablespoons. S / N of each arch of 2. on, and the next. p. Knit 1 st. w / o of each item tied a piece of Scheme 2.

Assembly:
Scraps of fabric cut 2 pieces in the shape of a heart, according to the size of knitted items without finishing. In one of the parts of the fabric run horizontal cut and sew in a zipper. Sew details. Top sew knitted item. The finished product is wet and let it dry. Fill the bag with dry lavender flowers. In the center of the ribbon to sew in a loop (see photo).

Patterns for Living...

by L.M.Reeves


What is your daily pattern?

How do you go about your day?

Do you decide how to feel based on the weather?

Do you wake up on one side of the bed or the other?

What is the foundation for all occasions in your life?

First of all, to be able to establish a good pattern for living, one must be saved. Accepting the finished work of the cross by faith and receiving Jesus Christ into your heart begins a right relationship with the Truth of the word of God. Then you have the power to establish good patterns for living.

Romans 10:17 - "So then faith cometh by hearing and hearing by the word of God."

Second, after salvation comes the ever on going process of edification and application in one's life.

I Timothy 4:8b - "...but godliness is profitable unto all things, having promise of the life that now is, and of that which is to come."

I. If you want to be distressed, look within.

 A. Jeremiah 17:9 "The heart is deceitful above all things, and desperately wicked who can know it?

B. Philippians 4:8 "Finally, bretheren, whatsoever things are true, whatsoever things are honest, whatsoever things are just, whatsoever things are pure whatsoever things are lovely, whatsoever things are of good report: if there be any virtue, and if there be any praise, think on these things."

A GOOD PATTERN FOR LIVING - STEWARDSHIP OF OUR MIND.
II. If you want to be defeated, look back.

A. Luke 9:62 "And Jesus said unto him, No man, having put his hand to the plough, and looking back, is fit for the kindom of God."

B. Philippians 3:13 "...forgetting those things which are behind, and reaching froth unto those things which are before,..."

A GOOD PATTERN FOR LIVING - STEWARDSHIP OF OUR ACTIONS.

III. If you want to be distracted, look around.

A. II Timothy 2:4 "No man that warreth entangleth himself with the affairs of this life; that he may please him who hath chosen him to ve a soldier."

B. II Corinthians 4:18 "While we look not at the things which are seen, but at the things which are not seen: for the things which are seen are temporal; but the things which are not seen are eternal.

A GOOD PATTERN FOR LIVING - STEWARDSHIP OF OUR FOCUS.

IV. If you want to be dismayed, look before.

A. Acts 1:7 "And he said unto them, It is not for you to know the times or the seasons, ..."

B. Psalm 37:5-7 "Commit thy way unto the LORD; trust also in him; and he shall bring it to pass. And he shall bring forth thy righteousness as the light, and thy judgement as the noonday. Rest in the LORD, and wait patiently on him ..."

A GOOD PATTERN FOR LIVING - STEWARDSHIP OF OUR TRUST.
V. If you want to be delivered, look to Christ. Proverbs 28:13 "He that covereth his sins shall not prosper: but whoso confesseth and forsaketh them shall have mercy.

A GOOD PATTERN FOR LIVING - STEWARDSHIP OF OUR FORGIVENESS.

VI. If you want to be delighted, look up! Hebrews 12:2 "Looking unto Jesus the author and finisher of our faith: who for the joy that was set before him endured the cross, despising the shame, and is set down at the right hand of the throne of God.

A GOOD PATTERN FOR LIVING - STEWARDSHIP OF OUR CONTENTMENT

Praying for the Purity of Our Children


Join me in praying for the purity of our children.

“Oh that God would give every mother a vision
of the glory and splendor of the work that is given to her
when a babe is placed in her bosom to be nursed and trained!
Could she have but one glimpse
into the future of that life as it reaches on into eternity;
could she look into it’s soul to see its possibilities;
could she be made to understand her own personal responsibility 
for the training of this child,
for the development of its life, and for its destiny,
–she would see that in all God’s world there is no other work so noble
and so worthy of her best powers,
and she would commit to no others hands the sacred and holy trust given to her.”
-JR Miller

Thursday 13 September 2012

Diagram for a Beautiful Butterfly!!!


More Butterflies......


Printer-friendly versionPrinter-friendly version


MATERIALS:

CLARK'S O.N.T. or J. & P. COATS BEST SIX CORD MERCERIZED CROCHET, size 30, 1 ball.

Steel crochet hook No. 10 or 11.

This material is sufficient for a set of 3 butterflies, a large butterfly about 4 x 5 inches, a medium butterfly about 3 x 3½ inches and a small butterfly about 2½ x 3 inches.

A-WINGS ... Starting at center ch 13 1st row: Dc in 4th ch from hook and in each of next 7 ch, h dc in next ch, in next ch make sc, ch 3 and sc; now work­ing along opposite side of founda­tion ch, work h dc in next ch, dc in 9 remaining ch across. Ch 3, turn. 2nd row: Dc in each st to ch-3 loop at tip, in loop make 3 dc, ch 3 and 3 dc; dc in each remaining st across and in top st of turning ch. Ch 1, turn. 3rd row: Sc in each st across, making 2 sc, ch 3 and 2 sc in sp at tip. Ch 4, turn. 4th row: * Skip 1 sc, dc in next sc, ch 1. Repeat from * across, making dc, ch 1, dc, ch 3, dc, ch 1 and dc in loop at tip. Ch 1, turn. 5th row: 2 sc in each sp across, making 2 sc, ch 3 and 2 sc at tip. Ch 5, turn. 6th row: * Skip 1 sc, dc in next sc, ch 2. Repeat from * across, making dc, ch 2, dc, ch 3, dc, ch 2 and dc at tip. Ch 1, turn. 7th row: 3 sc in each sp across, making 3 sc, ch 3 and 3 sc at tip. Ch 5, turn. 8th row: Same as 6th row. Ch 1, turn. 9th row: Make 3 sc and a p in each sp across—to make a p, ch 3, then make sc in 3rd ch from hook. Make 3 sc only in last sp. Fasten off.

B-WINGS ... 1st to 6th rows incl: Same as A-wings. 7th row: Same as 9th row of A-wings. Fasten off.

C-WINGS ... 1st to 3rd rows incl: Same as A-wings. 4th and 5th rows: Same as 6th and 9th rows of A-wings.

D-WINGS ... 1st row: Same as 1st row of A-wings. Ch 5, turn. 2nd row: * Skip 1 dc, dc in next dc, ch 2. Repeat from * across, making dc, ch 2, dc, ch 3, dc, ch 2 and dc in ch-3 loop at tip. Ch 1, turn. 3rd row: Same as 9th row of A-wings. Fasten off.

LARGE BUTTERFLY
Make two A-wings and two B-wings.

BODY ... Starting at one end, ch 11. 1st row: Sc in 2nd ch from hook and in next 9 sc. Ch 1, turn. Hereafter pick up back loop only of each sc. 2nd row: 2 sc in 1st sc, sc in next 7 sc, work off last 2 sc as 1. Ch 1, turn. 3rd row: Work off 1st 2 sc as 1, sc in next 7 sc, 2 sc in last sc. Ch 1, turn. Repeat the 2nd and 3rd rows alternately until piece measures 3 inches. Fasten off.

ANTENNAE ... Ch 50, work sc in 2nd ch from hook and in each ch across. Fasten off.

FINISHING ... Shirr the straight ends of wings tightly. Place the shirred end of one larger wing over the shirred end of smaller wing as in illustration and sew in place. Sew two remaining wings together in same way. Sew the shirred edges of the 2 pairs of wings together at center. Sew the two long ends of body together, stuffing with several strands of thread and making sure to keep one end of body pointed. Sew body in place over the joined wings, having the pointed end of body even with bot­tom edge of smaller wings. Roll and sew the ends of antennae to form small knobs. Double this piece and sew in place under upper part of body.

MEDIUM BUTTERFLY

Make two B-wings and two C-wings.

BODY ... Ch 9 and work as for Body of Large Butterfly until piece measures 2½ inches. Fasten off.

ANTENNAE ... Ch 45, work sc in 2nd ch from hook and in each ch across. Fasten off. Finish as for Large Butterfly.

SMALL BUTTERFLY
Make two C-wings and two D-wings.

BODY ... Ch 7 and work as for Body of Large Butterfly until piece measures 2 inches.

ANTENNAE ... Ch 40, work sc in 2nd ch from hook and in each ch across. Fasten off. Finish as for Large Butterfly.

Shining Blue Nymph Butterfly Charted Design

by Sandi Marshall


Crochet Instructions
Materials:

  • Worsted weight yarn: 1 oz. white, 1 oz. black, 
  • 1/2 oz. medium bright blue 
  • optional metallic blue thread
Size G crochet hook
Guage: 4 stitches = 1 inch, 4 rows = 1 inch
Apprx. size of each finished square = 10 inches

Directions:
With white yarn, chain 41.
Row 1: sc in 2nd ch from hook, sc in ea ch across.(40 sc)
Rows 2 - 4: sc in ea st across.
Row 5: Begin chart at first row on the chart. (plain row)
Rows 6 - 37: Continue to follow chart.
After completing all rows on the chart:
Rows 38 - 40: With white yarn, sc in ea st across.
End off.

Finishing
Using a straight stitch, with black yarn or embroidery floss, embroider antennae as indicated in blue on the chart.

Another way is to crochet the square entirely in the background color in single crochet (or in afghan stitch) and then, with yarn, using a large-eye needle, cross stitch the butterfly design on, following the chart, in the indicated yarn colors.

Note: To print out the pattern, without printing the rest of the feature, go here.

Pancakes with Cinnamon Sugar


The secret to successful pancakes is to have your pan constantly well-greased. I use cooking spray AND a teaspoon of oil every time I add more batter to the pan. Also, you need to play around with your pans and see which one is the perfect pancake pan. and you need to find the perfect heat setting on your stove. For me, the perfect amount of batter is just under a ladle full, about 3/4 of a ladle. Bring the pan to the bowl of batter and pour the batter in slowly while swirling the pan around to coat the base of the pan with a thin layer of batter. Once air bubble appear on the surface and the pancake pulls away from the sides of the pan, you can flip it over. Do this anyway you want, flip it like a pro or use any utensil you want. They might tear if they are very thin but that’s not a problem, flip them anyway, adjust them slightly and pour a tiny bit of batter over the tear and allow to cook. Stack the pancakes on a plate set over a pot of gently simmering water to keep them warm and only sprinkle with the cinnamon sugar when you’re ready to serve them.

Ingredients:  (Makes 40 pancakes)
  • 1l water
  • 2tsp salt
  • 1 cup oil
  • 4tsp white vinegar
  • 8 eggs
  • 4 cups flour
  • 1tsp baking powder mixed with 2tsp luke warm water (only add this to the batter when you are ready to bake the pancakes).
How to:
Mix everything together, beating well to ensure there are no lumps. Allow to stand for 15-20 minutes covered.
When you are ready to bake the pancakes, mix the batter again and if it’s too thick, add a bit more water. It needs to be quite thin, about the thickness of home-made custard.You’ll see if you bake the first few if the batter is too thick, the pancakes need to be very thin.
Heat the pan and spray with cooking spray and 1tsp of oil. Add the baking powder mix to the batter and mix through.

Cinnamon Sugar:
2 cups Caster sugar
2-3tbsn Cinnamon (add as much or as little as you like)
Mix the sugar and cinnamon thoroughly and scatter over baked pancakes.

Step-by-Step Knitting Fishnet Anklets


The Materials:

The Pattern:
Gauge:

6 1/2 stitches = 1 inch with the larger needles in stockinette stitch
Finished Size:  Variable, to fit most women's feet.

Cuff:
With a set of US #1 1/2 double pointed needles, cast on 72 stitches.
Round 1: *K1, p1, repeat from * to end of round.
Repeat Round 1 eight more times.

Leg:
Changing to US #4 double pointed needles,
Round 1: K1, *[k2tog] 8 times, k2, repeat from * two more times, [k2tog] 8 times, k1. (40 stitches)
Round 2: *Yo, k2tog, repeat from * to end of round.
Repeat Round 2 thirty three more times or until piece measures 3 3/4 inches from the cast on edge (do not stretch to measure).

The Heel Flap:
Knit 10 stitches and turn the work so the purl side of the fabric is facing you.
Purl 20 stitches. (The 20 stitches that you just purled are the beginning of the heel flap. For this section, you will be working back and forth on just these 20 stitches.)
Arrange the stitches so that the 20 heel flap stitches are on one needle. Put the remaining stitches on hold on two needles (10 stitches each).
(Again, work the following rows back and forth, turning the work between each row.)
Row 1 (right side): *Slip 1 purlwise, k1, repeat from * to end of 20 stitches.
Row 2 (wrong side): Slip 1 purlwise, purl to end of 20 stitches.
Repeat Rows 1 and 2 nine more times.

Turning the Heel:
Still just working the heel flap stitches:
Row 1 (right side): Slip 1 purlwise, K10, ssk, k1, turn the work so the wrong side is facing you and there are 13 stitches on the left needle and 6 stitches on the right needle.
Row 2 (wrong side): Slip 1 purlwise, p3, p2tog, p1, turn the work.
Row 3: Slip 1 purlwise, knit to 1 stitch before the gap, ssk (with the stitch before the gap and the stitch after the gap), k1, turn.
Row 4: Slip 1 purlwise, purl to 1 stitch before the gap, p2tog, p1, turn.
Repeat Rows 3 and 4 until all the heel stitches have been worked and 12 stitches remain on the needle.

The Gusset:
Knit across the 12 heel stitches.
With the same needle (now called "needle #1"), pick up 11 stitches along the heel flap. (23 stitches)
With a new needle (needle #2), [yo, k2tog] 10 times across the 20 stitches that have been on hold.
With a new needle (needle #3), pick up 11 stitches along the other side of the heel flap.
Still with needle #3, knit 6 stitches from needle #1.
Now there are 17 stitches on needle #1, 20 stitches on needle #2, and 17 stitches on needle #3. Needle #1 is the beginning of the round (at the middle of the heel).

Round 1: Needle #1 - knit to last 3 stitches, k2tog, k1. Needle #2 - [yo, k2tog] 10 times. Needle #3 - k1, ssk, knit to end.
Round 2: Needle #1 - knit. Needle #2 - [yo, k2tog] 10 times. Needle #3 - knit.
Repeat Rounds 1 and 2 until 40 total stitches remain.

The Foot:
Round 1:
*Yo, k2tog, repeat from * to end of round.
Repeat Round 1 the number of times needed to make the size you want:
US size 6 shoe = 27 rounds
US size 7 shoe = 29 rounds
US size 8 shoe = 31 rounds
US size 9 shoe = 33 rounds
US size 10 shoe = 35 rounds

The Toe:
Round 1:
*K8, k2tog, repeat from * to end of round. (36 stitches)
Round 2: Knit.
Round 3: *K7, k2tog, repeat from * to end of round. (32 stitches)
Round 4: Knit.
Round 5: *K6, k2tog, repeat from * to end of round. (28 stitches)
Round 6: Knit.
Round 7: *K5, k2tog, repeat from * to end of round. (24 stitches)
Round 8: Knit.
Round 9: *K4, k2tog, repeat from * to end of round. (20 stitches)
Round 10: Knit.
Round 11: *K3, k2tog, repeat from * to end of round. (16 stitches)
Round 12: *K2, k2tog, repeat from * to end of round. (12 stitches)
Round 13: *K1, k2tog, repeat from * to end of round. (8 stitches)
Cut the yarn and sew the tail through the remaining stitches. Weave in the ends.

Make another sock to join the first!


Enjoy!!!!

Time-Tested Beauty Tips


For attractive lips, speak words of kindness.
For lovely eyes, seek out the good in people.
For a slim figure, share your food with the hungry.
For beautiful hair, let a child run his or her fingers through it once a day.
For poise, walk with the knowledge you'll never walk alone.
People, even more than things, have to be restored, renewed, revived, reclaimed, and redeemed; Never throw out anybody.
Remember, if you ever need a helping hand, you'll find one at the end of your arm.
As you grow older, you will discover that you have two hands, one for helping yourself, the other for helping others.
The beauty of a woman is not in the clothes she wears, the figure that she carries, or the way she combs her hair. The beauty of a woman must be seen from in her eyes, because that is the doorway to her heart, the place where love resides.
The beauty of a woman is not in a facial mole, but true beauty in a woman is reflected in her soul. It is the caring that she lovingly gives, the passion that she shows, and the beauty of a woman with passing years only grows!
--Sam Levenson

I Give You


I give you the sun,
and I give you the rain.
I give you the air to breathe,
and I give you the grain.
I give you the mountains to climb,
and I give you the sea to explore.
I give you words to rhyme,
and I give you lions that roar.
But you never look up once to thank me
for the blessings I have given thee.
And you’re always much too busy to think of me,
yet I love you and will wait for you,
pray you’ll come to see.
I give you the birds that fly,
and I give you the earth and sky.
I give flowers that bloom,
and I give you the stars and moon.
But you never look up once to thank me
for the blessings I have given thee.
And you’re always much too busy think of me,
yet I love you and will wait for you,
pray you’ll come to see.

- – - written by Milton L. Delgado

Wednesday 12 September 2012

Amarula Chocolate Cake


INGREDIENTS:

  • 60ml Cocoa
  • 125ml Boiling Water
  • 3 Eggs
  • 220ml sugar
  • 60ml Oil
  • 250 Flour
  • 10ml Baking Powder
  • 2ml Salt

SYRUP:
  • 200ml Sugar
  • 250ml Water
  • 60ml Amarula

TOPPING:
  • 1 Tin Caramel
  • Whipped Cream
  • Flake

HOW TO:
Preheat your oven to 180 degrees
Mix cocoa with boiling water and let it cool
Beat eggs, sugar and oil, add the cool cocoa mixture and mix throughly
Sieve the rest of the dry ingriedients and mix well into the egg mixture
Pour into a greased 22cm x 30cm cake tin and bake for approximately 20 minutes

Boil the sugar and water together for about 5 minutes and add the Amarula and mix well
As the cake comes out of the oven prick with a fork and pour the warm syrup over
Allow the cake to cool, and decorate with the caramel, cream and Flake.
ENJOY!!!!

Step-by-step Knitting a Cabled Baby Boy Vest.

by: Purl Soho 


Materials:
  • 2 skeins of Rowan's Purelife DK, 100% organic cotton for the main color. I used Natural #986.
  • 1 skein of Rowan's Purelife DK for the contrast color. This is Logwood #981.
  • A 24 inch US #5 circular needle.
  • A 16 inch US #5 circular needle.
  • A 24 inch US #6 circular needle.
  • 3 stitch holders (Optional: you can use scrap yarn to hold your stitches if you prefer.)
  • A cable stitch holder (Also optional: you can use a double pointed needle instead. Whether you use a cable stitch holder or a double pointed needle, make sure it is at least one size smaller than the main knitting needle you use.)
  • 2 buttons, 1/2 inch in diameter 
Pattern:
Gauge:

7 1/2 stitches = 1 inch in the cable pattern with the larger needle (5 1/4 stitches = 1 inch in stockinette stitch)
Finished Size:  3 months to 6 months
Chest circumference = 19 inches
Hem to underarm = 6 inches
Hem to shoulder = 10 1/4 inches

(Babies come in a wide range of sizes and shapes. Try to measure the recipient if you can. If you can't, rest assured that cotton is quite maleable, stretching with a little blocking and shrinking with a little time in the dryer.)

Notes on "How to Adjust the Size":
The easiest way to adjust the size of this vest is to alter the gauge. Instead of knitting the cable pattern at 7 1/2 stitches to the inch, change just the needle size (for slight size adjustments) or the yarn and needle size (for more extreme adjustments) to knit the pattern at a smaller or bigger gauge.
To figure out what gauge you need, divide 144 (the cast on number) by the chest circumference you want. So, for example, if you want a 22 inch chest: 144 divided by 22 = 6.5 stitches to the inch (in the stitch pattern and blocked).
You may have to alter the number of rounds and rows you knit in order to get the right length from the hem to the underarms and from the underarms to the shoulders. If the recipient of the vest isn't on hand to measure, I recommend referring to other sweater patterns that list or diagram these measurements for the size you want to make. (The Child's Placket Sweater in Last Minute Knitted Gifts has a great schematic for a wide range of baby to child sizes.)

How to Make the Cable:
To make the cable used in this pattern, first slip two stitches onto a cable needle (or double pointed needle). Slip the stitches purlwise, which means, insert the right needle into each stitch as if you were purling it.

Bring the cable needle with the two slipped stitches to the front of the work. Let it hang there while you go on to knit the next stitches from the left knitting needle.
  
Slide the slipped stitches to the other end of the cable needle. Do not spin the cable needle or try to knit the stitches from the same end that you used to slip the stitches.

Now use the right knitting needle to knit the two stitches off the cable needle.

That's it!   In this pattern the abbreviation for making a cable will be "mc".
The Ribbing:
With the contrast yarn and the 24 inch US #5 needle, cast on 144 stitches.
Place a marker and join for working in the round, being careful to not twist the stitches.
Rounds 1-5: *P1, k1, repeat from * to end of round.

The Body:
Change to the main yarn and the US #6 needle.
Set Up Round: Knit.
Rounds 1-4: P1, *k4, p2, repeat from * to last 5 stitches, k4, p1.
Round 5: P1, *make a cable (mc), p2, repeat from * to last 5 stitches, mc, p1.
Round 6: Repeat Round 1 (P1, *k4, p2, repeat from * to last 5 stitches, k4, p1).
Repeat Rounds 1-6 six more times.
Next Round: Repeat Round 1..
Next Round: Bind off 5 stitches (always bind off in pattern, knitting the knit stitches and purling the purl stitches), p1, [k4, p2] 10 times, bind off 10 stitches, p1, [k4, p2] 10 times, bind off 4 stitches, cut the yarn and pull it through the last stitch.

Slip the next 62 stitches onto stitch holders or scrap yarn.

Front Armholes:
With the right side facing you, join new yarn and work back and forth on just the 62 stitches that are on the needles.
**Row 1 (right side): Bind off 3 stitches, k2, *p2, k4, repeat from * to last 2 stitches, p2. (59 stitches)
Row 2 (wrong side): Bind off 3 stitches, p2, *k2, p4, repeat from * to last 5 stitches, k2, p3. (56 stitches)
Row 3: Bind off 2 stitches, *p2, mc, repeat from * to last 5 stitches, p2, slip next 2 stitches to cable needle (cn), hold in front of work, k1, k2 from cn. (54 stitches)
Row 4: Bind off 2 stitches, *k2, p4, repeat from * to last 3 stitches, k2, p1. (52 stitches)
Row 5: K1, ssk, *k4, p2, repeat from * to last 7 stitches, k4, k2tog, k1. (50 stitches)
Row 6: P1, p2tog, p3, *k2, p4, repeat from * to last 8 stitches, k2, p3, p2tog through the back loop (tbl), k1. (48 stitches)
Row 7: K1, ssk, k2, *p2, k4, repeat from * to last 7 stitches, p2, k2, k2tog, k1. (46 stitches)
Row 8: *P4, k2, repeat from * to last 4 stitches, p4.
Row 9: K1, ssk, k1, *p2, mc, repeat from * to last 6 stitches, p2, k1, k2tog, k1. (44 stitches)
Row 10: P3, *k2, p4, repeat from * to last 5 stitches, k2, p3.
Row 11: K1, ssk, *p2, k4, repeat from * to last 5 stitches, p2, k2tog, k1. (42 stitches)
Row 12: P2, *k2, p4, repeat from * to last 4 stitches, k2, p2.
Row 13: K2, *p2, k4, repeat from * to last 4 stitches, p2, k2. ***

Row 14: P2, [k2, p4] 2 times, k2, p2, bind off 6 stitches, p1, [k2, p4] 2 times, k2, p2. (18 stitches remain for each shoulder)

Front Left Shoulder:
Work just the 18 stitches of the front left shoulder ("left" as if you were wearing the vest). The other 18 stitches can just remain on the needle or, if you prefer, you can put them on a stitch holder until later.
Row 1 (right side): K2, [p2, mc] two times, p2, k2.
Row 2: Bind off 2 stitches, k1, [p4, k2] two times, p2. (16 stitches)
Row 3: K2, p2, k4, p2, k3, k2tog, p1. (15 stitches)
Row 4: K1, [p4, k2] two times, p2.
Row 5: K2, p2, k4, p2, k2, k2tog, k1. (14 stitches)
Row 6: [P4, k2] two times, p2.
Row 7: K2, p2, mc, p2, k1, k2tog, k1. (13 stitches)
Row 8: P3, k2, p4, k2, p2.
Row 9: K2, p2, k4, p2, k2tog, k1. (12 stitches)
Row 10: P2, k2, p4, k2, p2.
Row 11: K2, p2, k4, p2, k2.
Row 12: Repeat Row 10.
Row 13: K2, p2, mc, p2, k2.
Rows 14-18: Repeat Rows 10 and 11, ending with Row 10.
Row 19: Repeat Row 13.
Rows 20 and 21: Repeat Rows 10 and 11.
Slip the stitches onto a stitch holder and cut the yarn.

Front Right Shoulder:
Working the 18 remaining stitches, join new yarn with the wrong side facing you.
Row 1 (wrong side): P2, [k2, p4] two times, k2, p2.
Row 2: Bind off 2 stitches, p1, [mc, p2] two times, k2. (16 stitches)
Row 3: P2, k2, p4, k2, p3, p2togtbl, k1. (15 stitches)
Row 4: P1, [k4, p2] two times, k2.
Row 5: P2, k2, p4, k2, p2, p2togtbl, p1. (14 stitches)
Row 6: K4, p2, k4, p2, k2.
Row 7: P2, k2, p4, k2, p1, p2togtbl, p1. (13 stitches)
Row 8: K3, p2, mc, p2, k2.
Row 9: P2, k2, p4, k2, p2togtbl, p1. (12 stitches)
Row 10: K2, p2, k4, p2, k2.
Row 11: P2, k2, p4, k2, p2.
Rows 12 and 13: Repeat Rows 10 and 11.
Row 14: K2, p2, mc, p2, k2.
Row 15: Repeat Row 11.
Row 16: Repeat Row 10.
Row 17: Repeat Row 11.
Change to US #5 needles and the contrast yarn.
Row 18: Knit.
Row 19: *K1, p1, repeat from * to end of row.
Row 20: [K1, p1] three times, yo, p2tog, [k1, p1] two times.
Row 21: Repeat Row 19.
Bind off.

Back Armholes:
Now working the 62 stitches that have been on hold, orient the work so the right side is facing you. Use the US #6 needle and join new yarn.
Repeat the Front Armholes section from the ** to the ***.
Row 14: Repeat Row 12. (P2, *k2, p4, repeat from * to last 4 stitches, k2, p2)
Row 15: K2, *p2, mc, repeat from * to last 4 stitches, p2, k2.
Row 16: Repeat Row 12.
Row 17: Repeat Row 13. (K2, *p2, k4, repeat from * to last 4 stitches, p2, k2)
Row 18: Repeat Row 12.
Row 19: K2, [p2, k4] two times, p2, bind off 10 stitches, p1, [k4, p2] two times, k2. (16 stitches remain for each shoulder)

Back Left Shoulder:
Work only the 16 stitches of the back left shoulder.
Row 1 (wrong side): P2, [k2, p4] two times, k2.
Row 2: Bind off 2 stitches, slip 1 stitch to the cn, hold in front of work, k next 2 stiches, k1 from cn, p2, mc, p2, k2. (14 stitches)
Row 3: P2, k2, p4, k2, p1, p2togtbl, p1. (13 stitches)
Row 4: K3, p2, k4, p2, k2.
Row 5: P2, k2, p4, k2, p2togtbl, p1. (12 stitches)
Row 6: K2, p2, k4, p2, k2.
Row 7: P2, k2, p4, k2, p2.
Row 8: K2, p2, mc, p2, k2.
Rows 9-13: Repeat Rows 7 and 6, ending with Row 7.
Row 14: Repeat Row 8.
Rows 15 and 16: Repeat Rows 7 and 6.

Join the Left Shoulders
Join the shoulders using a three needle bind off. 

Here's how:
Orient the two left shoulders so that the right sides are facing each other. Hold the stitch holder and needle parallel to each other.

Insert the needle into the first stitch from each shoulder and knit them together.

Knit the next two stitches together, and then slip the first stitch over the second, just like a normal bind off.

Continue the three needle bind off in the stitch pattern so that you knit the knit stitches together and purl the purl stitches together. When you've completed the row, cut the yarn and pull it through the last stitch.

Back Right Shoulder:
Working the 16 remaining stitches, join new yarn with the wrong side facing you.
Row 1 (wrong side): Bind off 2 stitches, p3, k2, p4, k2, p2. (14 stitches)
Row 2: K2, p2, mc, p2, k1, k2tog, k1. (13 stitches)
Row 3: P3, k2, p4, k2, p2.
Row 4: K2, p2, k4, p2, k2tog, k1. (12 stitches)
Row 5: P2, k2, p4, k2, p2.
Row 6: K2, p2, k4, p2, k2.
Row 7: Repeat Row 5.
Row 8: K2, p2, mc, p2, k2.
Rows 9-12: Repeat Rows 5 and 6.
Change to US #5 needles and the contrast yarn.
Row 13: Purl.
Rows 14-16: *P1, k1, repeat from * to end of row.
Bind off.

Right Armhole Edging:
With the right side facing you and starting at the middle of the underarm, use the contrast yarn and the 16 inch US #5 needle to pick up 64 stitches around the entire armhole.
Place a marker, and join to knit in the round.
Rounds 1-3:
*K1, p1, repeat from * to end of round.
Bind off.

Left Armhole Edging:
With the right side facing you, use the contrast yarn and the 16 inch US #5 needle to pick up 3 stitches through both layers of the left shoulder ribbing (joining them together).
  
Pick up 61 more stitches around the left armhole, place a marker and join for knitting in the round. (64 stitches total)
Rounds 1-3: *K1, p1, repeat from * to end of round.
Bind off.

Neckband:
With the contrast yarn, the 16 inch US#5 needle and the right side facing you, pick up the first stitch at the corner of the inside layer of the left shoulder ribbing.

Pick up a total of 71 stitches around the entire neckband. Work the neckband back and forth, turning the work between rows.
Row 1 (wrong side): *P1, k1, repeat from * to end of row.
Row 2: *K1, p1, repeat from * to last 4 stitches, p2tog, yo, p1, k1.

Row 3: Repeat Row 1.
Bind off.

Buttons:
Sew on two buttons right below the buttonholes on the left shoulder.

Your baby vest is all done!