
Shell Stitch Booties
a free crochet pattern by
Megan Mills
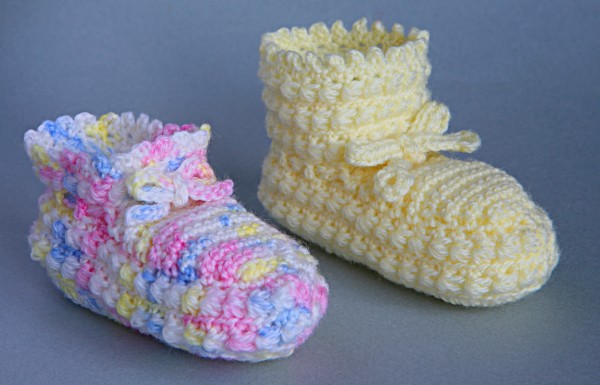
This little bootee is made with the old-fashioned Daisy Stitch. It is not at all lacy so is just as suitable for little boys as little girls.
The instep makes an ideal 'canvas' for little cross stitch designs, or any other sort of embroidery you might like to add to personalise them. I particularly like bullion roses.
If you want to make these in advance but you don't know whether the baby will be a boy or girl why not make them in white and then do the tie and trims in another colour once baby arrives? Remember you can put a trim around the sole too.
Special Abbreviation:
sc dec = (insert hook into next st, yoh and draw up a loop) twice, yoh and draw through all 3 loops on the hook.
Sole:
Round 1: Ch 20 loosely. Working into the back ridge work 2hdc into the 3rd ch from the hook, 1dc into each of the next 16 ch, 4hdc into the next ch. Working on the other side of the foundation ch 1dc into each of the next 16 ch. Close the rnd with a ss into the 2nd ch at beg of the rnd.
Round 2: 3ch, 1dc into the same sp, 2dc into each of the next 4 sts, 1dc into each of the next 13 sts, 2dc into each of the next 7 sts, 1dc into each of the next 13 sts, 2dc into the next st. Close the rnd with a ss into the 3rd ch at beg of the rnd.
Round 3: 3ch, 1dc into the same sp, 2dc into each of the next 8 sts, 1dc into each of the next 16 sts, 2dc into each of the next 10 sts, 1dc into each of the next 16 sts, 2dc into the next st. Close the rnd with a ss into the 3rd ch at the beg of the rnd. You now have 72 sts.
Side of the Foot:
Round 4: Keeping the slip stitches 'whole st size' because you will be treating them as sts at the end of this rnd ss over the next 5 sts, 1ch, 1sc into the same sp, *(skip 2 dc, 5dc into the next st, skip 2 dc, 1sc into the next st). Repeat from * 11 times. Skip 2 sts, 5 dc into the next st. Close the rnd with a ss into the top of the 1st sc at the beg of the rnd.
Round 5: 3ch, 2dc into the same sp, *(1sc into the 3rd dc of the next shell, 5dc into the next sc). Repeat from * 11 times. Sc into the 3rd dc of the next shell, 2dc into the same sp as the beg 3-ch. Close the rnd with a ss into the 3rd ch at the beg of the rnd.
Round 6: 1sc into the next st, sc dec 10 times, 1sc into each of the next 36 sts, sc dec 7 times. Close the rnd with a ss into the 1st sc at the beg of the rnd. You now have 54 sts.
Instep:
Row 1: Ch1, 1sc in the same st, 1sc into each of the next 3 sts, turn.
Row 2: Ch1, working into every stitch and into the back loops 1sc into each st across the instep and then 1sc into the next free stitch on the Side of the Foot (the first time you do this be careful to use the ss you used to close the previous rnd), turn.
Row 3: Ch1, working into every stitch and into the front loops 1sc into each st across the instep and then 1sc into the next free stitch on the Side of the Foot, turn.
You will see that working into every st increases the number of sts on the instep with each row done. Repeat Rows 2 and 3 until you have 11 stitches on the instep. From now until Row 16 miss the 1st st after you turn to keep the instep stitch count constant at 11 and also keep joining to the Side of the Foot as you go. The 'joining st' is the 12th st.
At the end of Row 16 do 1sc into the free st on the Side of Foot as you have been and then also 1sc into the next free st as well.
Ribbon Slot Row:
3ch, turn, skip 2 sc, (1dc into the next sc on the instep, 1ch, skip 1 sc on the instep) x 5, 1ch, 1dc into the same sp that row 15 of the instep joined to the Side of the Foot and at the same time go through the turning ch from rows 15-16 as you do so, (1ch, skip 1 sc on the Side of the Foot, 1dc into the next sc) x 17, 1ch. Close the rnd with a ss into the 2nd ch at the start of the rnd. You now have 24 ribbon slots.
Cuff:
Round 1: Ss over the next ch, ss into the next dc, 1ch, 1sc into the same st, [miss the next dc, (3dc, 1ch, 3dc) into the next dc, miss the next dc, 1sc into the next dc] x 5. Miss the next dc, (3dc, 1ch, 3dc) into the next dc, miss the next dc. Close the rnd with a ss into the 1st sc of the rnd.
Round 2: 3ch, 2dc into the same sp, [1sc into the next 1-ch, (3dc, 1ch, 3dc) into the next sc] x 5, 1sc into the next 1-ch, 3dc into the same sp as the 3-ch at the beg of the rnd, 1ch, 1sc into the 3rd ch at the beg of the rnd.
Round 3: (6dc into the next sc, 1sc into the next 1-ch) x 5, 6dc into the next sc. Fasten off.
Note: If you wish the cuff to be longer you can do more rounds of shells.
Trim for the Cuff:
With contrast yarn join in the dip of a shell near the back and work 1sc into every stitch around the cuff. Fasten off.
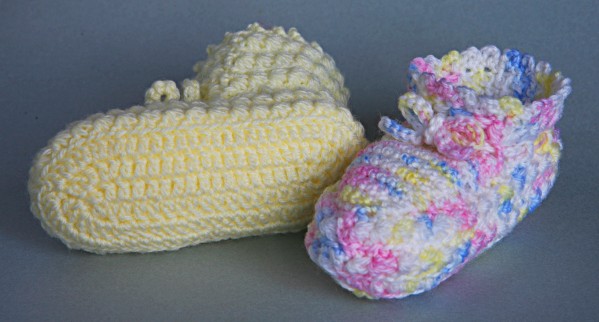
Trim for the Sole:
With contrast yarn join near the back of the sole on Rnd 3. Working entirely from the outside of the bootee work one ss into every stitch of Rnd 3 of the sole. You will be doing it just under the 'ch tops' of the dc's, where they interlock with each other. Fasten off.
Finishing:
Tidy away all the ends. Insert a ribbon or any other tie of your choice through the ribbon slots. Make another bootee the same and enjoy.
Bootie Tie:
*Chain 40. Working into back ridge work 6sc into the 2nd ch from the hook (or a greater number of taller stitches in a further chain from the hook if you want a bigger 'dangle' at the ends - if you do so make the last 'st' a number of ch and a ss into the same sp as all the sts were worked).
Continuing along the back ridge work either 1ss or 1sc (depending on whether you want a thinner or thicker tie) into every st to the end. Do not turn. Repeat from * and you will meet up with your first half in the middle of the tie. Fasten off and tidy away both ends.
These can also be made with no 'dangles' at the ends if you wish by simply turning and working back through the back ridges. You can make the tie longer or shorter by varying the number of chains worked.
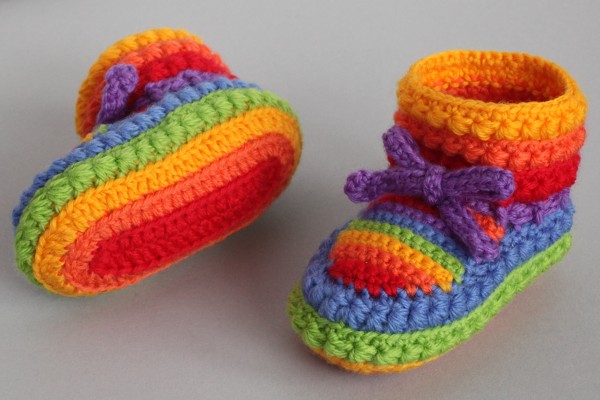
They'd also look wonderful done in bold, contrasting colours. Imagine a 'rainbow' bootee where the sole and each round of Daisies was another colour in rainbow succession! There would be a few more ends to tidy away but this is easy to do as you go in crochet because you can work over the tails and enclose them completely.
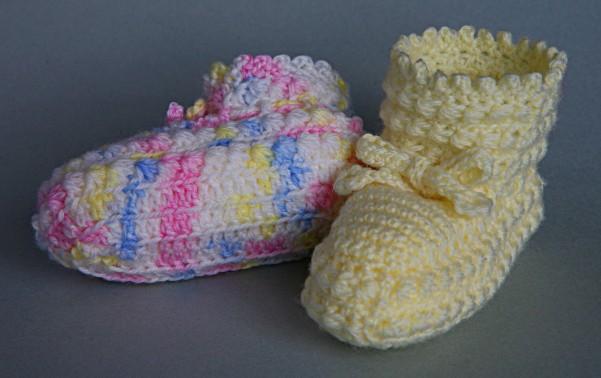
Size: The bootee and slipper both measure 10cm (4") along the sole and 4cm (1.5") across the sole. The bootee is 5.5cm (2.25") tall to the top of the cuff and the slipper is 4cm (1.5") tall - approximately. That should fit a baby around 3 to 6 months old.
Enjoy making them...