
by Megan Mills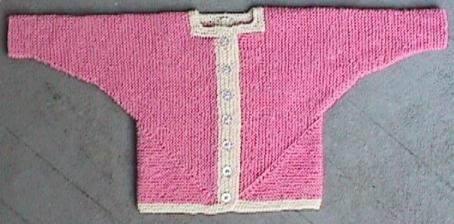
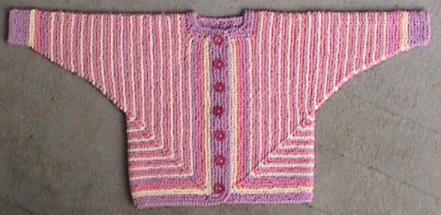

The striped version is the prototype and was made by two different methods. The pink version was made using the final, best method.
Gauge: 6 stitches to the inch. I used a 5 ply baby wool and size 3.75mm needles
The striped version is the prototype and was made by two different methods. The pink version was made using the final, best method.
Abbreviations:K Knit
P Purl
K2T K 2 together
P2T P 2 together
O Over
DD Double decrease (slip one, K2T, pass the slipped stitch over).
DI Double increase (M1, K1, M1 - keeping the centre stitch constant on further rows).
M1 Make one, my favourite in garter stitch is a simple backward loop over the right-hand needle.
Superscriptx numbers refer you to Special Instructions at the end of the pattern.
Materials:
- 3.75mm circular and double pointed needles (UK 9, US 5).
- Use a circular needle but change to double pointed needles when the circumference becomes too small to go round. Or you can use two circulars1.
- Approximately 415 metres (450 yards) of 5-ply baby yarn with a recommended gauge on the ball-band of about 26.5 stitches and 35 rows to a 10 x 10cm (4") square.
- 7 13mm (1/2") buttons.
Gauge: 6 stitches to the inch. I used a 5 ply baby wool and size 3.75mm needles
(UK 9, US 5).
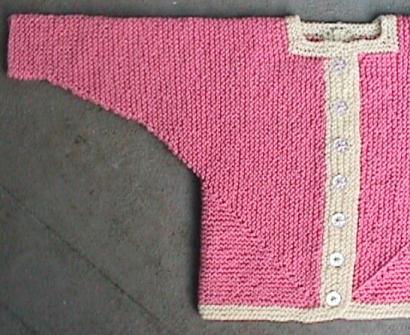
Approximate Size Across the body: 25cm (10").
From the top of the shoulder to the bottom edge of the jacket: 26.5cm (10.5").
From the centre back to the edge of the sleeve cuff: 29cm (11.5").
Body (worked as a Left Half and a Right Half)Using a provisional cast-on method, cast on 160 stitches, turn and K one row. Always slip the first stitch of the row knitwise to make a 'pip' selvedge.
Mitre Row: K51, DD, K48, DD, K55. The centre stitch of the DD's will be constant (this 4-stitch 'unevenness' will raise the back of the neck). On the 2nd half you will start your mitre row K55, DD, K48, DD, K51. The mitre row will continue to have the DD's centred over the DD of the previous mitre row - but the stitches each side of the DD's will decrease steadily.
Next Row: K (or P) one row to maintain the garter stitch pattern (when working back and forth K, when working circularly P).
Work back and forth alternating the Mitre Row and the Next Row. At the end of Row 16 cast on 12 stitches2 and join into a circle, being very careful not to twist. On the next round, immediately after picking up 12 stitches from the cast on chains, move3 the 'beginning' of your round so that each 'side' has the same number of stitches before and after the DD's. On one half you will move back 4 stitches and on the other half 8 stitches.
Working the combined method4 for garter stitch in the round keep decreasing as set until you have worked DD, DD at the centre.
On the very next round P2T on the two DD's to create a new centre stitch for further DD's - the sleeve now begins and you should have 71 stitches.
For the next 26 rounds do a DD at the centre on alternate rounds (45 stitches)
For the next 36 rounds do a DD at the centre on each 4th round. (27 stitches)
Work straight to desired sleeve length. If you wish you can stop doing garter stitch earlier and change to rib for a cuff (in that case you might want to decrease less because you will want more stitches for the ribbing than for garter stitch because it pulls in more). If you are doing a contrast border on the body you might like to do a matching one on the ends of the sleeves.
Cast off5. Make the other half.
Bands/BorderNotes: For one side of the garment you will be working from the bottom back corner across the bottom and around, for the other side you will be working from the bottom back corner up the back and around. Go in the direction so that doing Knit for the first row makes the garter stitch continue properly.
On the first round at the internal corners do decreases of K2T - this will provide a centre stitch for following DD's. On that first row I also 'fudged' an extra stitch at the external corners to centre my M1 increases around. The external corners at the 3-ridge front-bands go at the end, not the start of them. On following alternate rounds do a DD at the internal corners and a DI at the external corners.
When you get to 'gaps' at the neckline and front border edges (from the 3 ridges) where there are stitches to pick up either pick up one stitch for every 'ridge' (if going along the edge of knitting) or one stitch for each cast-on stitch.
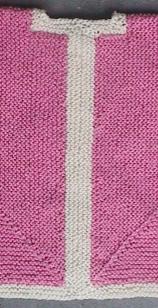
Release your provisional cast-on and put the stitches on a circular needle. Start at the back bottom corner and work around until you get to the front. Work back and forth on the front for 3 ridges. Do evenly spaced buttonholes on the third ridge by O, K2T on the side that you want buttonholes on. My spacing for seven buttonholes over 51 stitches was K1, (O, K2T, K6) 6 times, O, K2T. Then continue around.
Caution: Make sure that the centre backs have exactly the same number of stitches - to do this be very careful where you put your centre stitch for the DI's at the corners - double check it on the first round because if you get it wrong now it's Not Fun To Try And Fix Later (guess how I know that????).
When you have 5 ridges on the front band and 2 ridges everywhere else then stop and work the other half to the same stage (and either use a second ball, for convenience, or leave a goodly bit to use for casting off or grafting later).
Arrange it so that one half has two ridges and a valley under the needle on the right side at centre back. On the other half you want three ridges on the right side at centre back - with a ridge directly under the needle (so, at the end, for one half you will work along just the centre back after completing a whole round). This will ensure that when you graft the centre backs the garter stitch will be continuous.
Break off one yarn long enough to graft together the centre backs (a length of about 3 to 4 times the width to be grafted). Graft6 the centre backs. With the other yarn (that should still be attached to the ball) cast off around the whole border in one continuous stream - picking up stitches across the top and bottom of the centre back where you made 'extra rows' with the grafting.
Sew on buttons, tidy away any ends and enjoy.
Special Instructions 1:
Approximate Size Across the body: 25cm (10").
From the top of the shoulder to the bottom edge of the jacket: 26.5cm (10.5").
From the centre back to the edge of the sleeve cuff: 29cm (11.5").
Body (worked as a Left Half and a Right Half)Using a provisional cast-on method, cast on 160 stitches, turn and K one row. Always slip the first stitch of the row knitwise to make a 'pip' selvedge.
Mitre Row: K51, DD, K48, DD, K55. The centre stitch of the DD's will be constant (this 4-stitch 'unevenness' will raise the back of the neck). On the 2nd half you will start your mitre row K55, DD, K48, DD, K51. The mitre row will continue to have the DD's centred over the DD of the previous mitre row - but the stitches each side of the DD's will decrease steadily.
Next Row: K (or P) one row to maintain the garter stitch pattern (when working back and forth K, when working circularly P).
Work back and forth alternating the Mitre Row and the Next Row. At the end of Row 16 cast on 12 stitches2 and join into a circle, being very careful not to twist. On the next round, immediately after picking up 12 stitches from the cast on chains, move3 the 'beginning' of your round so that each 'side' has the same number of stitches before and after the DD's. On one half you will move back 4 stitches and on the other half 8 stitches.
Working the combined method4 for garter stitch in the round keep decreasing as set until you have worked DD, DD at the centre.
On the very next round P2T on the two DD's to create a new centre stitch for further DD's - the sleeve now begins and you should have 71 stitches.
For the next 26 rounds do a DD at the centre on alternate rounds (45 stitches)
For the next 36 rounds do a DD at the centre on each 4th round. (27 stitches)
Work straight to desired sleeve length. If you wish you can stop doing garter stitch earlier and change to rib for a cuff (in that case you might want to decrease less because you will want more stitches for the ribbing than for garter stitch because it pulls in more). If you are doing a contrast border on the body you might like to do a matching one on the ends of the sleeves.
Cast off5. Make the other half.
Bands/BorderNotes: For one side of the garment you will be working from the bottom back corner across the bottom and around, for the other side you will be working from the bottom back corner up the back and around. Go in the direction so that doing Knit for the first row makes the garter stitch continue properly.
On the first round at the internal corners do decreases of K2T - this will provide a centre stitch for following DD's. On that first row I also 'fudged' an extra stitch at the external corners to centre my M1 increases around. The external corners at the 3-ridge front-bands go at the end, not the start of them. On following alternate rounds do a DD at the internal corners and a DI at the external corners.
When you get to 'gaps' at the neckline and front border edges (from the 3 ridges) where there are stitches to pick up either pick up one stitch for every 'ridge' (if going along the edge of knitting) or one stitch for each cast-on stitch.
Release your provisional cast-on and put the stitches on a circular needle. Start at the back bottom corner and work around until you get to the front. Work back and forth on the front for 3 ridges. Do evenly spaced buttonholes on the third ridge by O, K2T on the side that you want buttonholes on. My spacing for seven buttonholes over 51 stitches was K1, (O, K2T, K6) 6 times, O, K2T. Then continue around.
Caution: Make sure that the centre backs have exactly the same number of stitches - to do this be very careful where you put your centre stitch for the DI's at the corners - double check it on the first round because if you get it wrong now it's Not Fun To Try And Fix Later (guess how I know that????).
When you have 5 ridges on the front band and 2 ridges everywhere else then stop and work the other half to the same stage (and either use a second ball, for convenience, or leave a goodly bit to use for casting off or grafting later).
Arrange it so that one half has two ridges and a valley under the needle on the right side at centre back. On the other half you want three ridges on the right side at centre back - with a ridge directly under the needle (so, at the end, for one half you will work along just the centre back after completing a whole round). This will ensure that when you graft the centre backs the garter stitch will be continuous.
Break off one yarn long enough to graft together the centre backs (a length of about 3 to 4 times the width to be grafted). Graft6 the centre backs. With the other yarn (that should still be attached to the ball) cast off around the whole border in one continuous stream - picking up stitches across the top and bottom of the centre back where you made 'extra rows' with the grafting.
Sew on buttons, tidy away any ends and enjoy.
Special Instructions 1:
Two short circulars will work but they are a bit awkward as the points get in the way a bit, the longer ones allow the points to drop out of the way. Put half of your stitches on each needle.
Let one half (that doesn't need to be worked right now) slide to the middle (flexible part) of
one needle. Push the other half up to the needle tip (on the other needle) and work them with the other end of that needle.
Now let the stitches you just worked go the middle of the needle and push the other half up to their needle tip and work them with the other end of that needle. So, you always work each half with the same needle.
It is easier to keep track of what to do next if you keep in mind where the working thread has to go in order to work in the round.
Special Instructions 2:
Cast on by making 12 loose chain with a crochet hook. Hook the first chain through the base of the last stitch on the needle. Make sure that you have 12 whole chains to be picked up from and a loop left over from making the chains to go on the needle. This is as an extra stitch that will be worked together with its neighbour on the next round to tidy the join.
Later when you pick up from these chains pick the stitches up from the 'purl bumps' at the back of the chain. When you do the bands/border you will pick up one loop of the 'V' part of the chain and get a next-to-undetectable continuation of the garter stitch.
Special Instructions 3:
To move the beginning of the round slip the required number of stitches from the right to the left-hand needle. Strand the working yarn behind the work and use the Fair Isle method7 to weave it into the back of the stitches as you work them.
Special Instructions 4: Garter stitch in the round alternates one round of knit with one round of purl. The combined method uses purling the 'wrong way' by throwing the yarn clockwise to form the stitch. When you subsequently knit these stitches work them through the back loop so that you don't get twisted stitches.
Note: When doing the DD in combined method knitting you will need to turn the stitches first so they aren't twisted. You can do garter stitch in the round with ordinary purling but for most knitters it won't have exactly the same gauge as garter stitch worked back and forth in all knit.
Special Instructions 5: Always cast off using the suspended method, in Purl. Purl 2, *pass the first stitch over the second but don't let it drop off the needle. While it is still being held by your left-needle tip purl the next stitch, let both stitches drop together. Repeat from *.
Special Instructions 6: When you have finished your knitting to the point where you want to graft (weave, Kitchener stitch) get some contrasting, smooth waste yarn. With this yarn work one row, keeping with the stitch pattern, across the stitches. Do it to both pieces to be grafted together.
Put the needles parallel to each other, with the right sides up.
Using one strand of the garment yarn (there should still be some attached to the knitting) weave the two pieces together by going in and out of the stitches on alternate sides by following the contrasting yarn.
You are grafting them together as if the contrasting yarn were not even there; you are just using it as a guide for the pattern so that you can duplicate how a row of knitting would be in that space. You will be working 'between the needles' - I find that handy because it is easier to make the tension of the graft-row correct. Stop and look at the tension after every few stitches and adjust it as you go.
At the end pull the needles out and then pull the contrasting yarn out. If you have accidentally threaded your graft through the contrasting yarn, just snip the contrast yarn to free it and pull the rest out.
Special Instructions 7: To weave by the Fair Isle method put the yarn to be woven over the right needle tip after you have put it through the next stitch but before you have thrown your working yarn. Throw your working yarn 'around' the woven yarn and finish the stitch. Do this on alternate stitches. When you have carried a yarn across the back (or have pulled another yarn towards you to be woven) then you will be ducking your right needle tip under the strand on alternate stitches.